DIY/Como forrar y decorar haciendo lindas flores una pinza para cabello de niña.(Hazlo fácil)ESP/ENG. DIY/How to line and decorate a girl's hair clip with pretty flowers.(Make it easy)
Buenas noches a todos los amigos y creadores de esta querida comunidad que hoy me visitan.
Los materiales a usar son:
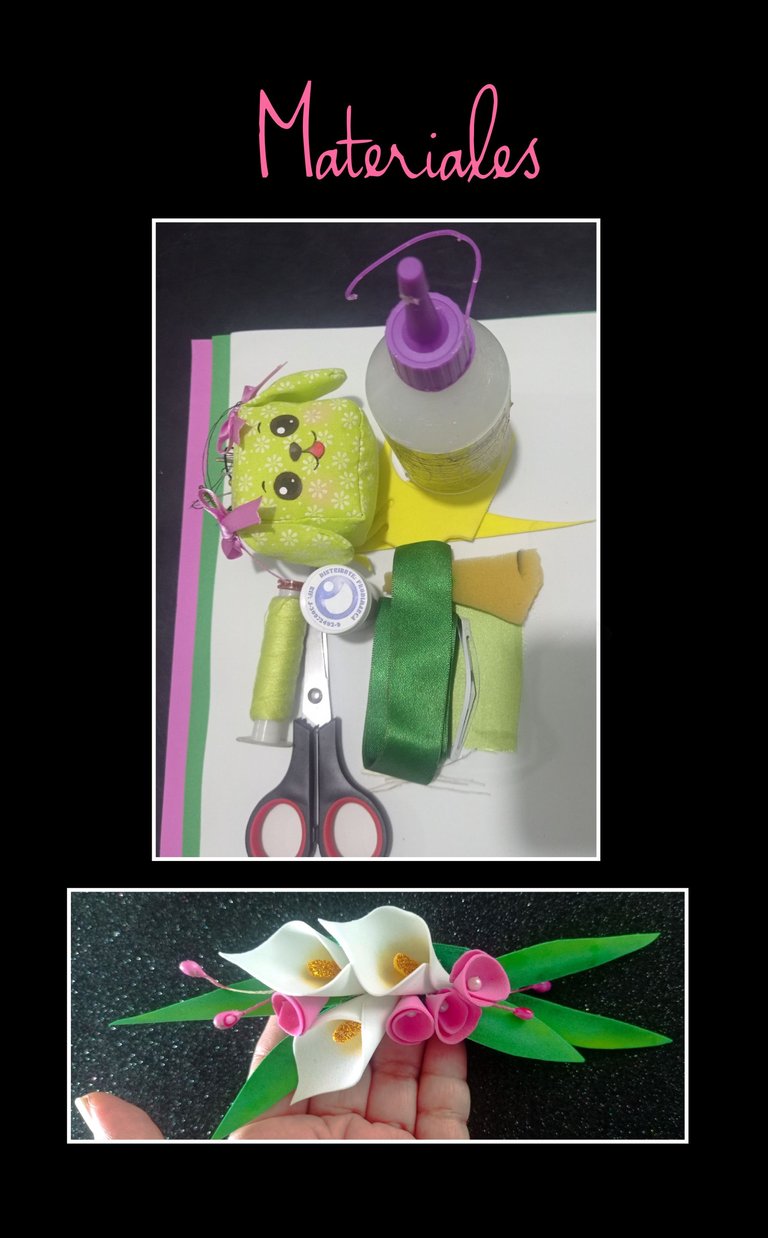
| Pinza de cabello | Foami de colores |
|---|---|
| Cinta | Hilo y aguja |
| Tijera | Silicón |
| Tiza | Pistilos y perlitas blancas |
| Tela | Yesquero |
Comencemos:

- Coloca la pinza sobre la tela y recorta aumentando 1cm a cada lado, luego quema las orillas con un yesquero, abre la pinza e inserta la tela, aplica silicón a la pinza y dobla hacia adentro la tela para forrar la pinza, así harás en los dos extremos.
- Recorta un pedazo de cinta (12cms) y comienza a hilvanar por el centro de la cinta aproximadamente 4 cm y hala el hilo para fruncir, anuda, deja el centro sin costura y vuelve a hilvanar en el otro extremo.
- Ahora aplica silicón en la parte de arriba de la pinza y pega la cinta fruncida.
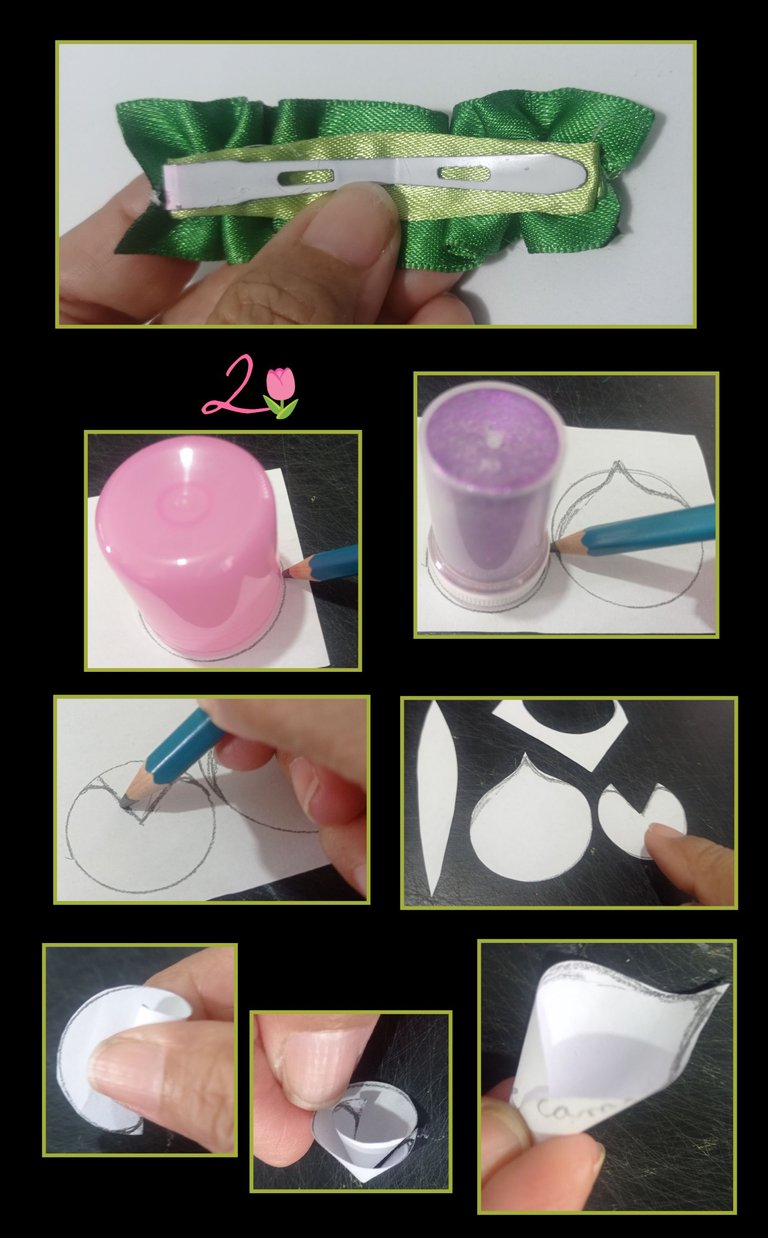
- Así quedará la pinza forrada.
- Haz los moldes, dibuja dos círculos uno más grande que el otro, al grande dibuja forma de pétalo como se observa en la foto y al pequeño le dibujas un triángulo y recorta, también haz la forma de una hoja alargada.
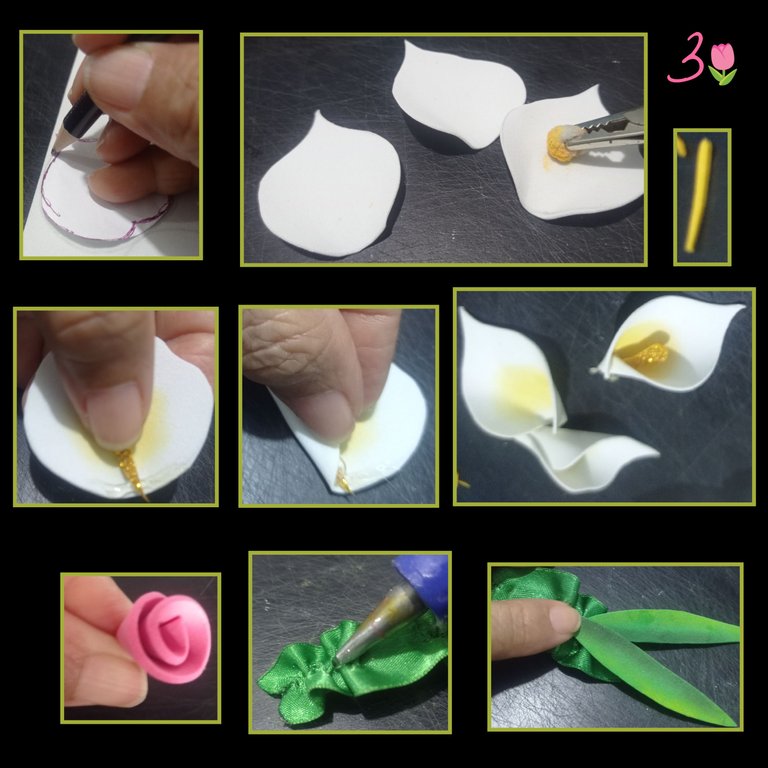
Calas
Coloca los moldes de flores y hojas sobre el foami, luego marca por todo el contorno y recorta.
Ahora con tiza pinta el centro de los pétalos, después aplica silicón en la parte de abajo y pega el pistilo.
Luego aplica silicón a un lado del pétalo y monta sobre el otro lado para cerrarlo y armar la cala como muestra la foto.
Para armar las flores pequeñas, aplica silicón en un extremo del círculo y enrolla, deja secar y en el centro pega una perlita.
Aplica silicón sobre la pinza y pega las hojas.
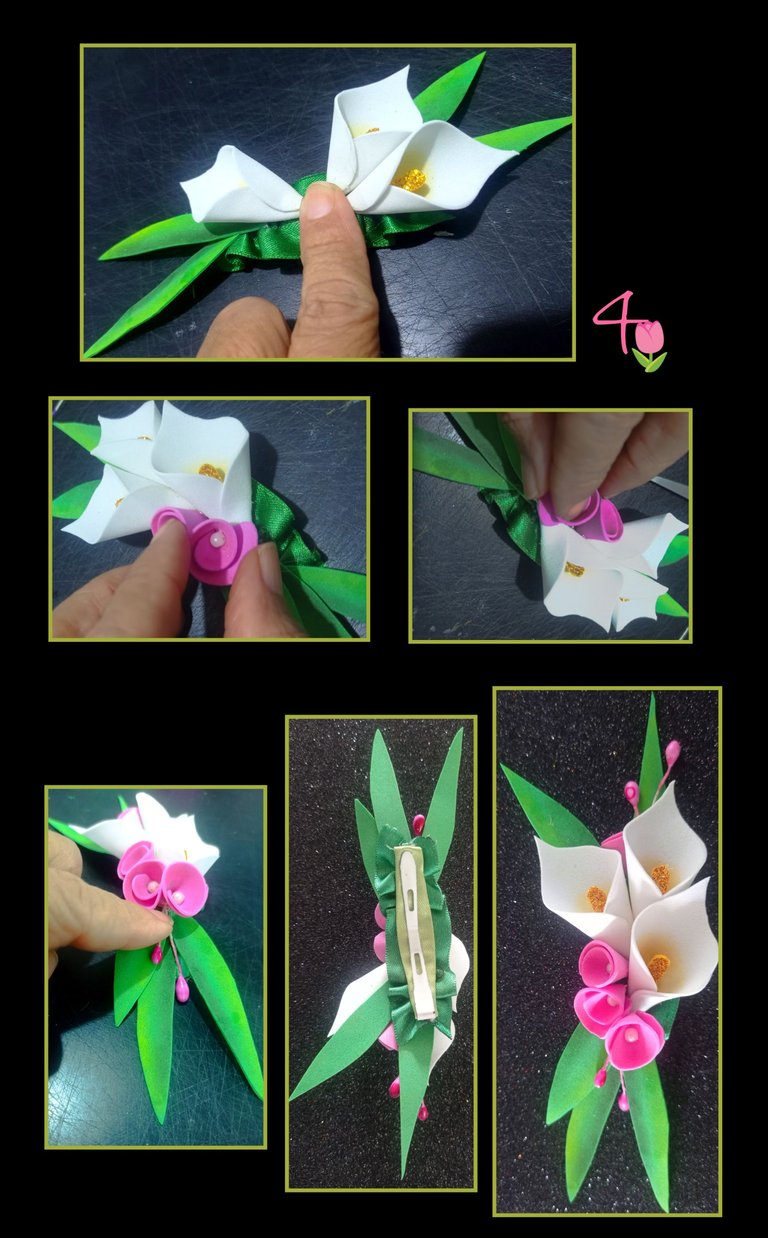
- Aplica nuevamente silicón y pega las calas y flores a tu gusto, también puedes decorar con pistilos.
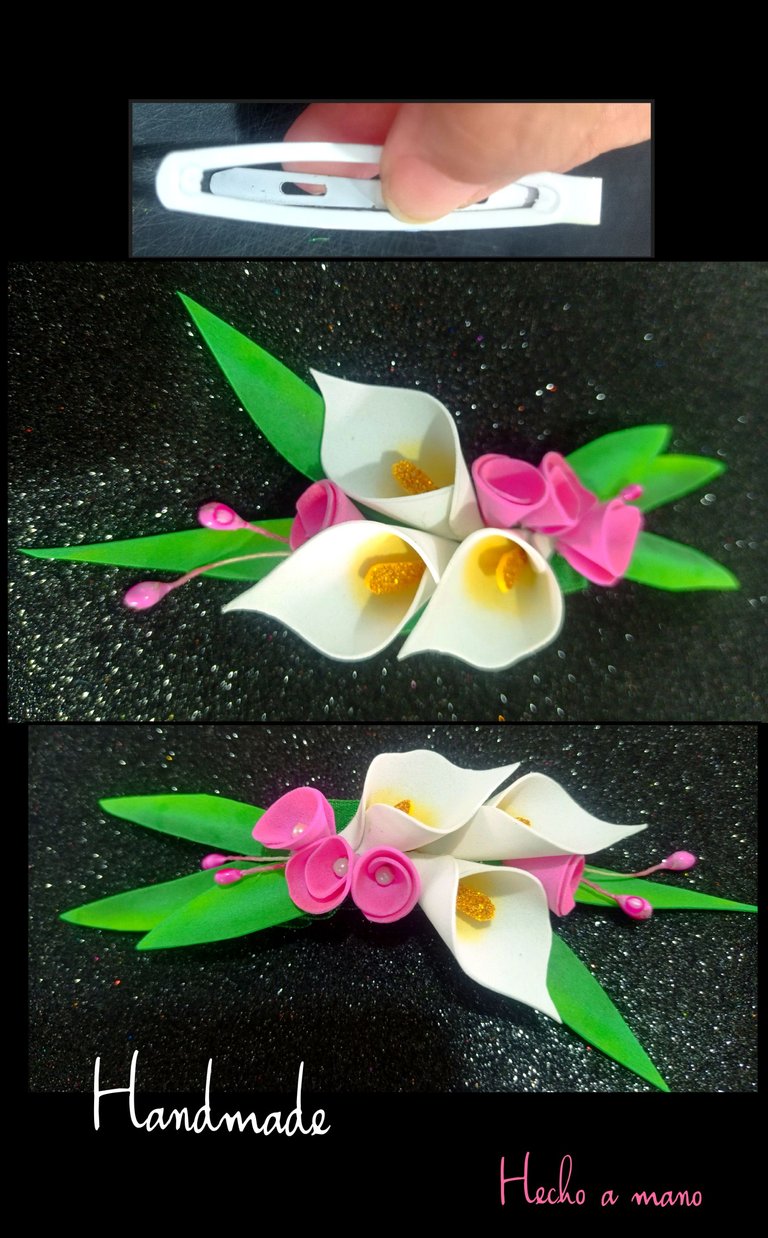
Aquí puedes observar como queda por el lado interno y externo la pinza.
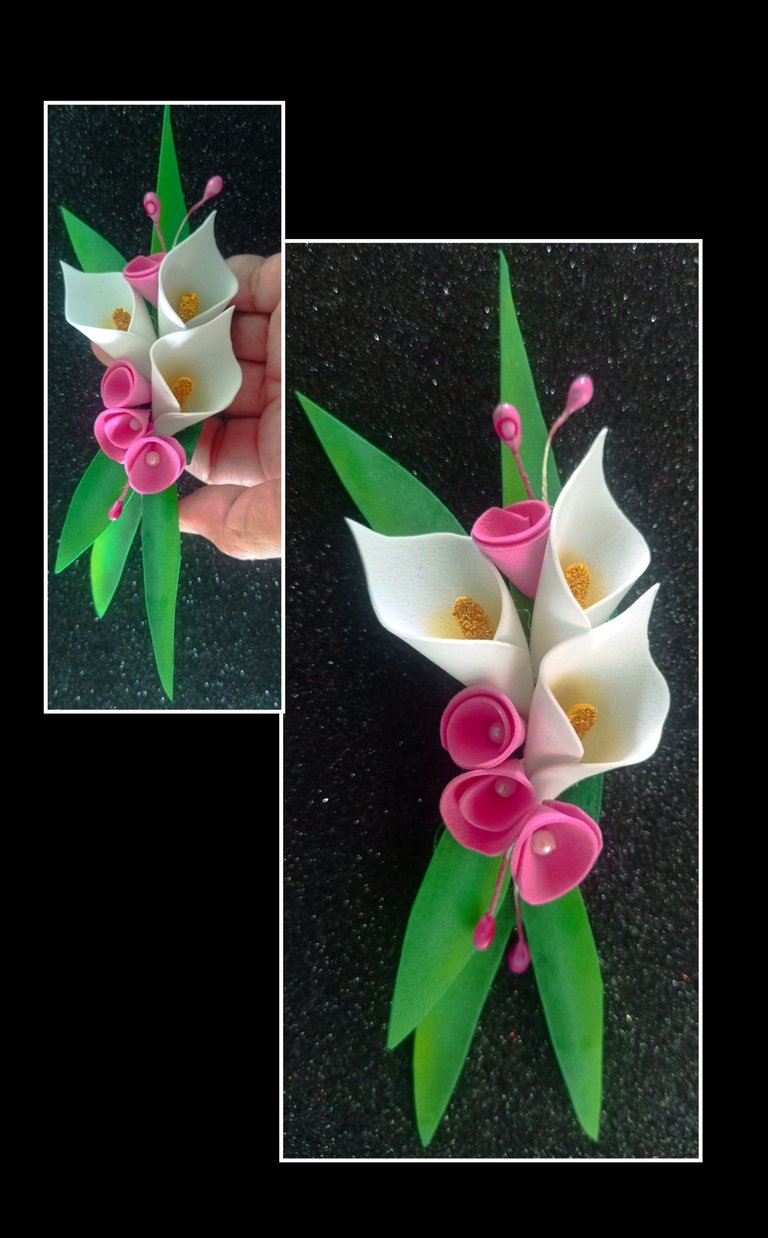
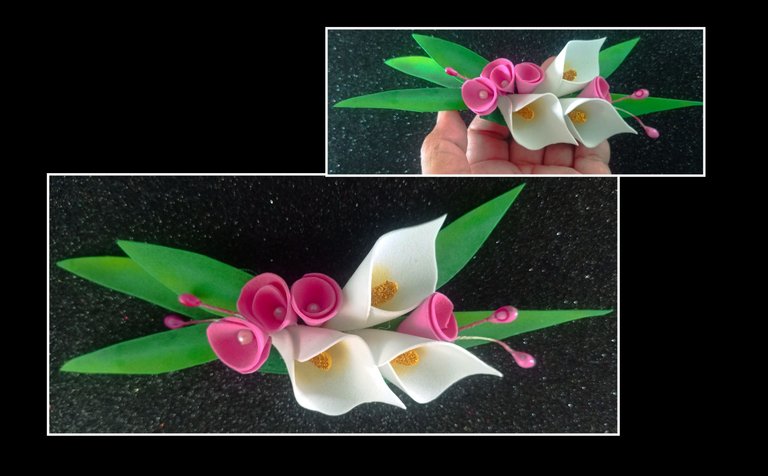
Ahora te mostraré el resultado y la transformación de una simple pinza en un lindo accesorio decorativo para peinados de niña hecho a mano
Las fotos son capturadas con mi Redmi Note 9 y las edité con GridArt.
Espero tu visita en mi próxima publicación.
Recuerda que puedes crear y diseñar a tu estilo, sólo deja que tu imaginación haga su parte.!
Good evening to all the friends and creators of this dear community who visit me today.
This model can also be made using felt or ribbons.
Then it only remains for me to invite you to join me and watch the process.
The materials to use are:
| hair clip | colored Foami |
|---|---|
| Tape | Thread and needle |
| Scissors | Silicone |
| Chalk | Pistils and white beads |
| Fabric | Tinder |
Let's get started:
- Place the clamp on the fabric and trim by 1cm on each side, then burn the edges with a tinder, open the clamp and insert the fabric, apply silicone to the clamp and fold the fabric inwards to line the clamp, you will do so at both ends.
- Cut a piece of ribbon (12cms) and begin to baste through the center of the ribbon approximately 4 cm and pull the thread to gather, knot, leave the center seamless and baste again at the other end.
- Now apply silicone to the top of the clip and glue the gathered ribbon.
- This is how the lined clamp will look like.
- Make the molds, draw two circles one larger than the other, draw a petal shape on the large one as shown in the photo and draw a triangle on the small one and cut it out, also make the shape of an elongated leaf.
Calas
Place the flower and leaf molds on the foami, then mark all around and cut out.
Now with chalk paint the center of the petals, then apply silicone to the bottom and glue the pistil.
Then apply silicone to one side of the petal and mount on the other side to close it and assemble the cove as shown in the photo.
To assemble the small flowers, apply silicone to one end of the circle and roll it up, let it dry and glue a bead in the center.
Apply silicone on the clamp and glue the leaves.
- Apply silicone again and glue the calla lilies and flowers to your liking, you can also decorate with pistils.
Here you can see how the inner and outer side of the clip looks like.
Now I will show you the result and the transformation of a simple hair clip into a beautiful handmade decorative accessory for girls' hairstyles.
The photos are captured with my Redmi Note 9 and I edited them with GridArt.
I look forward to your visit in my next post.
Remember you can create and design in your own style, just let your imagination do its part!
the hair clip design is very good and the used color combination is fantastic.
Muchas gracias @diyhub, por el apoyo que le brindan a mi publicación.
Me alegra mucho que le haya gustado.
Beautiful hair clips, color selection is also very good. very creative.
Hola @santibidini Que bueno que te gustó.
Muchas gracias por tu apoyo.
Aww what a cute little hair clip ❤️
I love your choice of colour !diy
Hola amiga, gracias por tu comentario y que bueno que te haya gustado.
You can query your personal balance by
!DIYSTATSMuchas gracias por el apoyo.
Saludos.