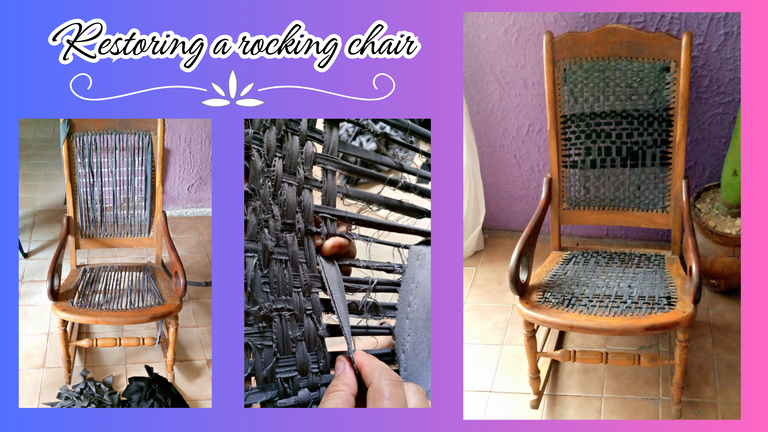
Restoring a rocking chair, with fabric straps (ENG/ESP)
Blessed week my beautiful people, I hope you are well, and continue doing creative projects, which makes you happy, and active.
On this occasion I come by to show you a restoration I did for a rocking chair, this chair had time in the storage room, and over time it was deteriorating, I did not have the economic means, nor the right materials to recover the use of it.
But as everything has a perfect time, surprisingly a few days ago I met some neighbors who do sewing work, and they told me that I could go to look for several scraps of fabrics when I liked, so without thinking much I went to look for those scraps of fabrics, super happy.
Among them came many fabric ribbons, which seemed to me suitable to make this beautiful and useful work.
The ribbons I chose were of 2 textures, some flexible and others of rigid fabric.
Later I will continue talking about this work, I hope you like it.
The pictures you will see below were taken with my phone model TECNO SPARK GO 2024.
Bendecida semana mi gente bonita, espero que estén bien, y sigan realizando los proyectos creativos, que los hace felices, activos.
En esta ocasión paso por aquí para mostrarles una restauración que hice para una silla mecedora, esta silla tenía tiempo en el cuarto del depósito, y con el paso del tiempo se fue deteriorando, no tenía los medios económicos, ni los materiales adecuados para recuperar el uso de la misma.
Pero como todo tiene un tiempo perfecto, sorpresivamente hace unos días conocí unos vecinos que hacen trabajos de costuras, y me dijeron que podía ir a buscar varios retazos de telas cuando llevara gusto, así que sin pensarlo mucho me fui a buscar esos retazos de telas, supercontenta.
Entre ellas venían muchas cintas de tela, que me parecieron adecuadas para realizar este hermoso y útil trabajo.
Las cintas que elegí fueron de 2 texturas, unas flexibles y otras de tela rígida.
Más adelante les seguiré hablando sobre este trabajo, espero que les guste.
Las fotografías que verán a continuación, fueron tomadas con mi teléfono modelo TECNO SPARK GO 2024.


The materials and tools I used were:
Wooden rocking chair
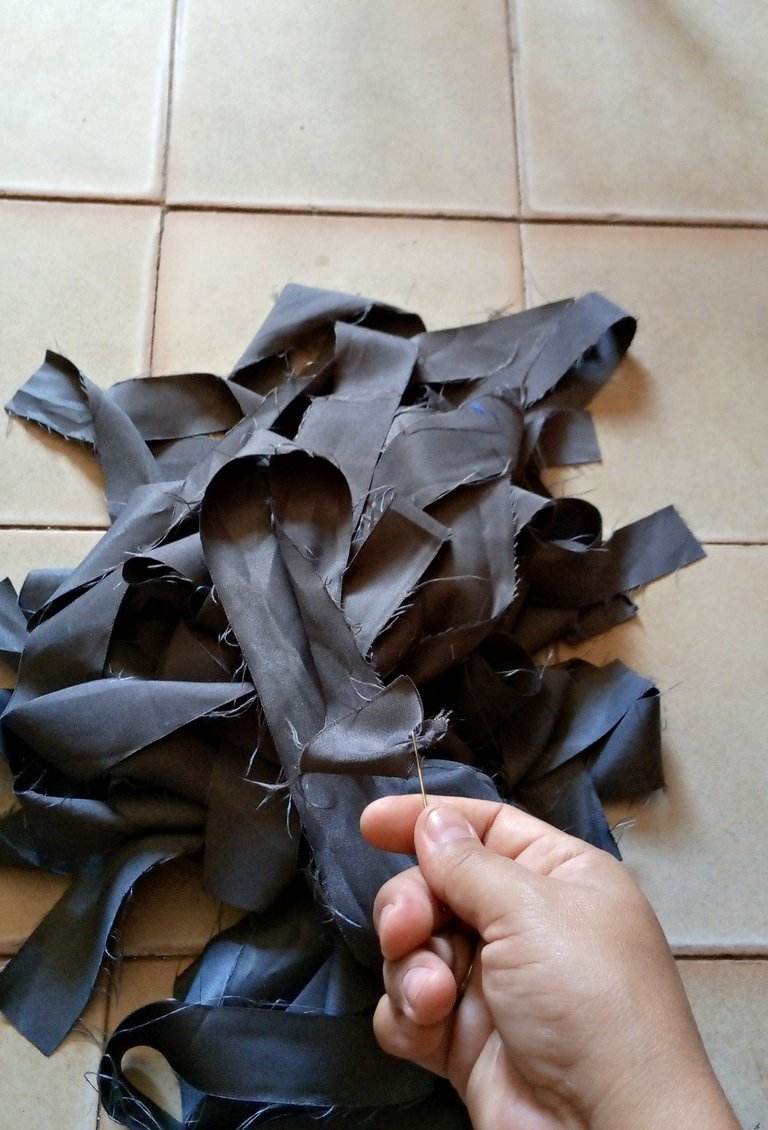
Fabric ribbons, gray and black
Needle
Thread
Scissors
Los materiales y herramientas que utilice fueron:
Silla mecedora de madera
Cintas de tela, gris y negro
Aguja
Hilo
Tijera
 |  |  |
|---|
Step by step to weave the chair.
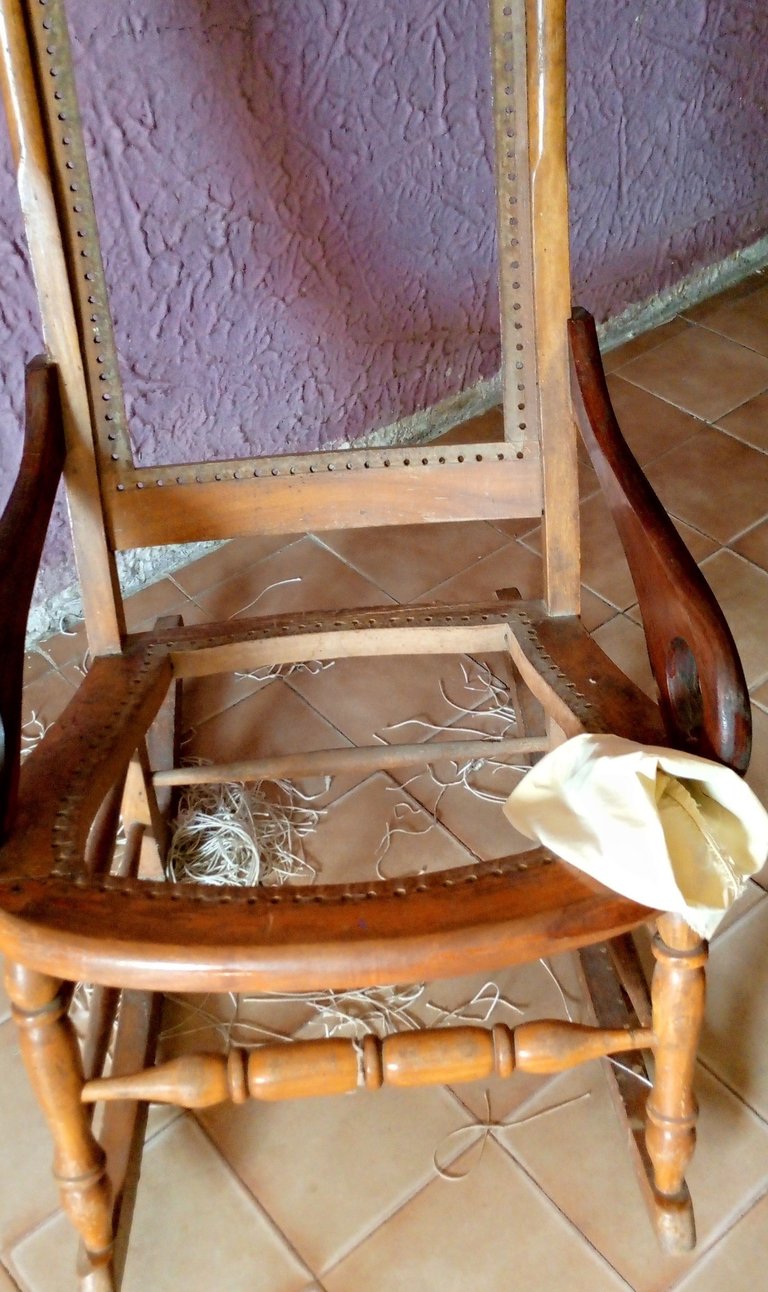
Step 1- Use the scissors to cut all the damaged material from the chair.
Step 2- After you remove all the material from the chair, take a damp cloth with disinfectant, remove the accumulated dust from the chair and clean the working area.
Step 3- Select the first ribbons to start weaving.
Paso a paso para tejer la silla.
Paso 1- Utilice la tijera para cortar todo el material dañado de la silla.
Paso 2- Después que retire todo el material de la silla, tome un paño húmedo con desinfectante, retire el polvo acumulado de la silla y limpie el área de trabajo.
Paso 3- Seleccione las primeras cintas para comenzar a tejer.
 |  |  |
|---|
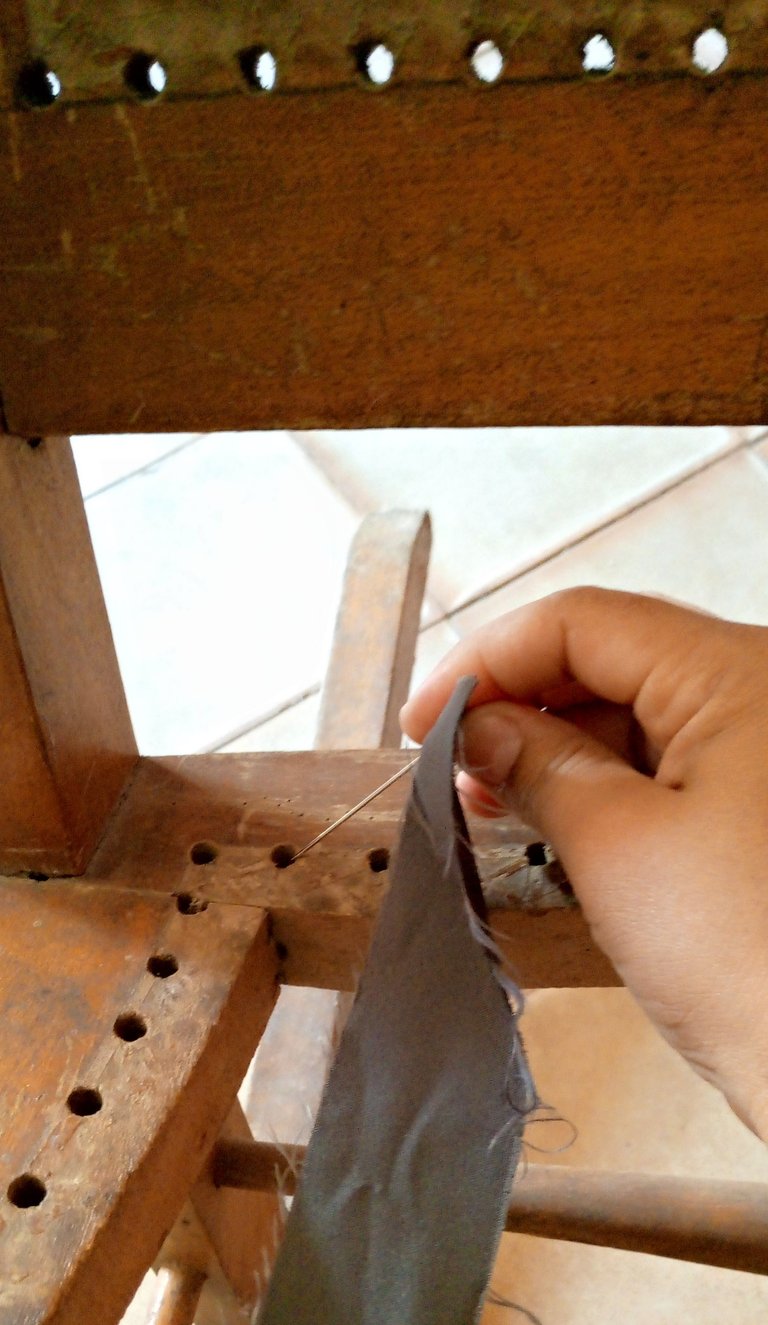
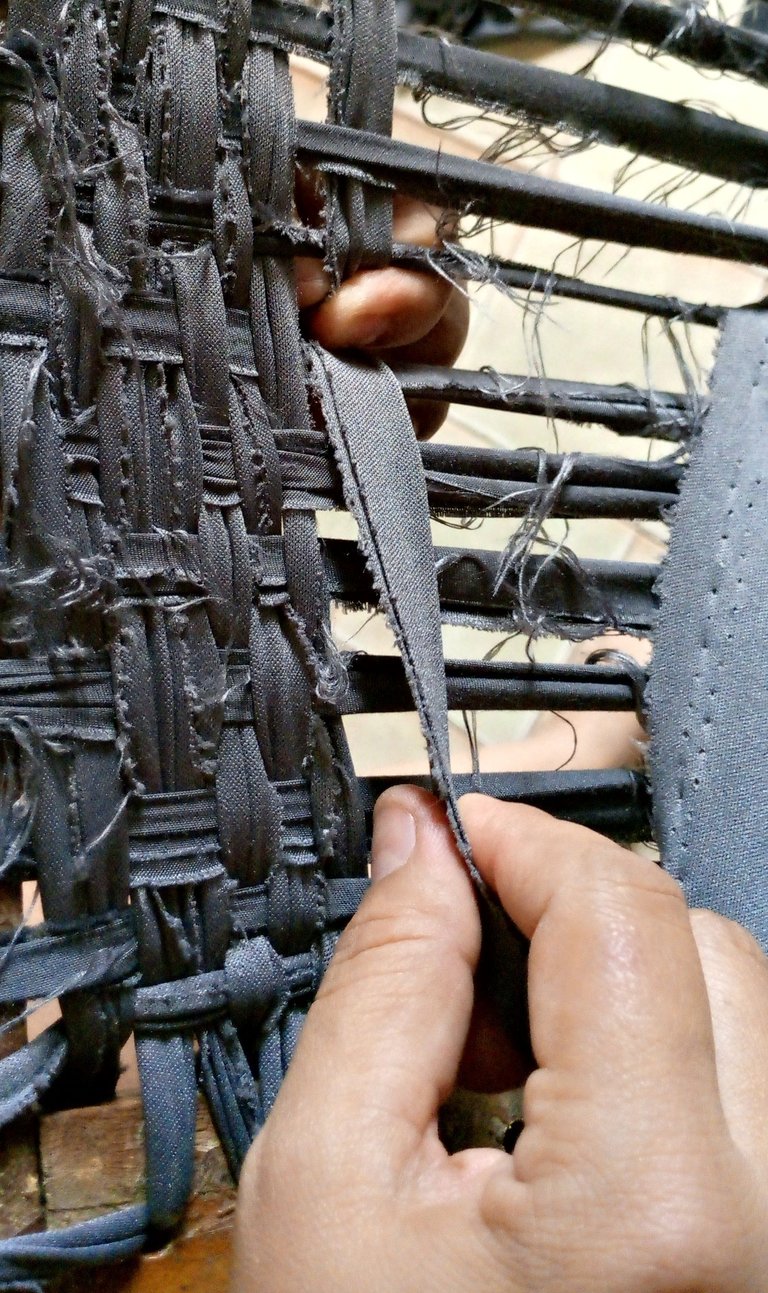
Step 4- I took one of the ribbons and introduced one of the ends into the needle, and then introduced it through the first hole in the wood of the chair.
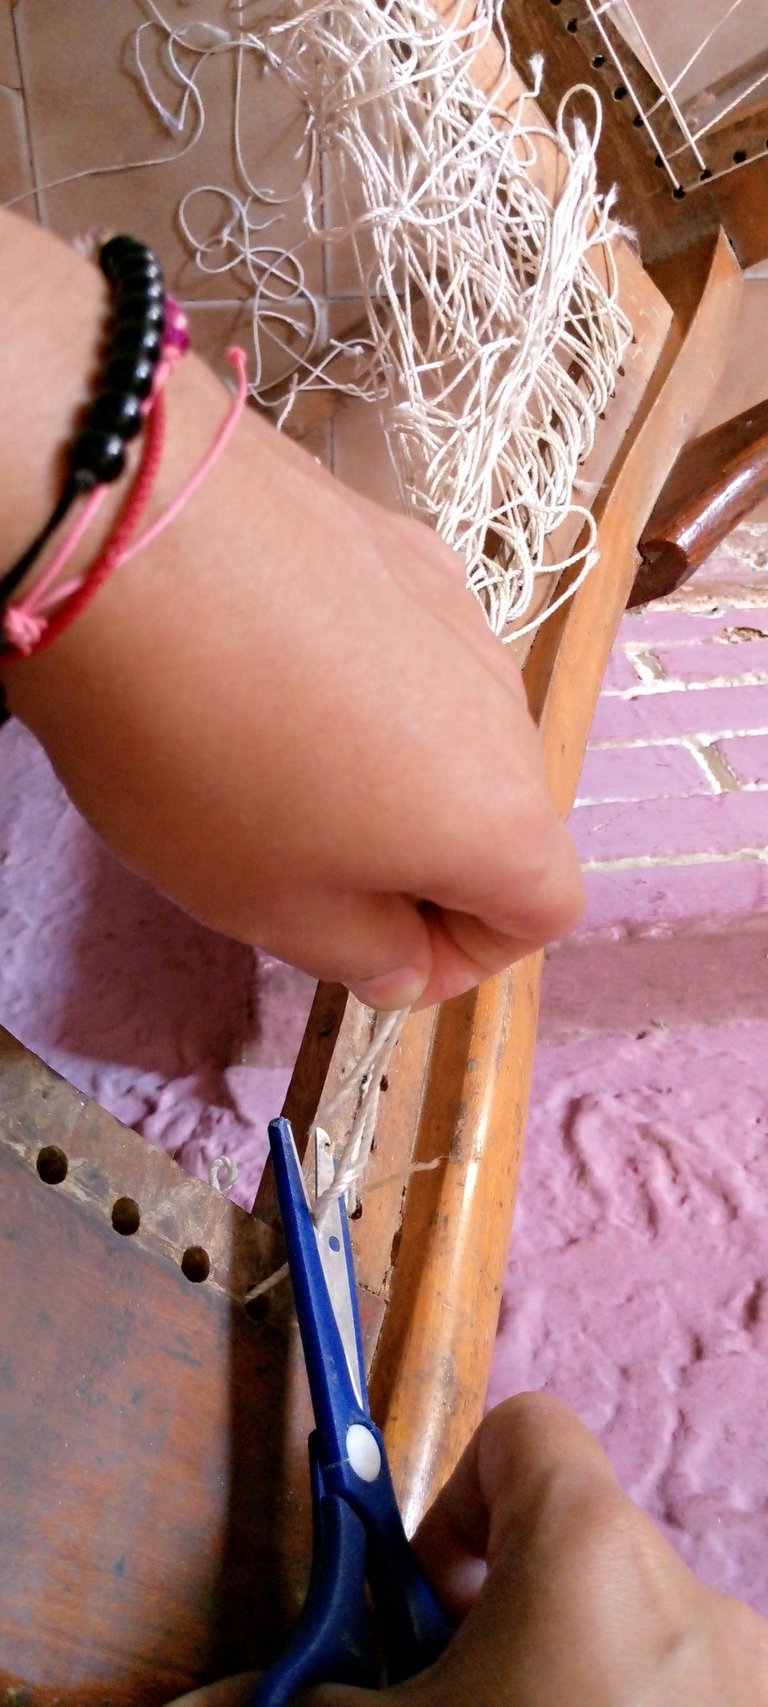
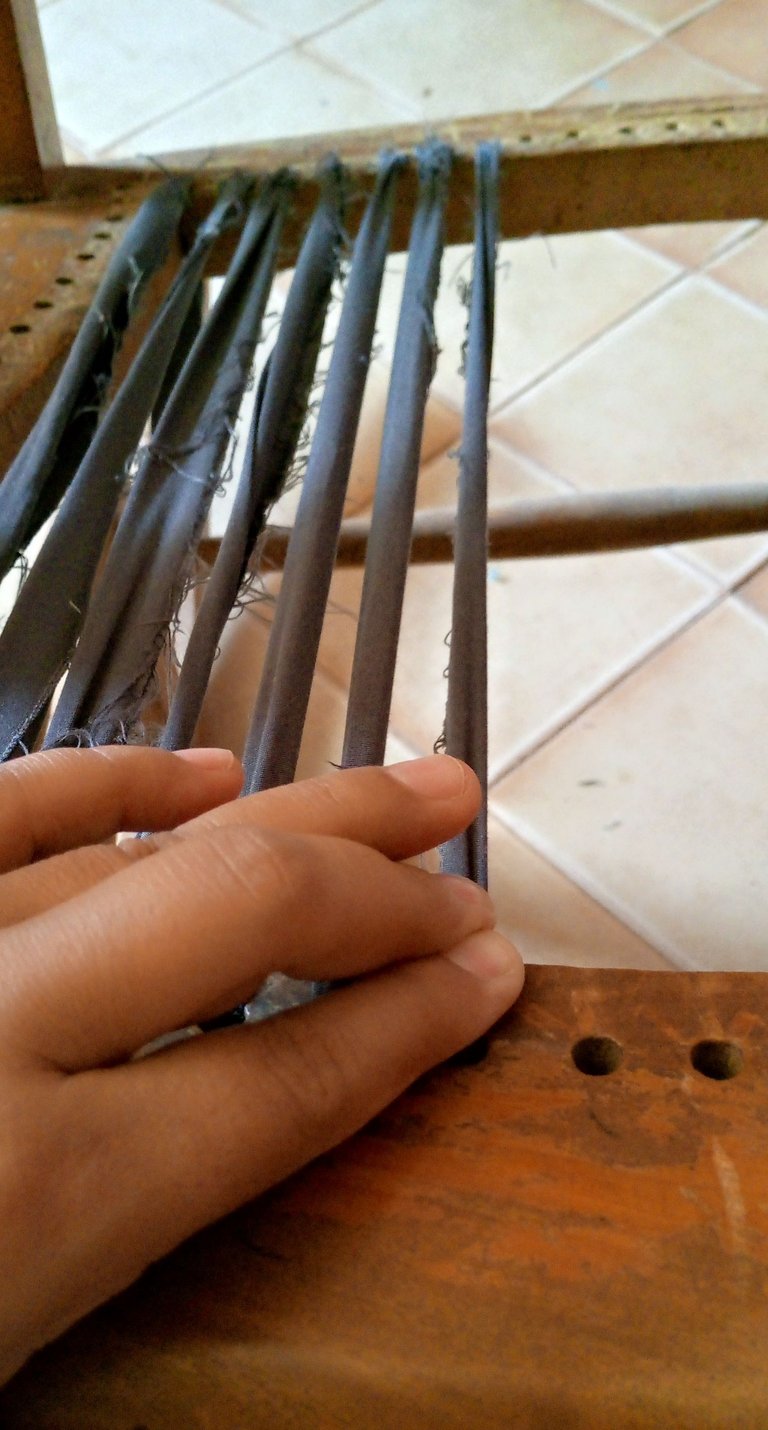
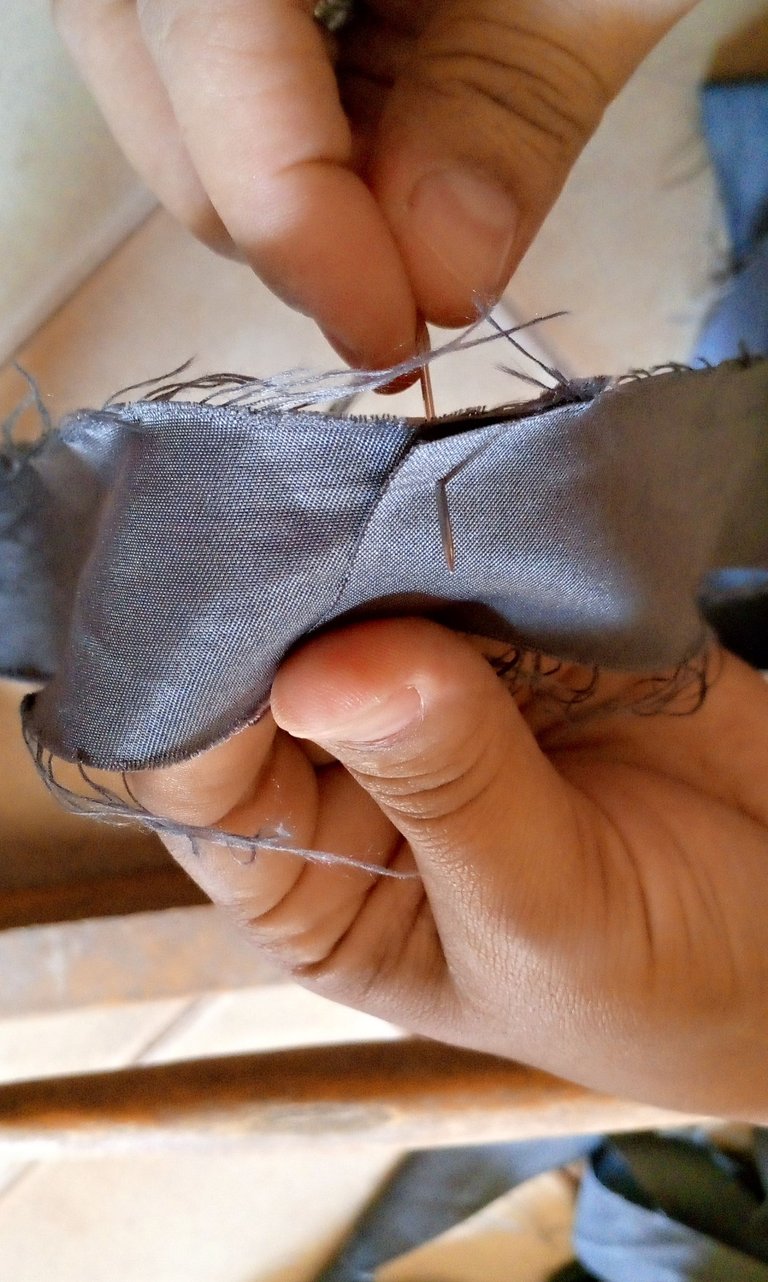
Step 5- I wove the first ribbons with rigid fabric tape, vertically, starting with the seat part of the chair, then I had to make ties of ribbons in several sections because the ribbons came between short and long, I joined them carefully with hand stitching, avoiding knots that would be obstructed at the time of passing them through the holes in the wood.
Paso 4- tome una de las cintas e introduje una de las puntas en la aguja, para luego introducirla por el primer orificio de la madera de la silla.
Paso 5- Tejí los primeros listones con cinta de tela rígida, en sentido vertical, comenzando por la parte del asiento de la silla, luego me toco hacer empates de cintas en varios tramos debido a que las cintas venían entre cortas y largas, las uni de manera cuidadosa con costura a mano, evitando hacer nudos que luego se obstruyeran, al momento de pasarlas por los orificios de la madera.
 |  |
|---|
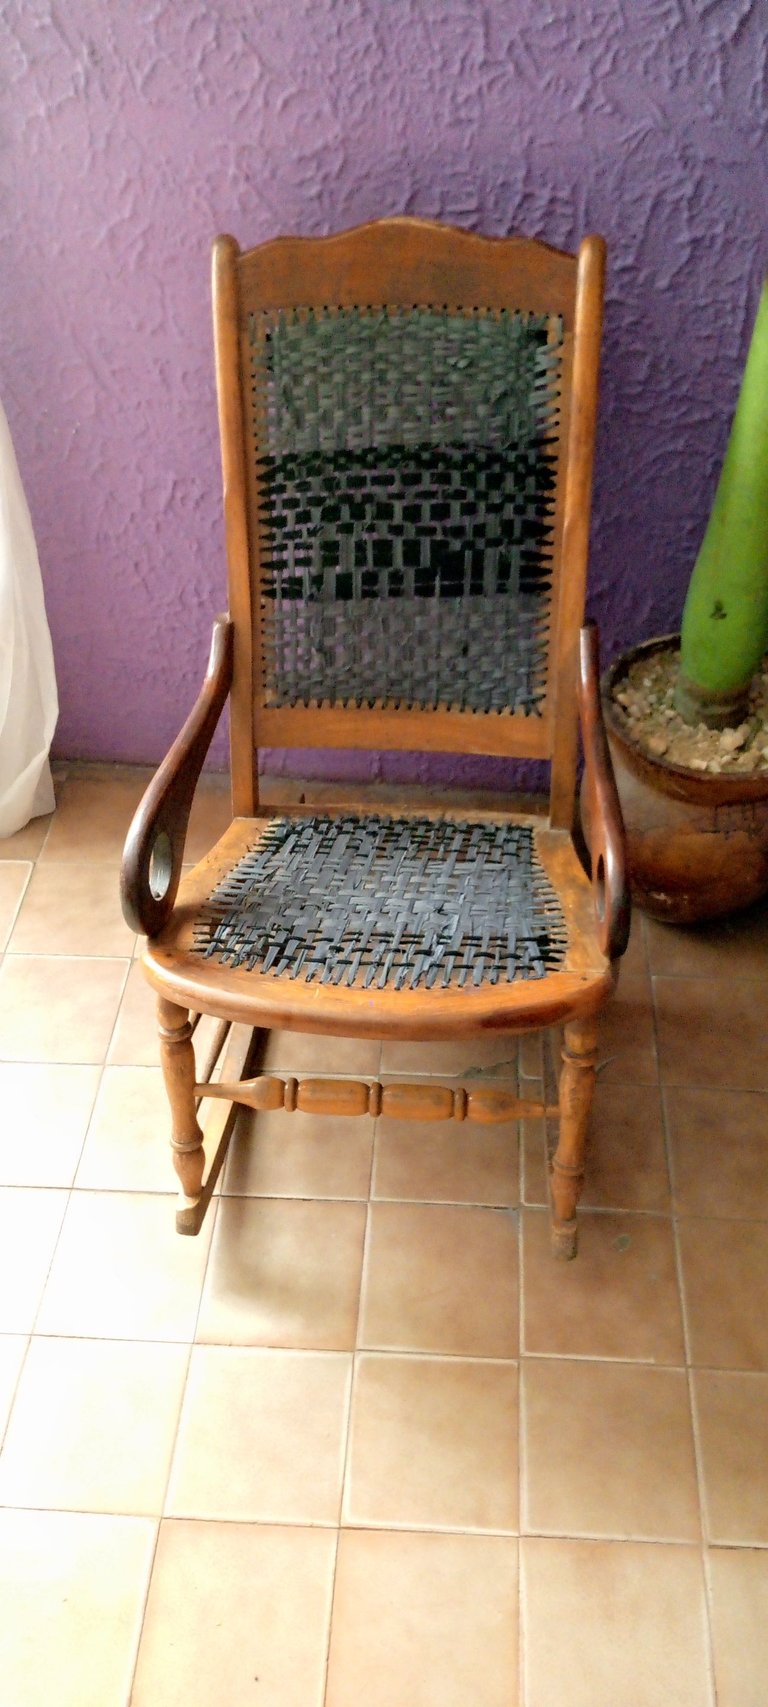
Step 6- The ribbons must be tightened very well, so that the work is quite neat.
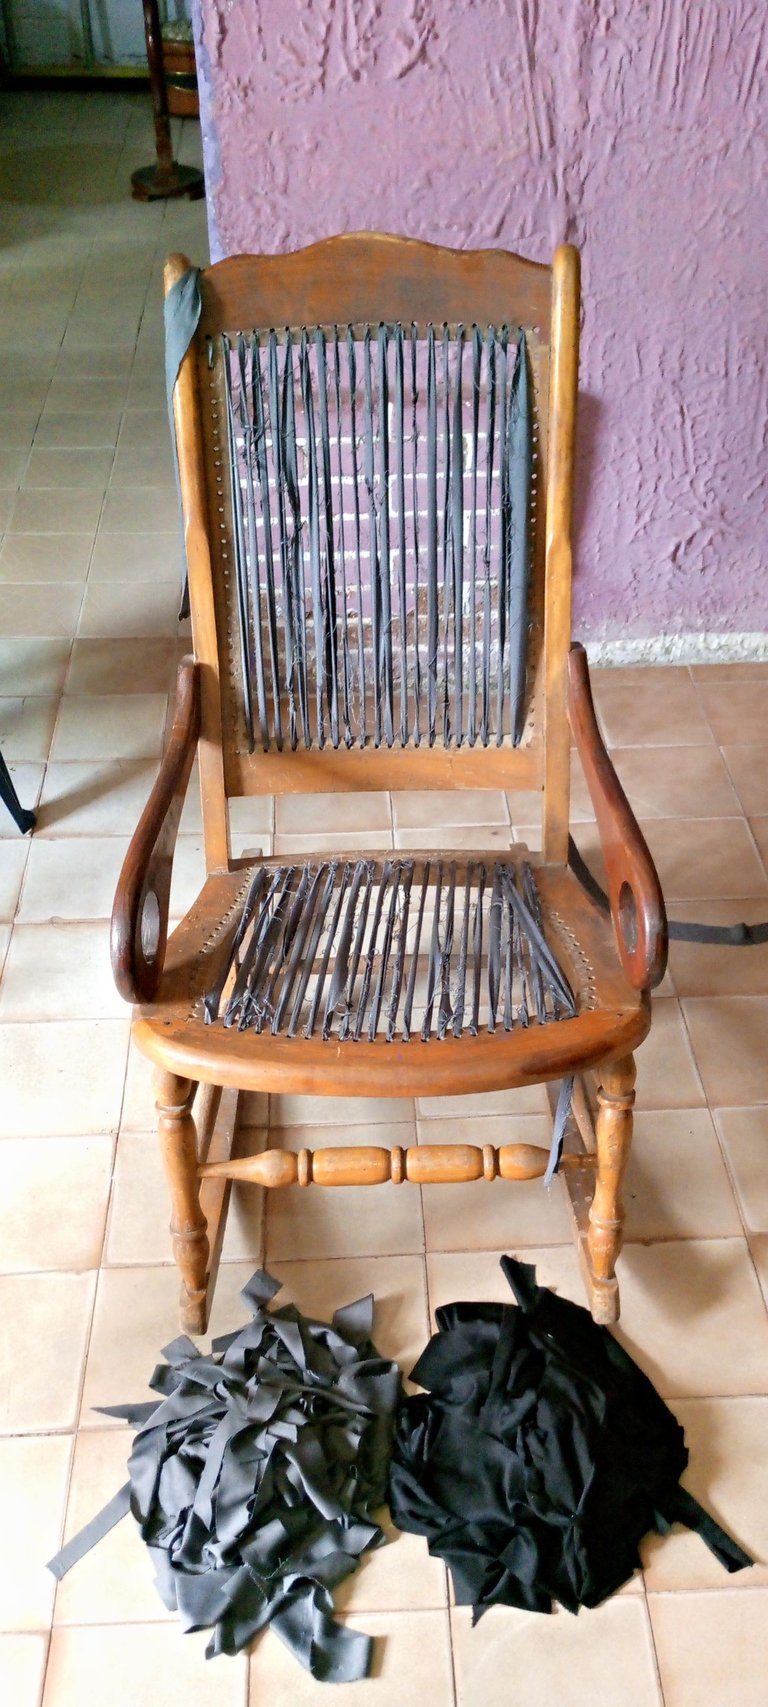
After finishing with the first ribbons that were rigid, I selected flexible ribbons to weave horizontally and make the chair a comfortable chair that adapts to the needs at the moment of resting and relaxing.
Step 7- In this step I started, also from the seat, through one of the side holes and weaving horizontally, passing a horizontal ribbon intertwined with the vertical ribbons.
I also combined colors by making stripes of gray ribbon and stripes of black ribbons.
Step 8- finishing weaving the seat part of the chair I continued with the back of the chair repeating the same technique as before.
The result is a very resistant and flexible fabric, 'to enjoy an afternoon of rest and entertainment, watching a good movie or making a nice knitting comfortably.
I love this rocking chair, it is really super relaxing, soft, cozy, and the best thing is that it makes me proud and makes me feel able to achieve every project I propose to do no matter how strong it seems.
I hope you are encouraged to rescue those chairs that you like so much and that are in a warehouse just waiting to go to the trash, but that can still be useful.
I thank you again for your pleasant visit to my publication today, hoping you are well filled with health, love and good economy. Atte. @lauracraft to all.🌎🌎🌏🌍🤗💙💞
Paso 6- Las cintas deben tensarse muy bien, para que el trabajo quede bastante prolijo.
Después de terminar con las primeras cintas que eran rígidas, seleccione cintas flexibles para tejer en sentido horizontal y hacer de la silla una silla cómoda y que se adapte a las necesidades al momento de descansar y relajarnos.
Paso 7- En este paso comencé, igualmente desde el asiento, por uno de los orificios laterales y tejiendo horizontalmente, pasando una cinta horizontal entrelazada con las cintas verticales.
También combiné colores haciendo franjas de cinta gris y franjas de cintas de color negro.
Paso 8- terminando de tejer la parte del asiento de la silla continué con el espaldar de la silla repitiendo la misma técnica anterior.
Quedando un tejido bastante resistente y flexible, ´para disfrutar de una tarde de descanso y entretenimiento, viendo una buena película o haciendo un lindo tejido cómodamente.
Adoro esta mecedora, realmente quedo super relajante, suave, acogedora, y lo mejor es que me enorgullece y me hace sentir capaz, de lograr cada proyecto que me proponga hacer por muy fuerte que parezca.
Espero que se animen a rescatar esas sillas que tanto les gusta y que están en un depósito solo esperando par irse a la basura, pero que todavía pueden ser útiles.
Les agradezco nuevamente su agradable visita a mi publicación de hoy, esperando que se encuentren bien colmados de salud, amor y buena economía. Atte. @lauracraft para todos.🌎🌏🌍🤗💙💞
social networks / redes sociales
![]()
![]()
Traductor Deepl
Translated Deepl
Ediciones Canva
Editions Canva


Posted Using InLeo Alpha
Awesome
Thank you, my dear friend!!!🙂
Thank you a lot my friend how are you
I am well my dear friend. A big greeting appreciated to you.🤗
Thank you too where is your home country,
Venezuela🙌
Gran trabajo de restauración mi bella, te quedó hermoso el tejido y la mecedora para darle más uso.
!discovery 40
Gracias mi linda, es un trabajo entretenido y útil, para seguir disfrutando esta silla tan cómoda, es una lastima tirarla a la basura cuando todavía se puede aprovechar.❤️
This post was shared and voted inside the discord by the curators team of discovery-it
Join our Community and follow our Curation Trail
Discovery-it is also a Witness, vote for us here
Delegate to us for passive income. Check our 80% fee-back Program
Good restoration work, very neat,looks beautiful. Thank you for giving us your creative process.
😊Thank you for your support @diyhub💙
Thank you for supporting my content.😃
¡Felicidades! Esta publicación obtuvo upvote y fue compartido por @la-colmena, un proyecto de Curación Manual para la comunidad hispana de Hive que cuenta con el respaldo de @curie.
Si te gusta el trabajo que hacemos, te invitamos a darle tu voto a este comentario y a votar como testigo por La Colmena.
Si quieres saber más sobre nuestro proyecto, te invitamos a acompañarnos en nuestro servidor de Discord.
Gracias por su apoyo @la-colmena🙂💛
Muy bueno !!
Yo hace más o menos 3 años tejí una de metal y hasta ahora está completa, lo hice con jean, así que le diste otra oportunidad para un buen tiempo.
¡Gracias!!!...
Y me parece genial que hayas tejido una de jean, me haré la meta, gracias por la idea 🤗👍