How to use Splinterlands-API with PowerShell 7 - Part #1 Basics

How to use Splinterlands-API with PowerShell 7 - Part #1 Basics
In the blog post series "How to use Splinterlands-API with PowerShell 7" I would like to show you how to play with the Splinterlands API via PowerShell 7. With the data from the API you can e.g. create CSV files - which can be imported in Excel - or create the content for a BlogPost. So that PowerShell 7 beginners - with technical(scripting) experience - can also follow the steps, I will explain each step in as much detail as possible for this kind of post.
What the heck is PowerShell 7?
PowerShell 7 is the new shell environment for Windows recommended by Microsoft. It is a far better shell than the good old "Windows CommandPrompt"(cmd). And unlike Windows PowerShell, the latest release PowerShell 7 is based on the powerfull .NET Core 3.1. That means it is available across Windows, Linux and MacOS platforms.Preparations
- Install PowerShell 7
- Configure the shell on Windows By default, you cannot run local scripts on Windows without receiving a warning that the script is not signed with a certificate. Each time you have to acknowledge the message before the script is executed by the shell. To disable this behavior for your own local scripts, you can change the execution policy. (The following steps are not required on Linux)
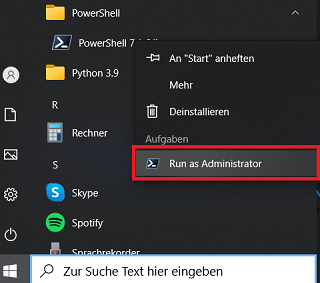
Start the shell as an administrator
Set the execution policy by typing the following command in the shell and pressing Enter
On Windows 10, I would also recommend using the Window Terminal.
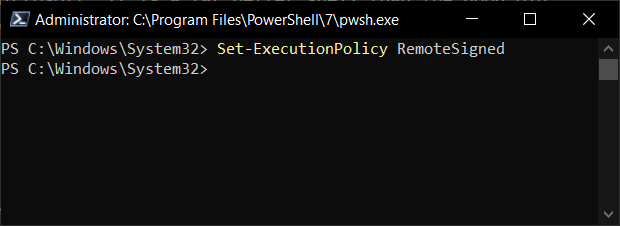
Set-ExecutionPolicy RemoteSigned
Never set the execution policy to "unrestricted" - this will weaken Windows security
Now we are ready to play with the Splinterlands API. You can find a unofficial API Documentation on https://splinterviewer.com/api#player
First Splinterlands API invokes
First of all it is very easy invoke the API by using the command "Invoke-RestMethod".
A command - also called function - is like a little tool within the shell. It can receive parameter and also return values.
Getting player details an check for error
Just enter following command in the shell and replace %username% with the name of the player.
Invoke-RestMethod -Method Get -Uri "https://api2.splinterlands.com/players/details?name=%username%"
In this case we use two parameters "-Method" and "-Uri". The method parameter tells the command that we want to get something and the uri parameter tells where we want to get it from.If the player exists, you will receive values like this:
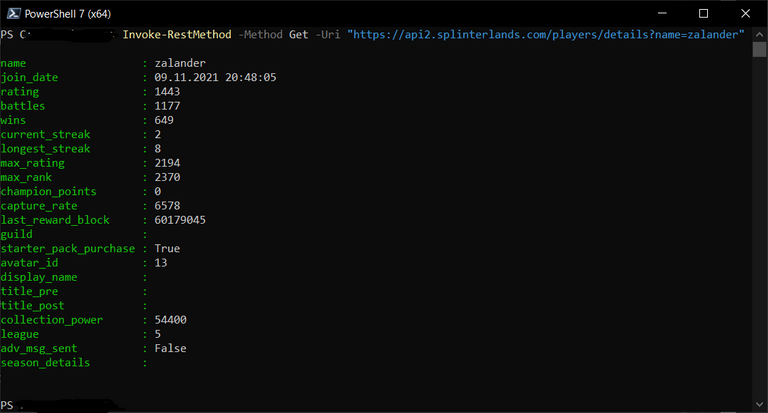
Otherwise you will get an error like this:

What happend in background?
The "Invoke-RestMethod" calls the uri and receives the data as json string, like a browser does.
But unlike a browser the json string will be parsed to an PSObject which contains the values such as name and rating as so-called "properties"(each property consists of a name and a value). Afterwards the values are outputted in the shell.
To work with the data further on, we have to save it in a so-called "variable".
- Every variable starts with a $ sign.
- The name of the variable should be meaningful, e.g. $userDetails. This will help you to keep your script understandable (even for yourself).
To do that just add "$userDetails = " at the begin of the line.
$userDetails = Invoke-RestMethod -Method Get -Uri "https://api2.splinterlands.com/players/details?name=Afterwards you can output all values by just typing the name of the variable and pressing Enter.%username%"
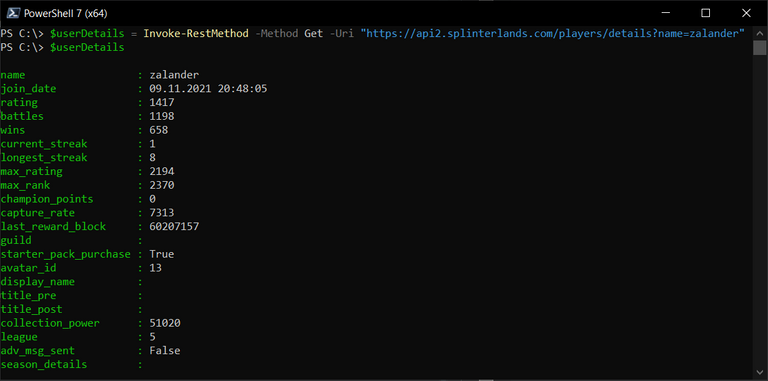
And you can also get the value from a specific property.

In conclusion for this section, a simple if statement can be used to check for errors.
$userDetails = Invoke-RestMethod -Method Get -Uri "https://api2.splinterlands.com/players/details?name=%username%"
if ($userDetails -ne $null -and $userDetails.error -eq $null)
{
    Write-Host $userDetails.name
}
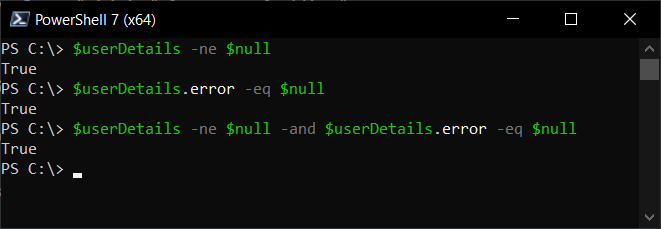
The condition for the if statement consists of two parts.Both parts are chained by the "-and". Which means that both checks has to be true. You can enter each part in the shell to check it.
- $userDetails -ne $null (-ne means "not equal")
Checks if we get any return value.- $userDetails.error -eq $null (-eq means "equal")
Checks if the returned value contains an error such as "Player @x not found."
Getting player balances and calculate current DEC capture rate
This time we use a slightly different command "Invoke-WebRequest" to get the player balances data. We do that cause in this case the returned json string is a bit crappy formatted. As a result, the command "Invoke-RestMethod" will also parse this crappy.
$response = Invoke-WebRequest -Method Get -Uri "https://api2.splinterlands.com/players/balances?username=%username%"
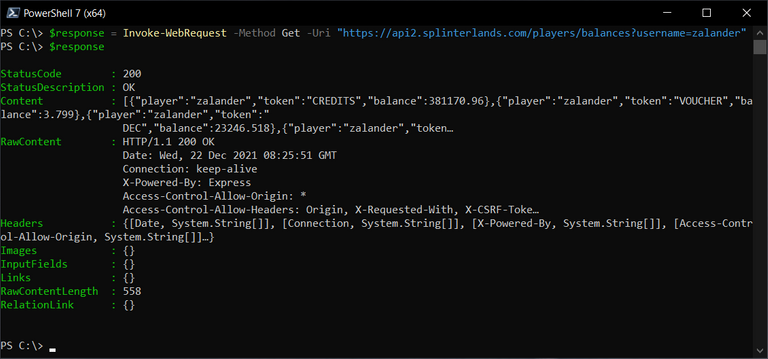
The command "Invoke-WebRequest" does not parse the json string and return a so-called Http-Response instead. From the response we just need to know, if the StatusCode is 200(OK) and the Content which contains the json string.If we receive a valid response with StatusCode 200 (OK), we can next parse the content (json string) ourselves.
$userBalances = @{}
$response.content | ConvertFrom-Json | foreach{$userBalances[$_.token] = $_}
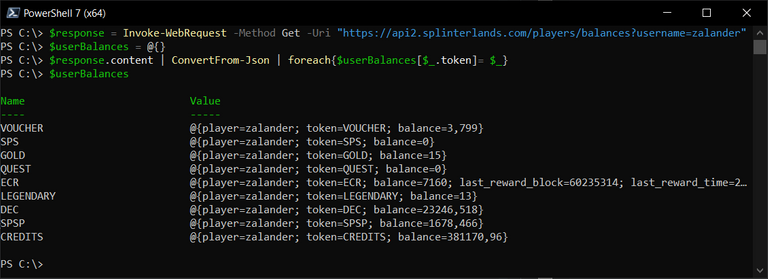
I know for PowerShell beginners this code lines can confuse a lot. But let me try to explain it.
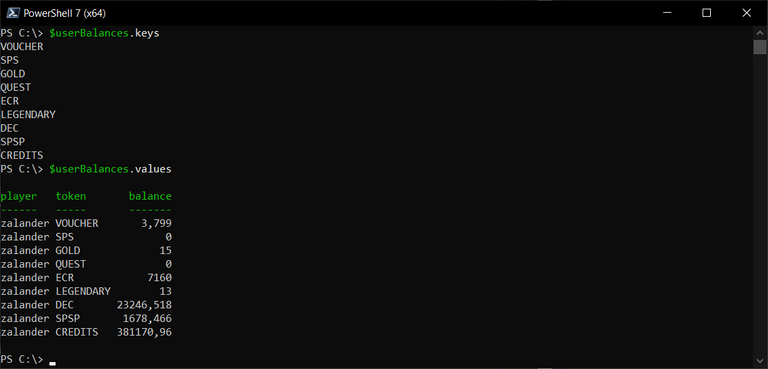
Now we have all the data we need to calculate the current DEC capture rate, which are nicely ordered in the $userBalances variable.
- $userBalances = @{}
We initialize a so-called Hash-Table a new variable $userBalances. Basically a Hash-Table can contain a list of key-value pairs and can be very helpful to order data by an key.- $response.content | ConvertFrom-Json | foreach{$userBalances[$_.token] = $_}
In this line we use PowerShell pipelines to get the data from json string into the Hash-Table.(Pipelines are very useful tool in PowerShell and if you go further on with PowerShell you will use it a lot)In the first part of the pipeline we use the command "ConvertFrom-Json" to convert the json string. In the next part "foreach{$userBalances[$.token] = $}" we get the result from the conversion and add it to the Hash-Table using the value of the property token as the key.
But I haven't found a good way to calculate the capture rate other than with a little ".Net Core" magic which i will not explain in detail.
First we need the last reward time from the ECR token in a proper UTC format.
$lastRewardTimeUtc = [DateTime]::SpecifyKind([DateTime]::new($userBalances["ECR"].last_reward_time.ticks), [DateTimeKind]::Utc)In the next step we have to calculate the offset between the last reward time and now in milliseconds.
$offset = ([DateTimeOffset]::new([DateTime]::UtcNow).ToUnixTimeMilliseconds() - [DateTimeOffset]::new($lastRewardTimeUtc).ToUnixTimeMilliseconds())With the offset we can do the calculation.
$ecr = [Math]::Min($userBalances["ECR"].balance + $offset / 36000 * 1.04, 10000) / 100All steps together:
$response = Invoke-WebRequest -Method Get -Uri "https://api2.splinterlands.com/players/balances?username=zalander"
$userBalances = @{}
$response.content | ConvertFrom-Json | foreach{$userBalances[$_.token]= $_}
$lastRewardTimeUtc = [DateTime]::SpecifyKind([DateTime]::new($userBalances["ECR"].last_reward_time.ticks), [DateTimeKind]::Utc)
$offset = ([DateTimeOffset]::new([DateTime]::UtcNow).ToUnixTimeMilliseconds() - [DateTimeOffset]::new($lastRewardTimeUtc).ToUnixTimeMilliseconds())
$ecr = [Math]::Min($userBalances["ECR"].balance + $offset / 36000 * 1.04, 10000) / 100
Write-Host ([string]::Format("Current capture rate: {0:0.00}%", $ecr))

In the next part I will show how to create a script in Visual Studio Code to get a player's card collection, the estimated value of each card, and how to export the data to a csv file.
If you like the post, please consider to vote and/or reblog it.

Your content has been voted as a part of Encouragement program. Keep up the good work!
Use Ecency daily to boost your growth on platform!
Support Ecency
Vote for new Proposal
Delegate HP and earn more
It is a very informative post.
Powershell is a great tool to gather information.
The tool is powerful. Can you tell me what tools a newbie should know to navigate this environment?
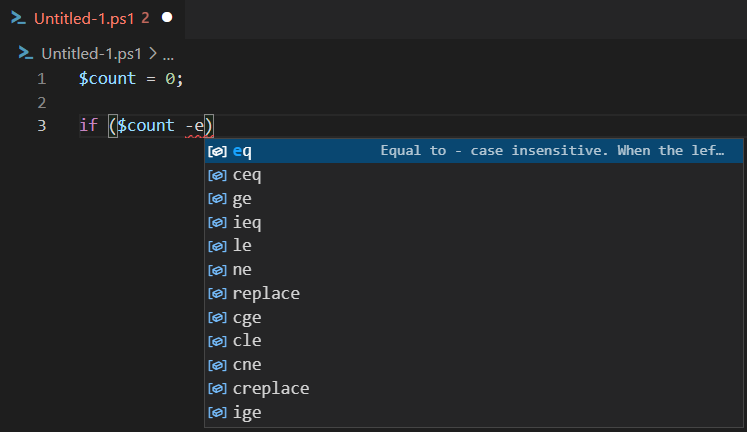
Thanks, in my opinion a good tool and free Tool is "Visual Studio Code". It's also available on Windows and Linux and it will help you e.g. with suggestions to choose an operator in an if-statement condition.
There is also a Command Explorer which offers an overview of all commands but is still in the preview (beta).
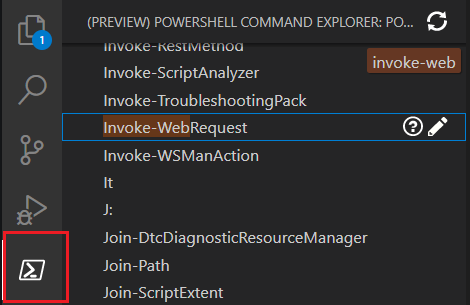
If you want to try it out, just download and install "Visual Studio Code". And install the PowerShell-Extension afterwards.
Amazing post, sorry for discovering it too late. I will upvote your Peakd collection for that post instead.
Thanks a lot 😄 All the votes encouraged me a lot to work on the next part. And even to improve the format with better title pictures....
That's the spirit!
Wow, this is awesome! I made a similar program created in Python. I didn't know that I can access this info using PowerShell. Thanks!