Embroidering old shoes / Bordando unos zapatos viejos [ENG/ESP]
ENGLISH
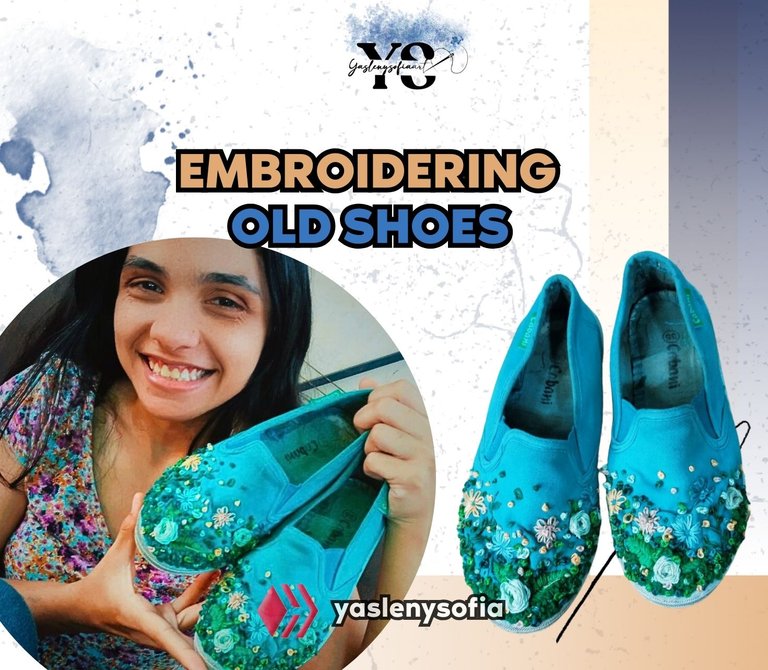
Greetings @needleworkmonday community, days ago, accommodating a part of the house, I got some shoes that I really liked, but, I stopped using them because they opened a hole in one of his pair, and time passed and I forgot them completely, I think it was a couple of years, but it is never too late to use it again and what better, to give another look, so I said to myself why not I embroidered some flowers to them and if it did not look good, it did not matter.
So, today I come to bring you the whole process that took me to elaborate these embroideries, which was a long time, because it is not easy; the awkwardness of passing the needle and that some areas of the shoe made it more complicated, plus I wanted to cover much of the front of it with the French knot technique, it took me more time than I thought, but, it was achieved.

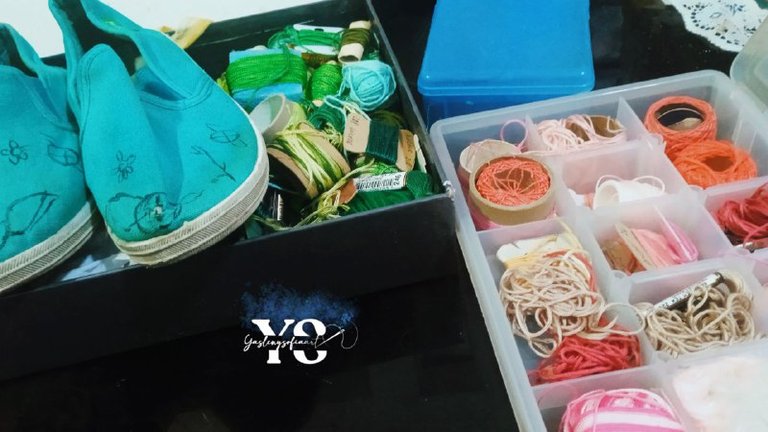
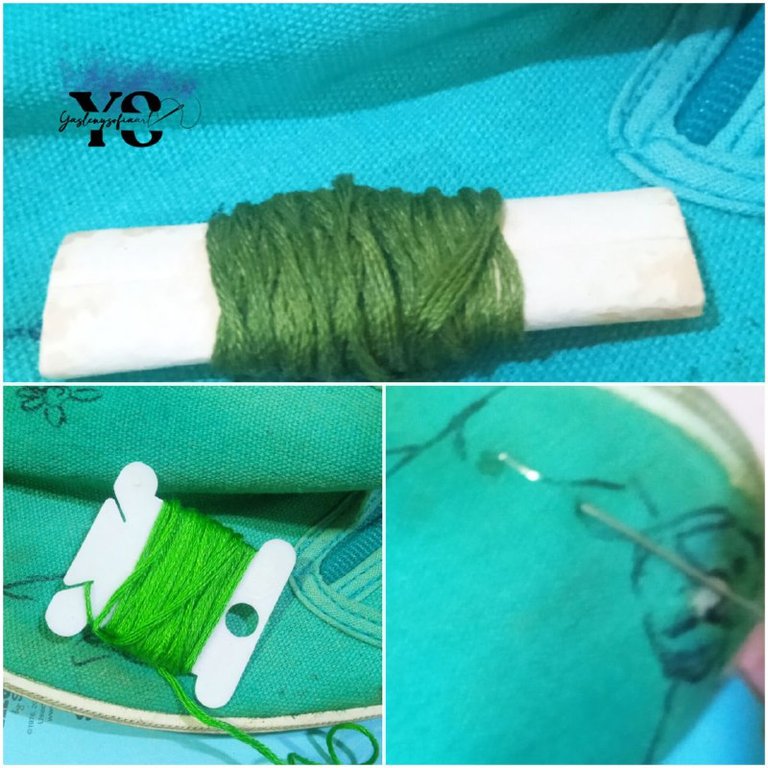
-embroidery thread, in different colors, in my case, I chose different shades of green and some cream and pink, to harmonize with the green color of the shoe.
-Embroidery needle
-Scissors

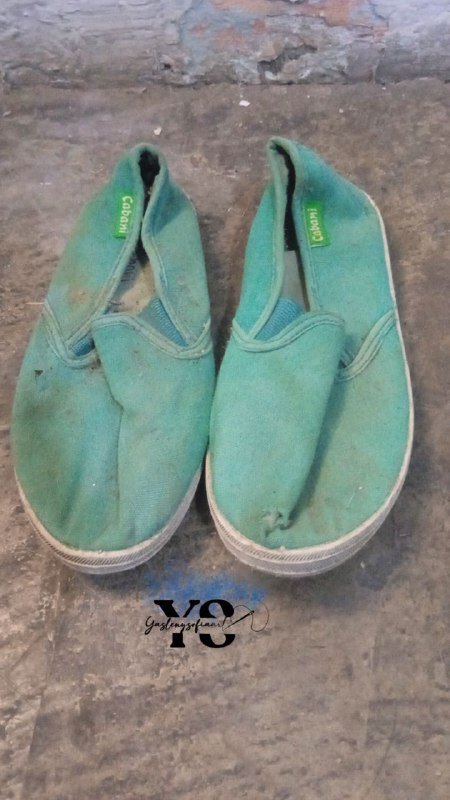
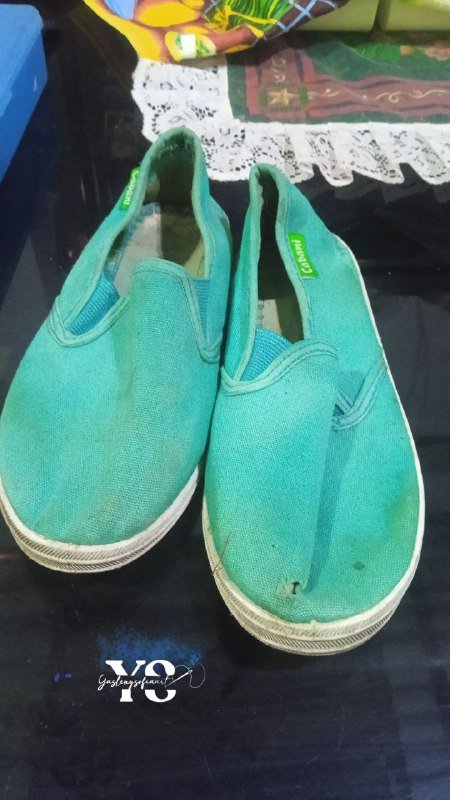
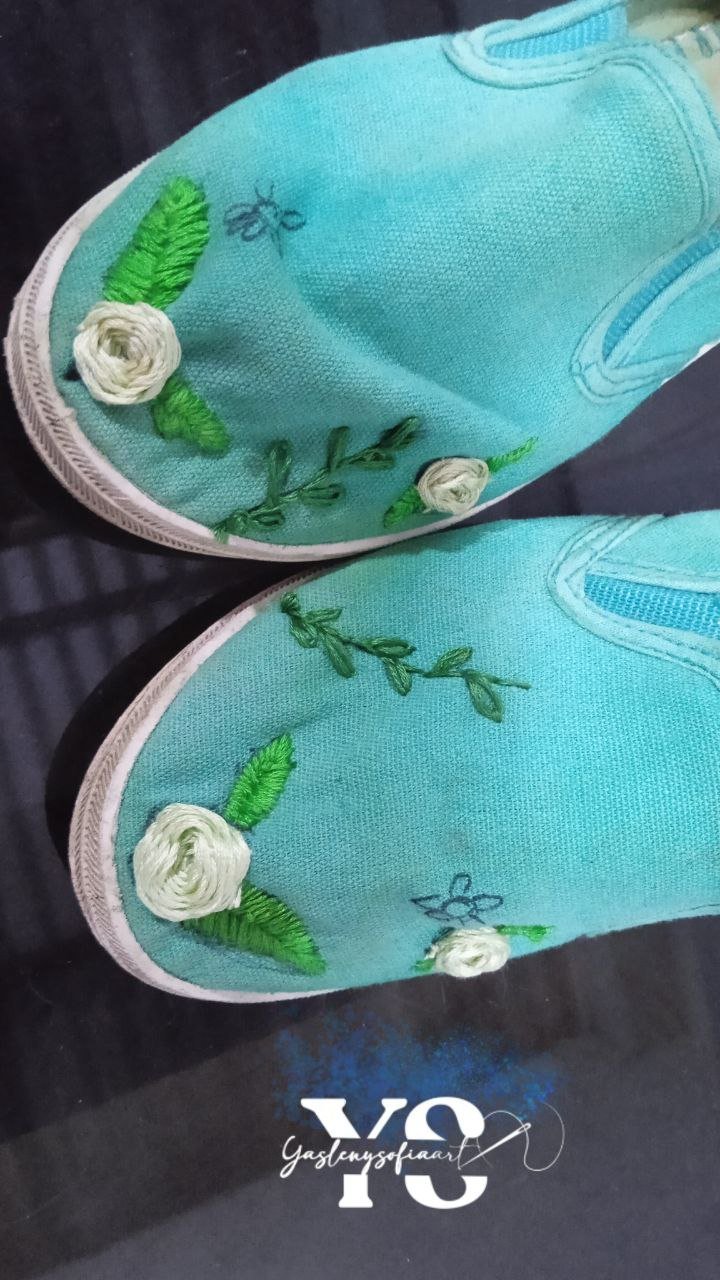
The first thing I did, and you will notice it in the image, was to wash the shoes, well, they were filthy; when I washed them I couldn't remove some stains, but since I was going to embroider it, I didn't care. The second step was to draw the patterns, starting the embroidery with the leaves that go on the sides of what would be a rose.
--
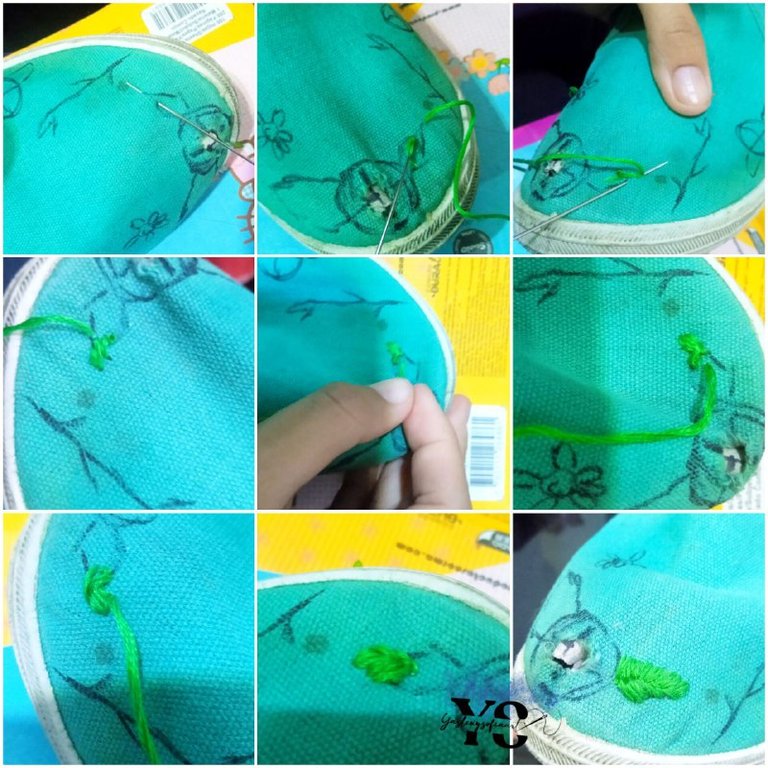
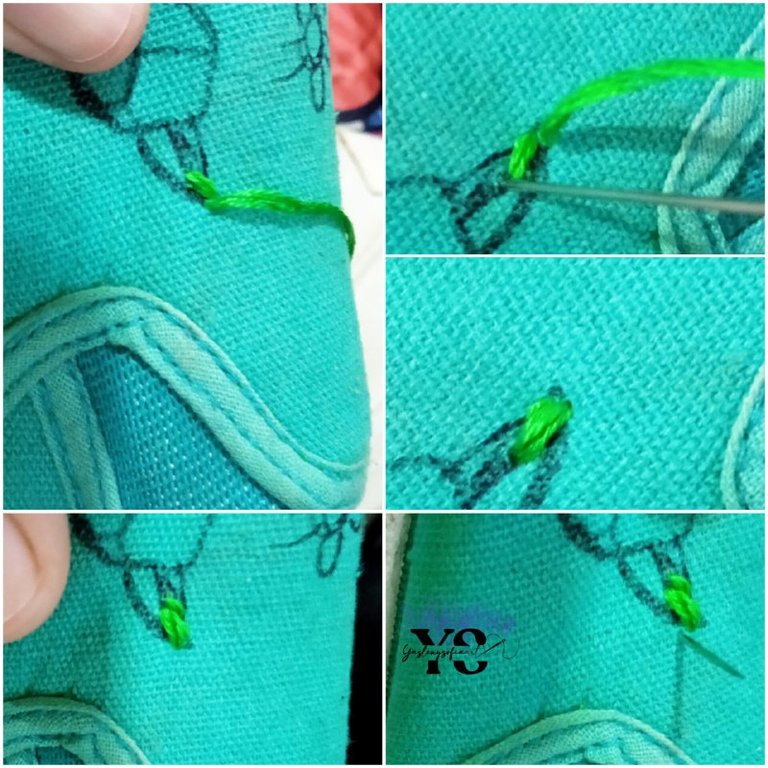
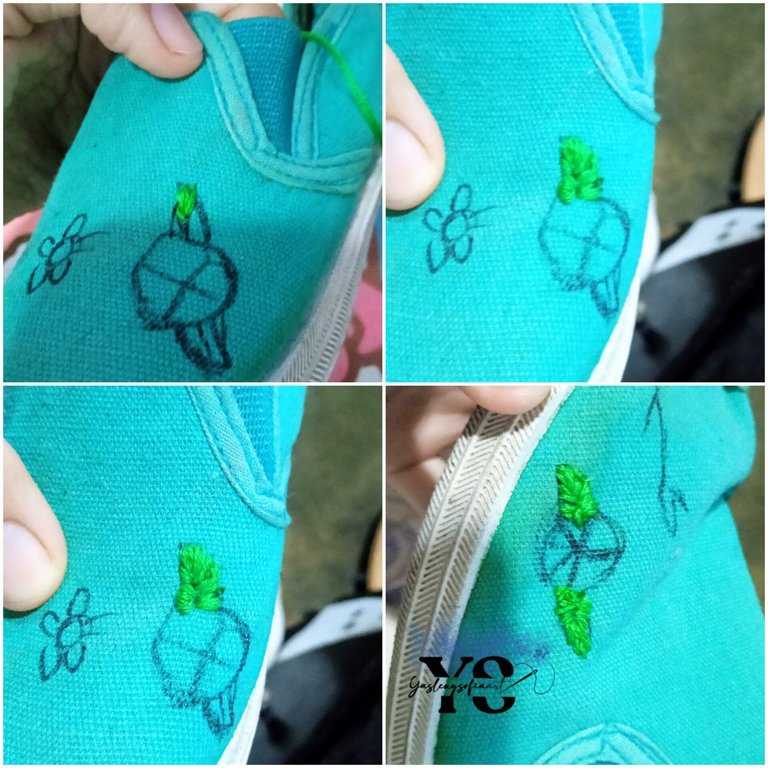
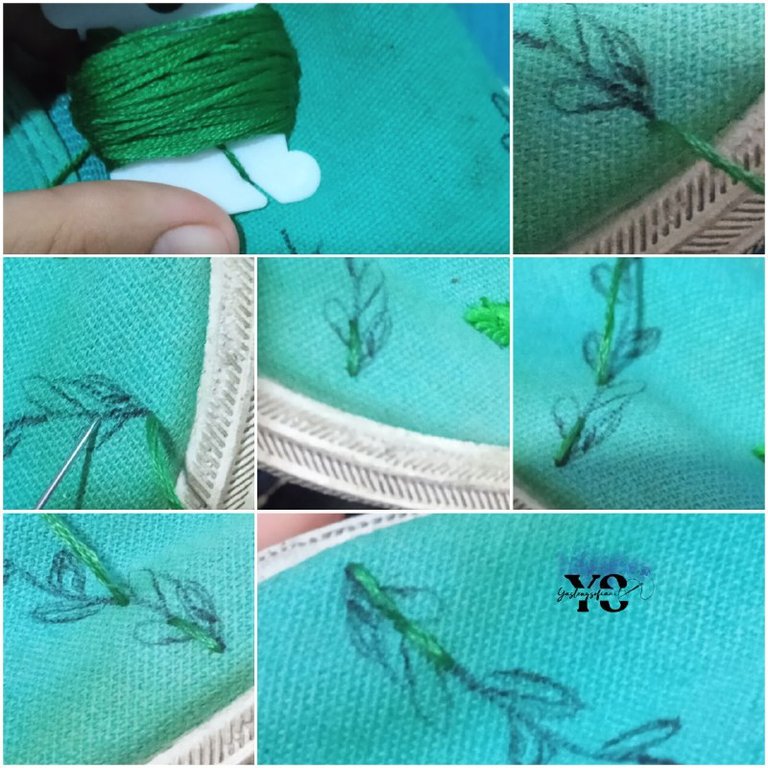
At first I thought it would work to do it without introducing the needle completely to the bottom, that is to say that it would go through the fabric, so to speak, as it is commonly done when embroidering on a fabric and with hoops, but, it didn't work, it was very difficult, so the first leaf was a little strange, and with the rest if I put the needle in and took it out through the outside of the tongue of the shoe.
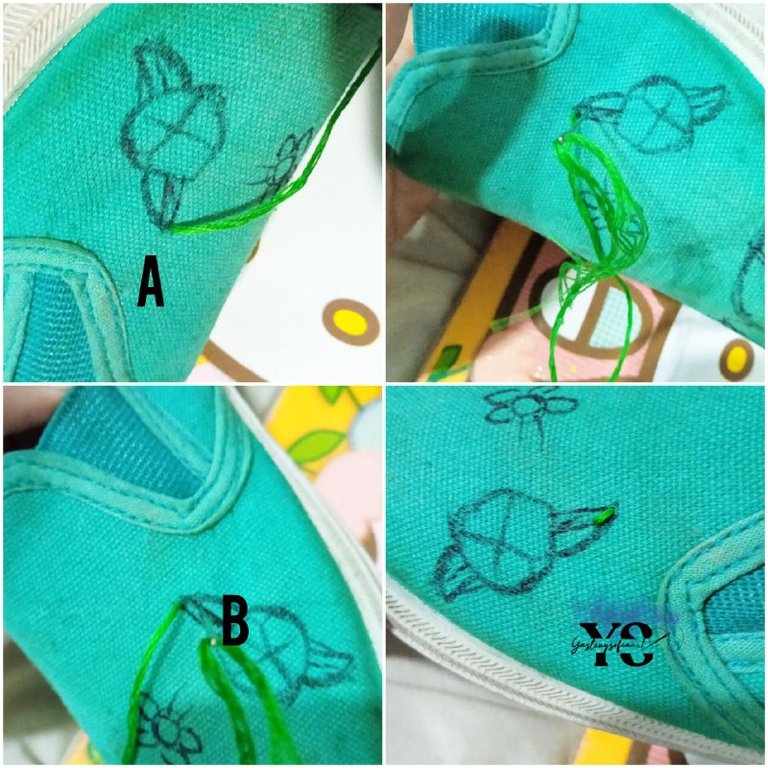
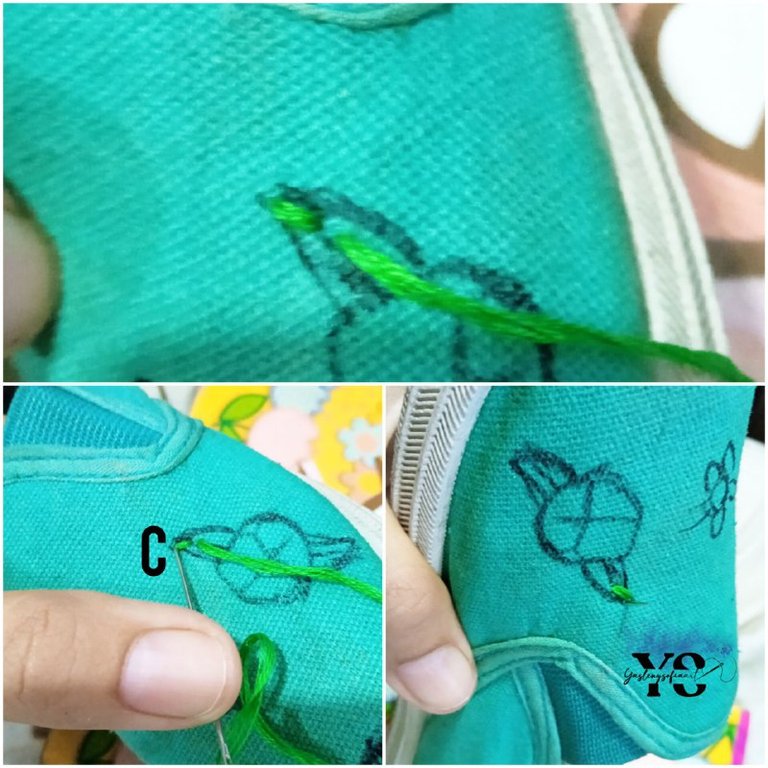
Now, previously you draw a centered line to that leaf, because it will be your guide, the herringbone stitch consists of taking out or inserting the needle through the tip of the leaf (POINT A), after taking it out, you reinsert it a little more in front of the guide line (POINT B). You take the needle out again on one side and a little below POINT B and the guide line, and reinsert it (POINT C) on one side of the first stitch, from POINT A, following the contour of the leaf. Then, we reinsert the needle from the inside to the outside of the shoe on the other side of POINT A, that is, opposite to POINT C, and the needle is reinserted across or diagonally from POINT B, and so on, until the figure is completed.
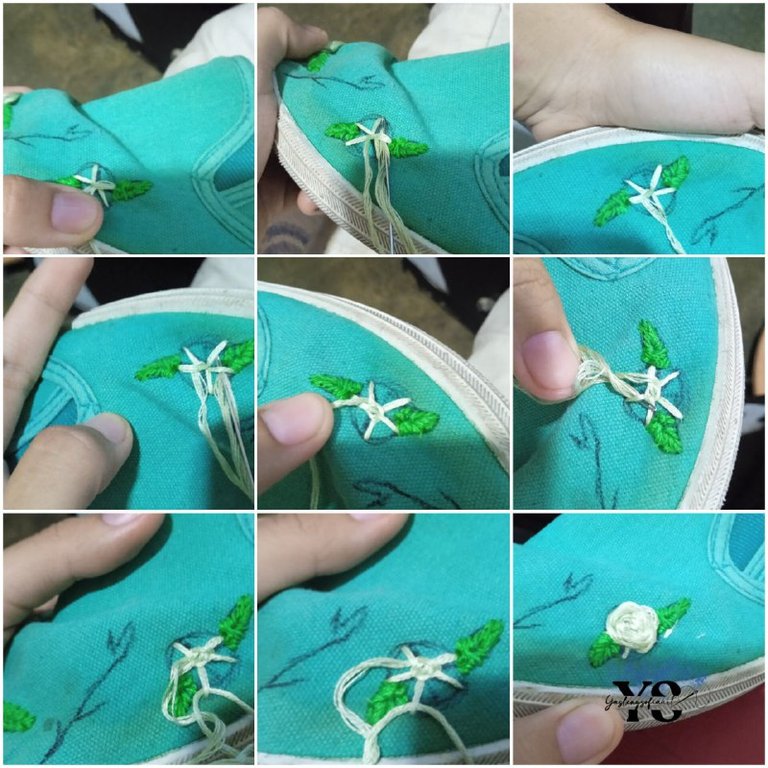
After all the embroidered leaves of each shoe, I proceeded with the roses, which I would use green threads, but in light tones. The pink stitch consists of drawing a circle, and that circle will be divided into 5 parts, two at the top and three at the bottom, which will be the guide lines.
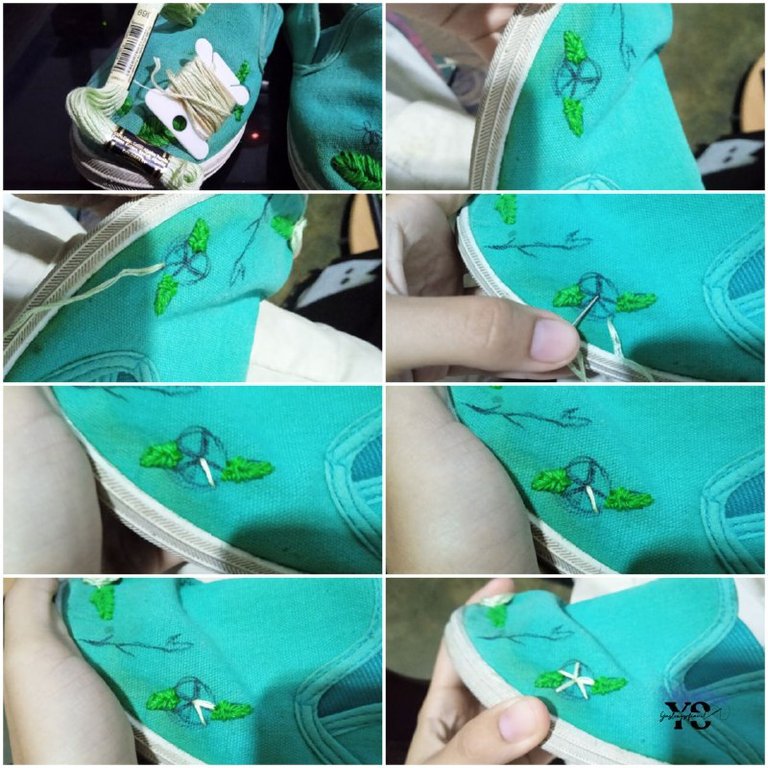
Insert the needle through one of the contours of the circle and where one of the guide lines is and reinsert it through the center of the circle, and so on with each of the guide lines, it will form a star base. Once this part is ready, insert the needle from the inside of the shoe to the outside, through the middle of the circle, next to one of the guide lines.
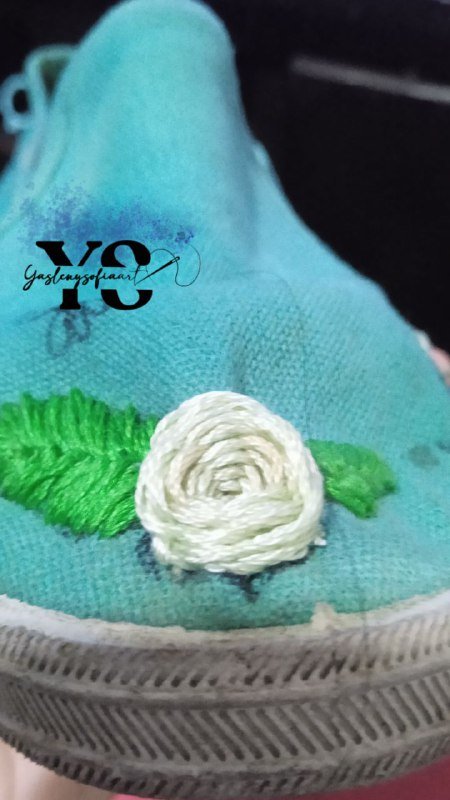
Now, you are going to pass the son over that guide line and pass the needle under the next guide line, then pass over the next guide line of that one and under the other and so on repeatedly, one passing over and the other under, you will see that those that were not passed under at first, in the second round if it will. You will do this until you finish the circle shape and there you have your rose with a star base.
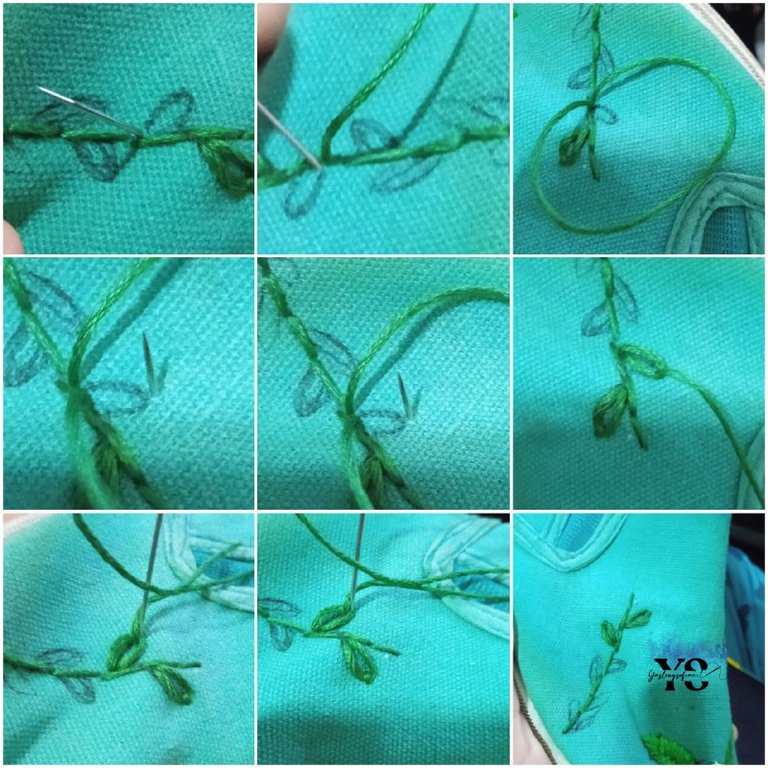
Once the roses were ready, I continued with the branches, using a darker green color, for the center part, I applied the technique step by step, but with the small leaves, I did the following: you insert the needle, from the inside to the outside of the shoe, in the center - underneath it, and reinsert it again through the same point, and, before lowering the thread completely, you reinsert the needle through the other end of the leaf, and, when pulling, the thread comes, forming an oval; to close, you just pass the needle behind that stitch and that's it.
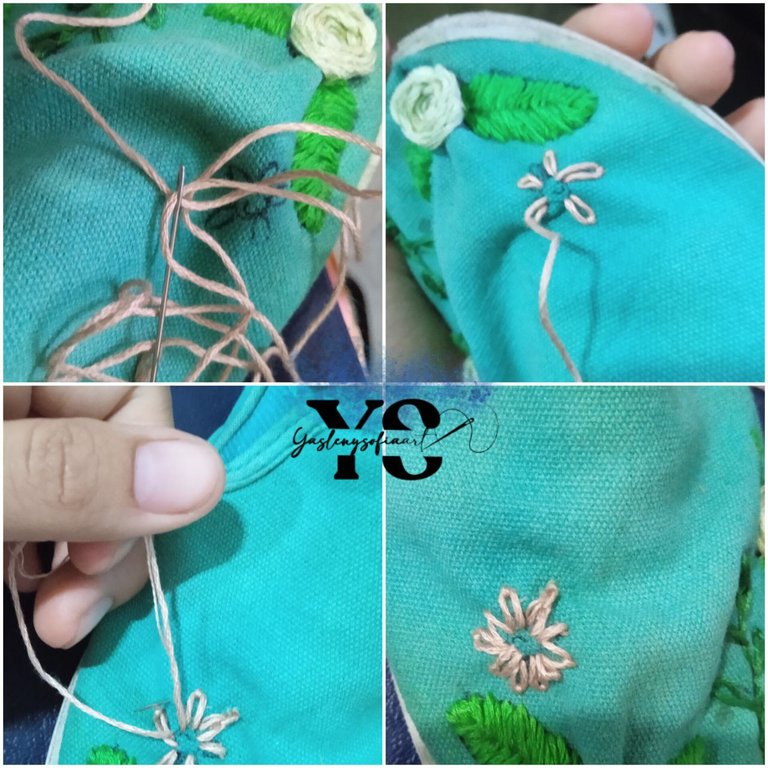
With the small flowers, I did the same as with the small leaves, previously explained, only in pink and orange. Some of the flowers, in the center, I filled them with the French knot stitch, which is to take the needle from the inside out, put it horizontally, give it a turn with the thread, hold the thread so that it does not move too much from the needle and reinsert it where it came out, slowly lower the thread so that it does not tangle and that's it, you have your knot stitch.
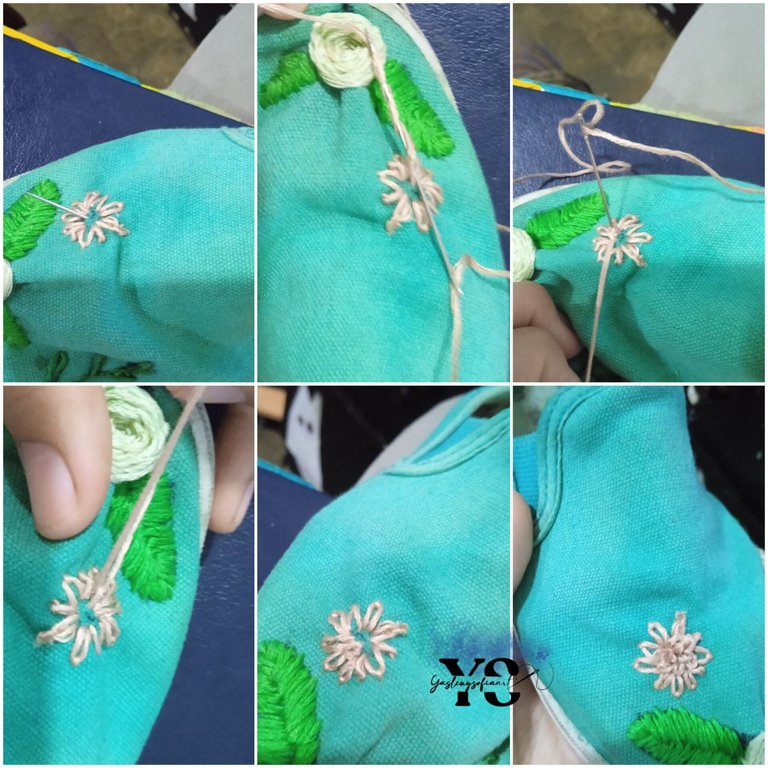
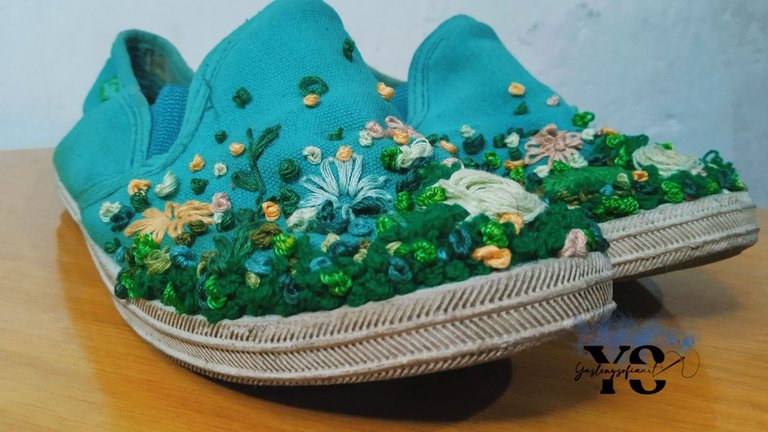
Once the flowers were ready, I wanted to fill the front part of the shoe with pure French knotted dots and in different shades of green, first using medium tones, then some dark and some light, here I didn't take a picture, because it took me so long to fill, that I did it at times and I forgot to take pictures.
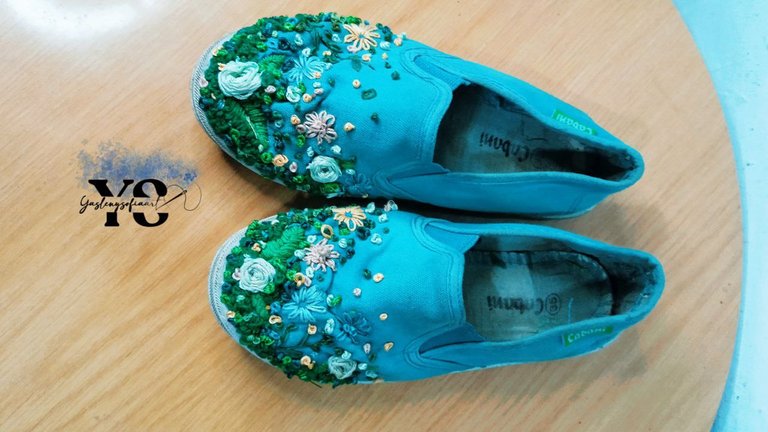
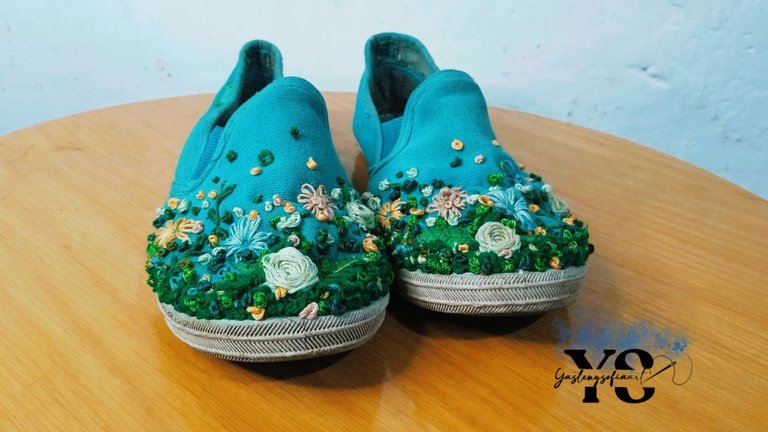
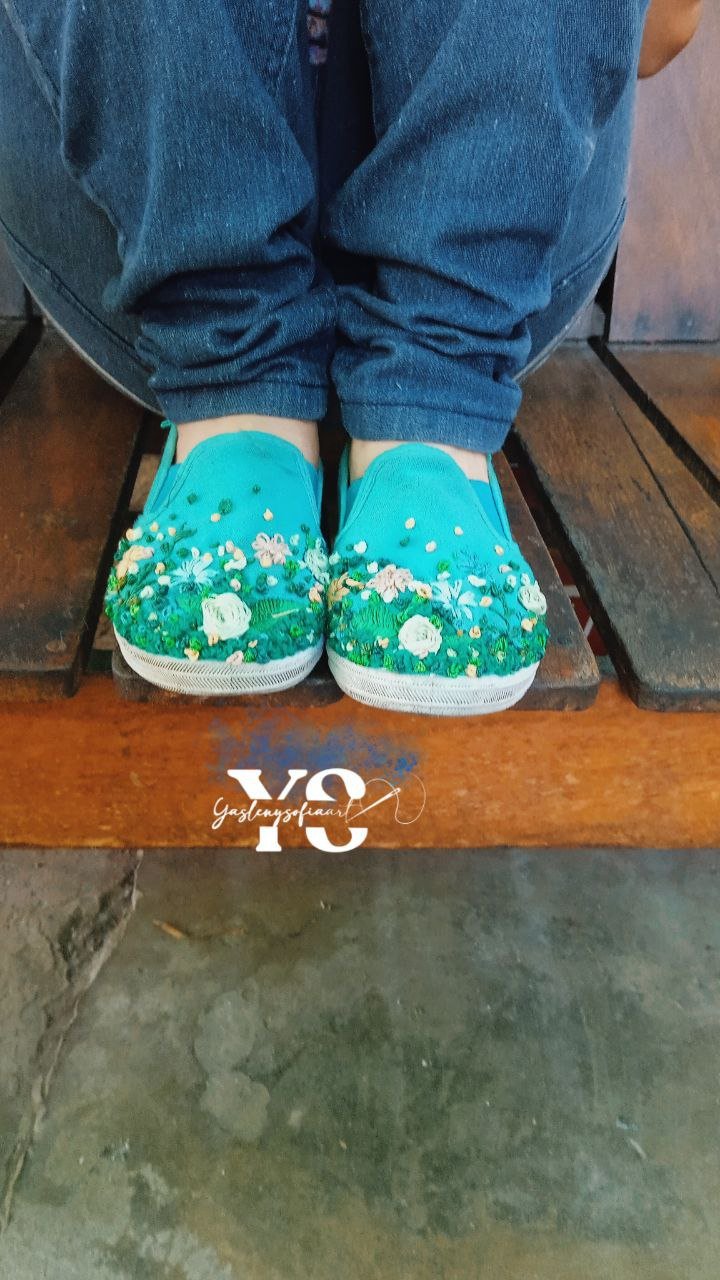
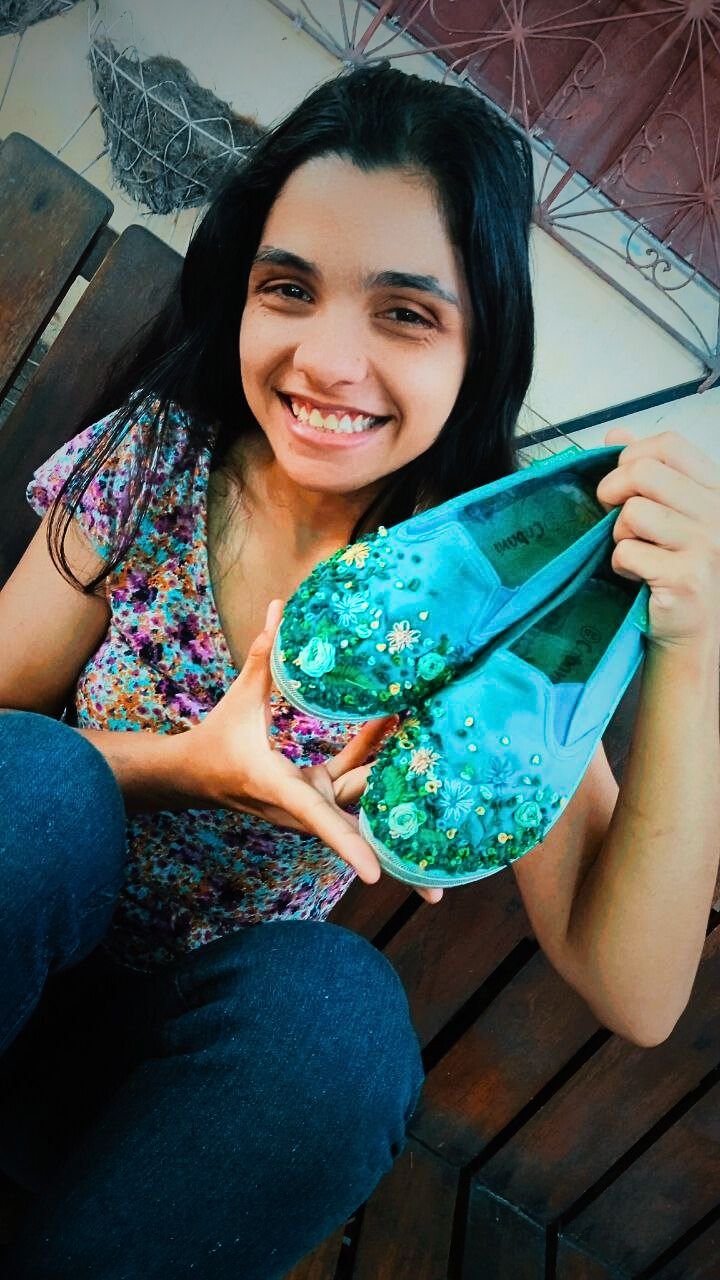
This was the final result and I loved it, but, there was a problem, the shoe doesn't fit me, I don't know if it shrunk because I stopped wearing it, it's not too tight, I might wear it at times to stretch it, although walking a lot with them, I don't think so, I hope I can wear them, they look beautiful, they look like a garden, I imagine them with a white dress, I don't know, something that focuses more attention on them, I'll see, if they don't fit, I'll give them away as a gift.

Thank you for reading my post. I hope you liked it. I will be attentive to answer your comments. You can visit my blog, follow my content and social networks.

FACEBOOK / INSTAGRAM / TWITTER

ESPAÑOL
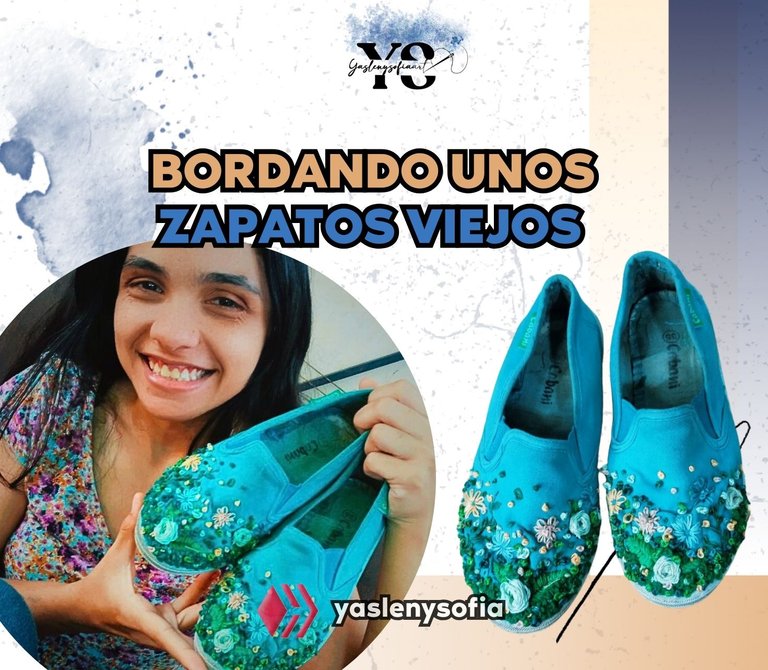
Saludos comunidad de @needleworkmonday, hace días, acomodando una parte de la casa, me conseguí unos zapatos que me gustaban mucho, pero, los deje de usar porque se les abrió un hueco a uno de su par, y paso el tiempo y los olvidé por completo, creo que fueron un par de años, aunque nunca es tarde para volverlo a usarlo y que mejor, que darle otra apariencia, por lo que me dije porque no les bordo unas flores a los mismos y si no quedaba bien, pues no importaba.
Así que, hoy les vengo a traer todo el proceso que me llevo elaborar estos bordados, lo cual fue en mucho tiempo, pues no es fácil; lo incomodo de pasar la aguja y que algunas zonas del zapato lo volvían más complicado, aunado que me puse a querer cubrir gran parte de adelante del mismo con la técnica del nudo francés, me llevo más tiempo de lo que creía, pero, se logró.


-hilo de bordar, de colores de preferencia, en mi caso, elegí diversos tonos en verde y uno que otro crema y rosado, para que armonizaran con el color verde del zapato.
-Aguja de bordar
-Tijera

Lo primero que hice y lo pondrán notar en la imagen, fue lavar los zapatos, pues bien, mugrientos que estaban; al lavarlos no pude quitarle unas manchas, pero como iba a bordarlo, no me importaba. El segundo paso fue dibujar los patrones, iniciando el bordado con las hojas que van a los lados de lo que seria una rosa.
--


Para ello, recurrí al punto espina de pescado, al principio creí que funcionaria hacerlo sin introducir la aguja completamente al fondo, es decir que traspasara la tela, por así decirlo, como se hace comúnmente cuando una borda en una tela y con aros, pero, que va, no funcionó, costaba mucho, por lo que la primera hoja si me quedó algo extraña, ya con el resto si metía la aguja y la sacaba por afuera de la lengüeta del zapato.


Ahora bien, previamente le dibujas una línea centrada a esa hoja, porque será tu guía, el punto espina de pescado consiste en sacar o insertar la aguja por la punta de la hoja (PUNTO A), luego de sacarla, la vuelves a reinsertar un poco más delante de la línea guía (PUNTO B). Vuelves a sacar la aguja por un lado y un poco más debajo del PUNTO B y de la línea guía, y la reinsertas (PUNTO C) por un lado de la primera puntada, del PUNTO A, siguiendo el contorno de la hoja. Luego, reinsertamos la aguja desde adentro hacia afuera del zapato del otro lado del PUNTO A, es decir, del contrario al PUNTO C y la se reinserta la aguja de forma cruzada o en diagonal del PUNTO B, y así sucesivamente se sigue haciendo, hasta completar la figura.


Posterior, a todas las hojas bordadas de cada zapato, procedí con las rosas, el cual usaría hilos verdes, pero en tonos claros. El punto rosa consiste en dibujar un círculo, y ese círculo lo vas a partir en 5 partes, dos en la parte superior, y tres en la inferior, serán las líneas guías.

Insertas la aguja por uno de los contornos del circulo y donde están una de las líneas guías y la reinsertas por el centro de ese círculo, así sucesivamente haces con cada una de las líneas guías, se va a formar como una base estrella. Ya con esta parte lista, insertas la aguja desde a dentro del zapato hasta afuera, por el medio del círculo, a lado de una de las líneas guías.
Ahora bien, vas a pasar el hijo por encima de esa línea guía y pasas la aguja por debajo de la siguiente línea guía, para luego pasar por encima de la siguiente línea guía de esa y debajo de la otra y así repetidamente, una pasando por arriba y la otra por debajo, veras que aquellas que no se pasaron por debajo en un primer momento, en la segunda vuelta si lo hará. Lo vas hacer hasta que termines la forma del circula y ahí tienes tu rosa con base de estrella.


Ya con las rosas lista, seguí con las ramas, usando un color verde más oscuro, para la parte del centro, apliqué la técnica paso a atrás, pero con las hojas pequeñas, hice lo siguiente: insertas la aguja, de adentro hacia afuera del zapato, en el centro – debajo de la misma, y la volvía a reinsertar por ese mismo punto, y, antes de bajar por completo el hilo, reinsertas la aguja por el otro extremo de la hoja, y, al jalar, se viene el hilo, formando como un ovalo; para cerrar, solo pasas la aguja por detrás de esa puntada y listo.


Con las florecitas pequeñas, hice lo mismo que las hojitas pequeñas, anteriormente explicadas, solo que en color rosa y anaranjado. Algunas de las flores, en su centro, las rellené con el punto nudo francés, que es sacar la aguja de adentro hacia afuera, se pone en horizontal, se le da una vuelta con el hilo, sostienes el hilo para que no se mueva mucho de la aguja y la vuelves a reinsertar por donde mismo salió, vas bajando poco a poco el hilo para que no se enrede y listo, tienes tu punto nudo.


Ya con la parte de las flores lista, desee rellenar la parte delante del zapato con puros puntos nudos francés y en diferentes tonos de verde, primero usando unos tonos medios, luego unos oscuros y otros claros, aquí si no le tome foto, porque me llevo tanto tiempo rellenar, que lo hacia por momentos y se me olvida tomar fotos.
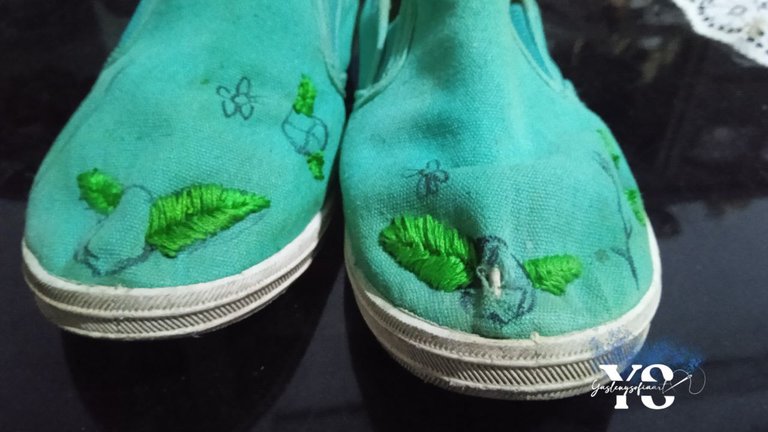
Este fue el resultado final y me encantó, pero, hubo un inconveniente, no me queda el zapato, no sé si se encogió por dejar de usarlo, apretado, que se diga apretado no está, puede que lo use por momentos para ir estirándolo, aunque caminar mucho con ellos, no lo creo, espero poder usarlos, pues se ven hermosos, parecen un jardín, me los imagino con un vestido blanco, no sé, algo que enfoque más la atención en ellos, ahí se verá, si no me quedan, los regalaré.


Gracias por leer mi post. Espero que les haya gustado. Estaré atenta a responder sus comentarios. Pueden visitar mi blog, seguir mis contenidos y redes sociales.

FACEBOOK / INSTAGRAM / TWITTER

0
0
0.000
¡Felicidades! Esta publicación obtuvo upvote y fue compartido por @la-colmena, un proyecto de Curación Manual para la comunidad hispana de Hive que cuenta con el respaldo de @curie.
Si te gusta el trabajo que hacemos, te invitamos a darle tu voto a este comentario y a votar como testigo por La Colmena.
Si quieres saber más sobre nuestro proyecto, te invitamos a acompañarnos en nuestro servidor de Discord.
Muchas gracias 🤗
It looks pretty cool. You gave it a new look. Now it looks amazing. Nice work!
Muchas gracias 😊 fue duro el trabajo, pero me encantó el resultado
Thank you very much 😊 it was hard work, but I loved the result.
Estoy impresionada de ver lo que has logrado con tus viejos zapatos, Ver como le has dado vida es maravilloso. Es un magnifico trabajo. Que disfrutes tus zapatos es su nueva faceta.
Bendiciones.
Muchas gracias 😊, eso espero, como me quedan un poco apretado, pero ahí veré. Saludos
Thank you very much 😊, I hope so, as they fit me a little tight, but there I will see. Regards
¡Dios mío, que preciosidad! Quedaron como zapatos de hadas 😍 La transformación es impresionante 😊 Me fascinaron en verdad, voy a intentarlo con unos zapatos que tengo 🤗 ¡Muchas gracias por compartir la idea! 💚
De seguro te quedarán hermosos, es bueno darle otra oportunidad a viejos zapatos, si se puede. Muchas gracias
I'm sure they will look beautiful on you, it's good to give old shoes another chance, if you can. Thank you very much
¡Enhorabuena!
✅ Has hecho un buen trabajo, por lo cual tu publicación ha sido valorada y ha recibido el apoyo de parte de CHESS BROTHERS ♔ 💪
♟ Te invitamos a usar nuestra etiqueta #chessbrothers y a que aprendas más sobre nosotros.
♟♟ También puedes contactarnos en nuestro servidor de Discord y promocionar allí tus publicaciones.
♟♟♟ Considera unirte a nuestro trail de curación para que trabajemos en equipo y recibas recompensas automáticamente.
♞♟ Echa un vistazo a nuestra cuenta @chessbrotherspro para que te informes sobre el proceso de curación llevado a diario por nuestro equipo.
🥇 Si quieres obtener ganancias con tu delegacion de HP y apoyar a nuestro proyecto, te invitamos a unirte al plan Master Investor. Aquí puedes aprender cómo hacerlo.
Cordialmente
El equipo de CHESS BROTHERS
Muchas gracias 🤗
Wow, you did great work, sometimes what we abandoned comes out new through how we give a new design or through how we amend it, this looks great, Weldone dear
Si, eso fue lo que pensé en el momento en el que los volví a ver. Muchas gracias 🤗
Yes, that's what I thought the moment I saw them again. Thank you very much 🤗
You did a great job with the shoes and it's looking so nice.
Muchas gracias 🤗
Thank you very much 🤗
This is a massive transformation of the shoes, I must commend you and it's true that you said that it wasn't easy. I can see that this must have been ot of hard work but you creatively persevered through it. Well done dear and thanks for sharing this beautiful piece in the community.
Más que nada fue hacer tanto puntos nudos, pero, se hizo. Muchas gracias 🤗
Mostly it was doing so many knotted stitches, but, it got done. Thank you very much 🤗
Hermosos, quedaron como nuevos ❤️ Esa es una forma ingeniosa de volverlos a la vida. Te felicito!
Muchas gracias 😊, definitivamente volvieron a la vida 🤗
Pocas personas le dan una segunda vida a sus zapatos viejos. Esta es una gran idea para ser creativos, me gusto @yaslenysofia 🤗😘Un abrazo para ti .
Si, la verdad merecían una segunda oportunidad y que mejor que con unos bordados. Muchas gracias. Abrazos igualmente. 😊
Wow - that is a brilliant transformation indeed, dear @yaslenysofia !! I love how you saw the beauty in an old pair of shoes that someone less creative may have thrown out: really wonderful result: you inspire me to look at new ways to remake shoes 😇 😍
Lo bueno es que uno puede darle los diseños que más nos guste. Espero lo hagas también con un par de zapatos. Muchas gracias 🤗
The good thing is that you can give it the designs that you like the most. I hope you do it also with a pair of shoes. Thank you very much 🤗
Que bellos, me encanta el jardin en tus zapatos, para nada parecen los que están en las primeras fotos, me encanto tu trabajo, Gracias por compartir
Muchas gracias. Si, es mini jardín en unos zapatos 😊
Es impresionante el hermoso trabajo que has hecho con los viejos zapatos se ven espectaculares, el motivo floral es uno de mis favoritos. 🌷🌼🌸🌺🌻❤️
Que tengas una excelente semana!
Muchas gracias. Igualmente, feliz semana para ti 🤗