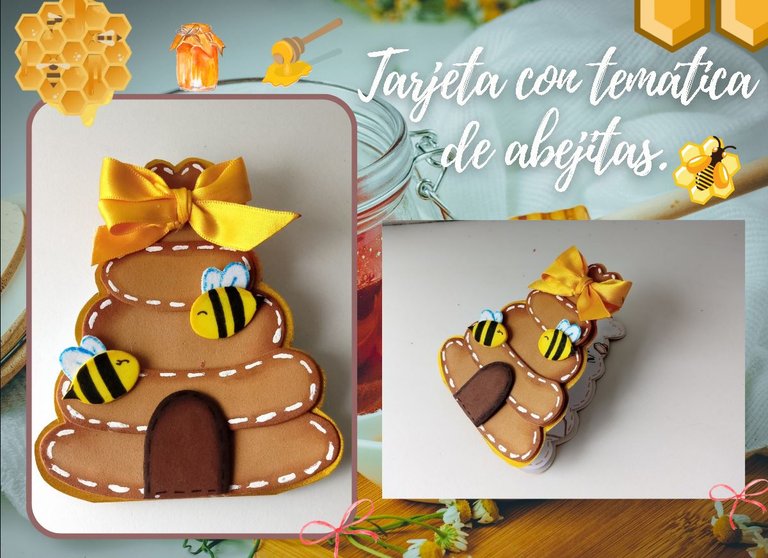
[Esp/Eng] ✨Tarjeta con temática de abejitas. // Bee themed card. ✨
✨🐝¡Hola amigos amantes de la creatividad! Espero que hayan pasado un muy buen comienzo de semana.✨
🔸Sin más que añadir, a continuación los dejo con el paso a paso:
✨🐝¡Hello friends who love creativity! I hope you had a very good start to the week.✨
¡Good afternoon friends! I hope you are having a great week. For my part, I am quite happy. On this occasion I share with you the step by step to make a beautiful bee-themed card. Tell me if this little card with bees in their hive wasn't cute, I was fascinated by this cuteness. I wanted to create something different, I don't think I had ever made something with this theme and the truth is that I love the theme of bees, beehives and the combination of these two with flowers, specifically my favorite.
🔸Without more to add, then I leave you with the step by step:
♥️ESPERO QUE TE GUSTE,
¡Empecemos!
♥️I HOPE YOU LIKE IT,
Let's start!

✂️ MATERIALES | ✂️ MATERIALS
- Cartulina escarchada dorada.
- Foami marrón o color miel.
- Foami marrón oscuro.
- Foami amarillo.
- Foami blanco.
- Pinturas y marcadores.
- Hoja blanca.
- Pegamento.
- Tijeras.
- Lápiz.
- Gold frosted cardstock.
- Brown or honey-colored foami.
- Dark brown foami.
- Yellow foam.
- White foam.
- Paints and markers.
- White sheet.
- Glue.
- Scissors.
- Pencil.
🐝 PROCEDIMIENTO | 🐝 PROCESS
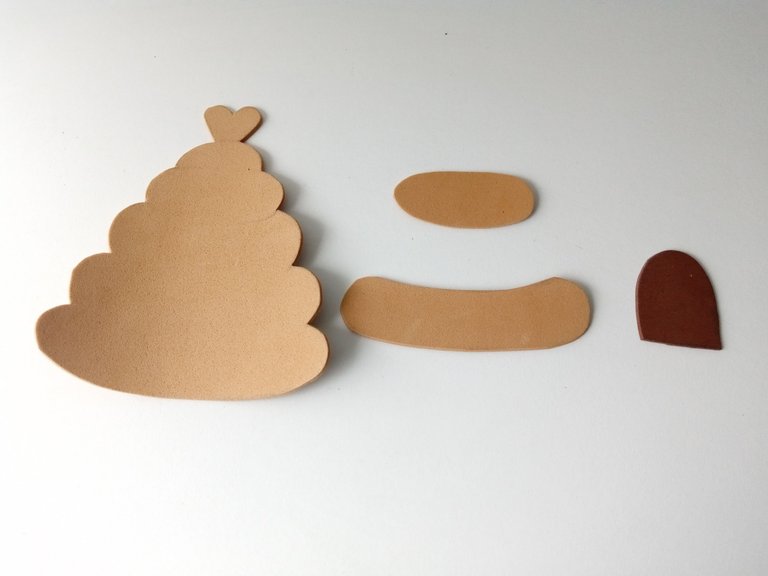
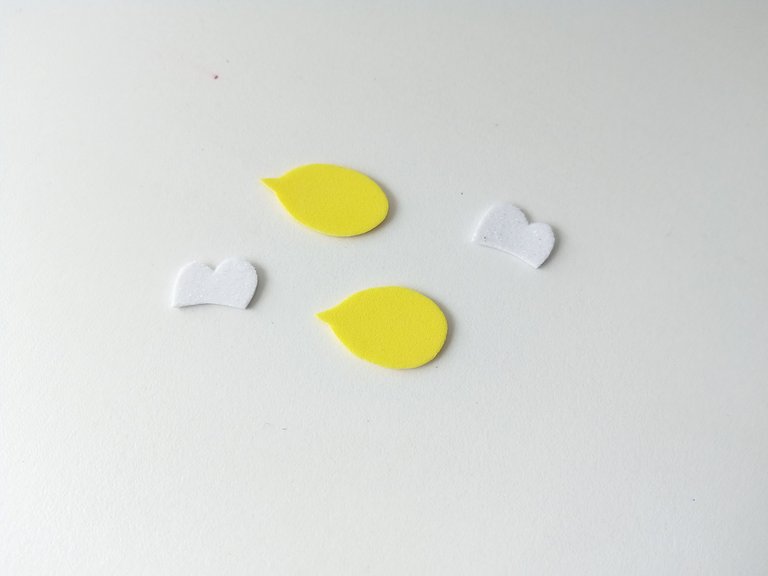
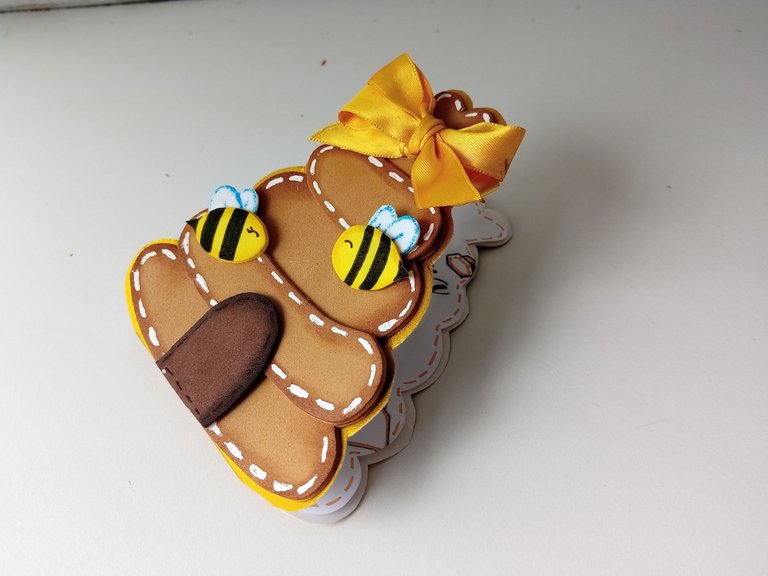
- PASO 1:
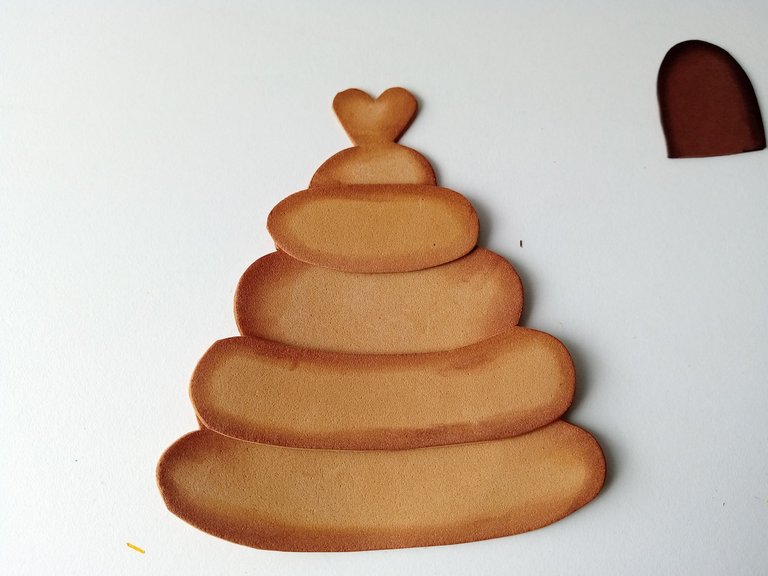
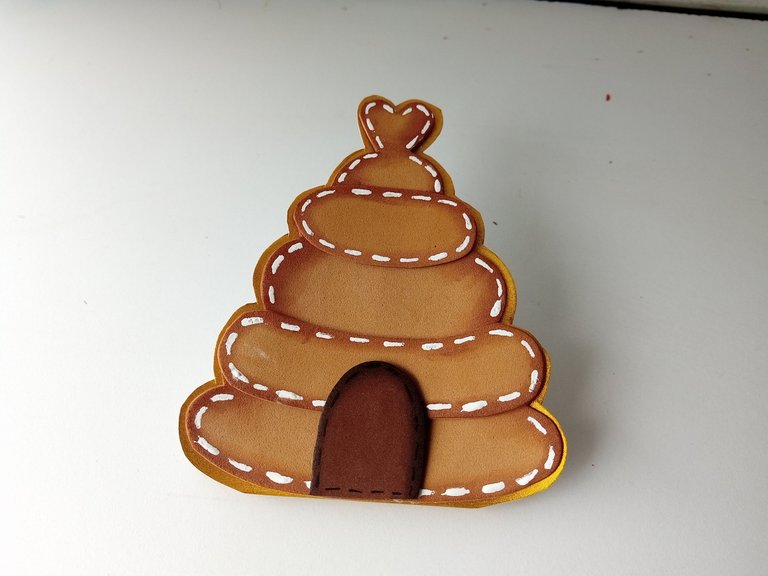
Lo primero que hice fue dibujar los patrones que iba a necesitar, en este caso el de una colmena, al cual le agregué un corazón en la parte superior y las abejas. Luego de tener todo listo, lo transferí a los colores correspondientes de foami de la siguiente manera: la colmena en marrón claro o color miel, también recorté dos piezas extras de los niveles de la colmena para dar más volumen, la puerta en foami marrón oscuro. El cuerpo de las abejas en amarillo y las alas en blanco.
- STEP 1:
The first thing I did was draw the patterns I was going to need, in this case a honeycomb, to which I added a heart at the top and the bees. After having everything ready, I transferred it to the corresponding colors of foami as follows: the hive in light brown or honey color, I also cut out two extra pieces of the levels of the hive to give more volume, the door in dark brown foami . The body of the bees in yellow and the wings in white.
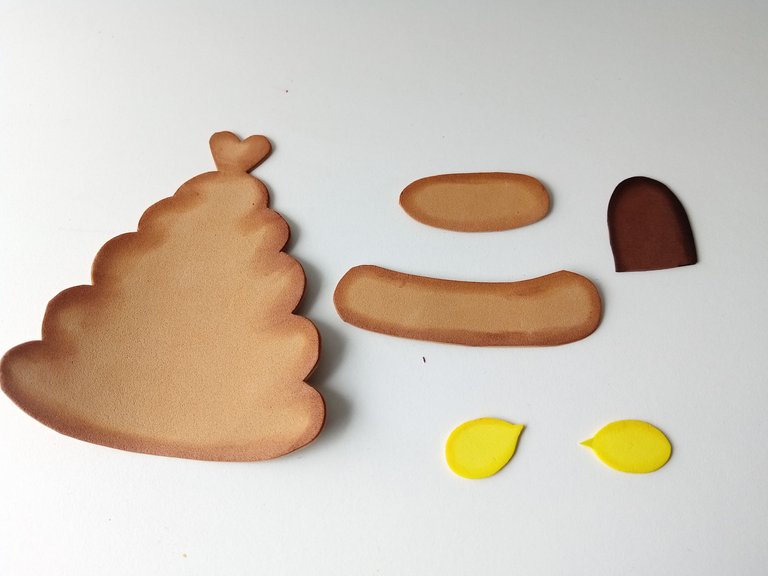
- PASO 2:
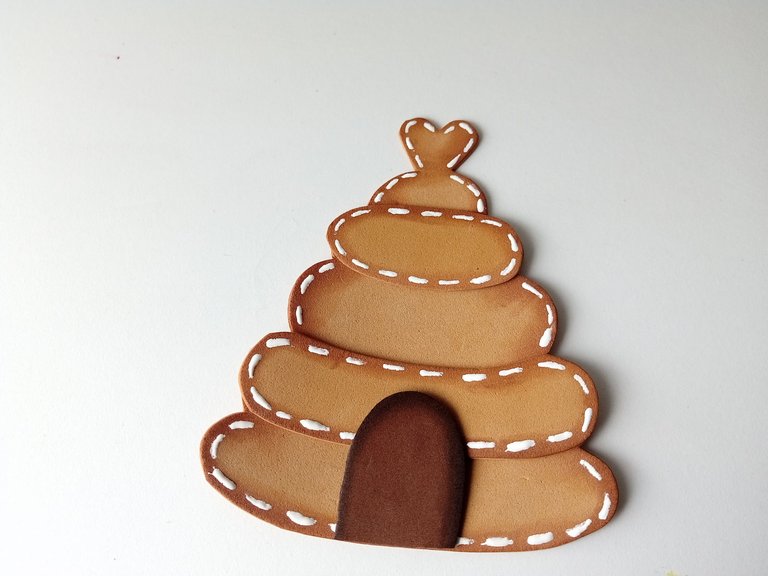
Al tener todas las piezas listas, comencé a dar sombras con pinturas y con ayuda de un pañito fui difuminando los bordes de algunas de las piezas, como la colmena, la puerta y los cuerpos de las abejas.
- STEP 2:
Having all the pieces ready, I began to give shadows with paints and with the help of a cloth I blurred the edges of some of the pieces, such as the hive, the door and the bodies of the bees.
- PASO 3:
Después pegué las piezas extras de la colmena para dar más volumen o relieve, pinté en los bordes de la colmena y piezas extras, líneas con aspecto de costura y luego pegué la puerta en la parte inferior, centrándola en la colmena.
- STEP 3:
Then I glued the extra pieces of the beehive to give more volume or relief, I painted sewing-like lines on the edges of the beehive and extra pieces and then I glued the door on the bottom, centering it on the beehive.
- PASO 4:
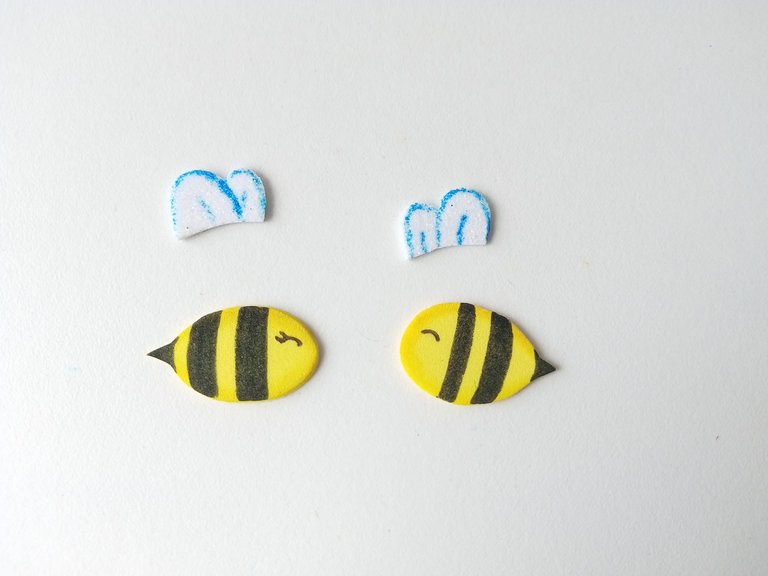
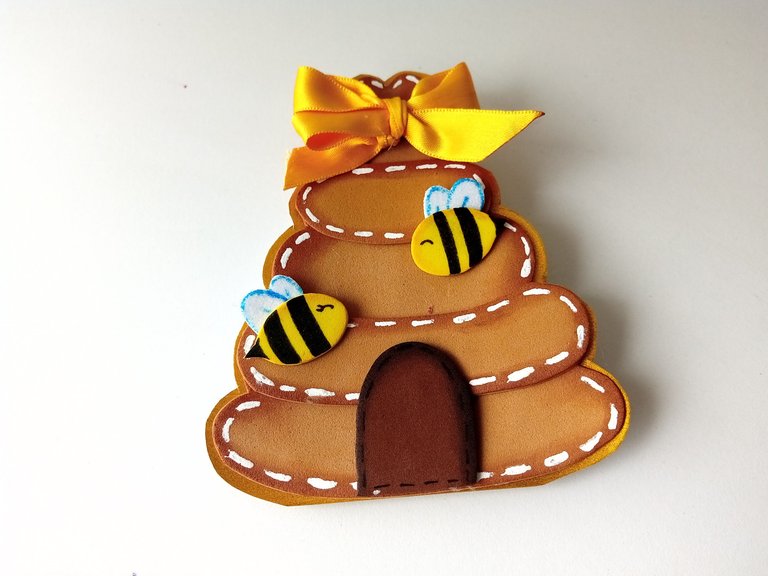
Después de eso, di detalles a las piezas de las abejas con marcador negro, agregando las rayas al cuerpo, pintando el aguijón, los ojos con un marcador más delgado y para las alas, utilicé un marcador azul para definir. También hice un lazo amarillo, pero esto es opcional.
- STEP 4:
After that, I detailed the bee pieces with black marker, adding the stripes to the body, painting the stinger, the eyes with a thinner marker and for the wings, I used a blue marker to define. I also made a yellow bow, but this is optional.

- PASO 5:
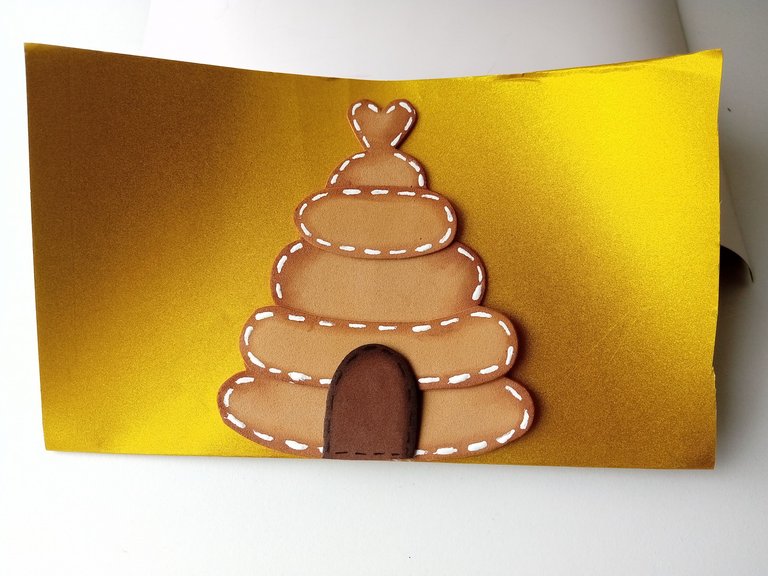
Para elaborar la tarjeta, doblé a la mitad una pieza de cartulina escarchada dorada, pegué la pieza de la colmena a la parte baja justo en el doblez, para que se abriera desde la parte superior. Luego de esto, recorté la cartulina, dejando un borde de 0.5 cm. También aproveché de pegar las decoraciones.
- STEP 5:
To make the card, I folded a piece of gold frosted cardstock in half, glued the beehive piece to the bottom right at the fold, so that it opened from the top. After this, I cut out the cardboard, leaving a 0.5 cm border. I also took advantage of gluing the decorations.
- PASO 6:
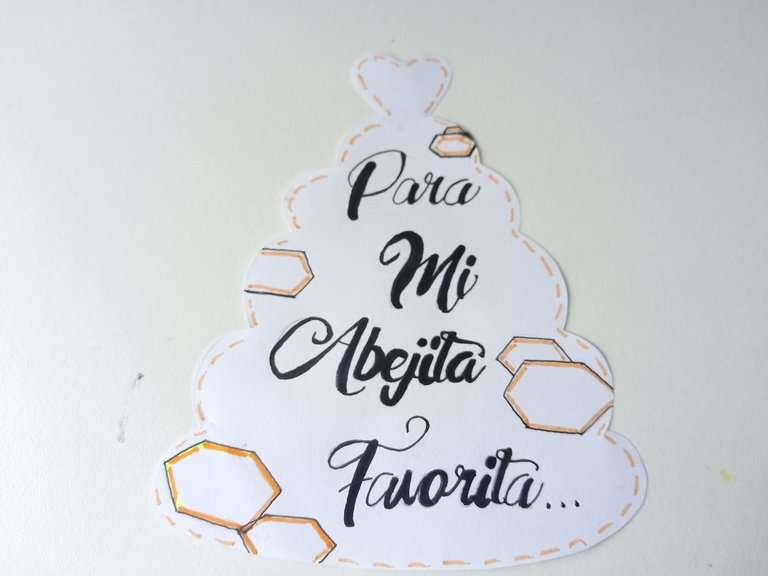
Para la parte interna de la tarjeta, recorté en una hoja blanca la forma de la colmena, solo que esta vez 0.5 cm más pequeña. Después, escribí un mensaje con lápiz y di detalles característicos de una colmena. Seguidamente, remarqué con marcador negro, di color a los detalles con marcador y al estar listo, pegué a la tarjeta.
- STEP 6:
For the inside of the card, I cut out the shape of the beehive from a white sheet of paper, only this time 0.5 cm smaller. Afterwards, I wrote a message with pencil and gave characteristic details of a beehive. Next, I highlighted with a black marker, colored the details with a marker and when I was ready, I glued it to the card.
✨🐝¡And ready!✨This is how you can make a beautiful and simple bee-themed card. In this case, I made it to give a detail to my favorite bee inside and outside of Hive, but it is a nice idea to give a nice detail to a colleague on the platform. I hope you liked it and are encouraged to do the step by step.
❤️Until the next post.
✨RESULTADO: | ✨RESULT:


Todas las fotografías son de mi propiedad.
Separador y Fotos editadas en Canva
All photographs are my property.
Photos edited in Canva
Te quedó preciosa amiga 😍
Gracias mi Vane bella ! 💕🐝🌻
Congratulations, your post has been curated by @dsc-r2cornell. You can use the tag #R2cornell. Also, find us on Discord
Felicitaciones, su publicación ha sido votada por @ dsc-r2cornell. Puedes usar el tag #R2cornell. También, nos puedes encontrar en Discord
Muchas gracias amigos 💕✨
Amo las abejitas y esa tarjeta quedó hermosa 😍
Gracias Eve preciosa! Sí, temática hive 🤭🐝
Congratulations @valenpba! You have completed the following achievement on the Hive blockchain And have been rewarded with New badge(s)
Your next target is to reach 8750 replies.
You can view your badges on your board and compare yourself to others in the Ranking
If you no longer want to receive notifications, reply to this comment with the word
STOPCheck out our last posts:
muy bella, deberias hacer una con tematica de hive.
Eso pensé, creó que quedaría bonito 🤭. Muchas gracias por la idea, iré pensando en algo.
Saludos ✨
saludos!!
Ami te pasaste con esta tarjeta, te quedó demasiado preciosa 🥰 Esa colmena es una cuchitura y las abejitas ni se diga. Que buen trabajo, hermoso y perfecto ❤️
Gracias Ami !! 🥺💕 Tan bella, tú también haces bellezas amiga. Me alegra muchísimo que te haya gustado cada detalle 🤭🌻🐝
Quedó muy linda, excelente como siempre 😍
Muchas gracias bella! Agradezco tus comentarios 💕
Está relinda amiga, incluso la puerta de la colmena, tiene profundidad. Siempre lo he dicho trabajas bastante bien el foami, se que son técnicas pero no todos la aplicamos tan bien. La colmena para las abejitas de @hive.
Muchas gracias amiga! Pues que bonitas palabras , agradecida 🤭💕. Esas técnicas son mucha práctica, aunque a veces solo me dejó llevar y ya 🤭.
Saludos bella! 💕
Muy bonita y creativa amiga
Muchas gracias amigo! ✨
Muchas gracias por el apoyo 💕
Una tarjeta realmente hermosa amiga, te quedaron lindas esas abejas.
Muchas gracias amiga! Mi parte favorita son las abejitas también 🤭 , me alegra que te hayan gustado 💕
Keep up the good work. 👏🎵
Dear beloved Hive creator,
Coding poet Gudasol here to support you sharing your art + life on Hive.
As a fellow creator, I know how hard it is to get the word out there.
I built cXc.world to help creators like us get more support from the blockchain community + beyond.
Share your music on cXc.world, and copy the Markdown for a easy post includes embedded players for Spotify, Youtube, Soundcloud.
That way, you can earn HIVE + stack streams on centralized platforms, as they do still matter.
Not a music creator? No problem. You can still use cXc.world to find + share music you love.
What's next?
Preview the next evolution of cXc, Tetra.earth.
Expose local music from your area!
We're helping grassroots musicians, and you can too by adding their music (no sign up or WAX account required).
Join our community 🐬
Find fellow music lovers in cXc's Discord
Bad news: Saying see you later to Hive! 👋
We didn't get the needed support to continue cXc.world on Hive, as our DHF proposal lacked votes, but [Good News Everyone] cXc.world will add a Markdown copy button, allowing you to easily share your music + music you find on Hive.
For now, we're on WAX, with tools you can use to mint your own Music/Media NFT collection.
Curious about the future of Earth + ET relations? New economic systems?
Find more apps + art from Gudasol
Want to build tools like I used to share this?
I'd love to show you some tips on AI Code generation