[Esp/Eng] ✨Decoración para la manilla de la puerta. // Decoration for the door handle.✨
✨¡Hola amigos amantes de la creatividad! Espero que hayan pasado un muy buen comienzo de semana.✨
🔸Sin más que añadir, a continuación los dejo con el paso a paso:
✨¡Hello friends who love creativity! I hope you had a very good start to the week.✨
Good afternoon, friends! I hope you are having a great week. This time I am sharing with you the step-by-step instructions for making a nice decoration for the door handle. This type of decoration is perfect for giving a touch of color and life to doors, of course, in this case specifically to the doors of the little ones' rooms.
The first decoration I made for the door handle was inspired by the little ones, so this time I wanted to make something for the princesses at home, inspired by a marine theme, with some fish and a cute mermaid. However, you can decorate with whatever theme the little ones want or with their favorite characters.
🔸Without more to add, then I leave you with the step by step:

♥️ESPERO QUE TE GUSTE,
¡Empecemos!
♥️I HOPE YOU LIKE IT,
Let's start!

✂️ MATERIALES | ✂️ MATERIALS
- Cartulina corrugada.
- Foami escarchado rosa y rojo.
- Foami rojo, amarillo, rosa,
crema y azul. - Marcadores.
- Pinturas.
- Hoja blanca.
- Pegamento.
- Tijeras.
- Regla.
- Lápiz.
- Corrugated cardboard.
- Pink and red frosted foam.
- Foami red, yellow, pink,
cream and blue. - Markers.
- Paintings.
- White sheet.
- Glue.
- Scissors.
- Ruler.
- Pencil.
🌟 PROCEDIMIENTO | 🌟 PROCESS
- PASO 1:
Lo primero que hice fue tomar las medidas en cartulina corrugada para la base de esta decoración. En este caso, las medidas fueron de 9 cm de ancho y 19 cm de largo. En cuanto al círculo donde irá colgado, depende mucho del tamaño de la manilla que tengan, pues puede ser mucho más pequeño o más grande, pero en mi caso es una circunferencia de 5 cm. Al tener todas las medidas, recorté, di dos capas de pintura color azul y al estar seco, di detalles como de olas con pintura blanca.
- STEP 1:
The first thing I did was take measurements on corrugated cardboard for the base of this decoration. In this case, the measurements were 9 cm wide and 19 cm long. As for the circle where it will be hung, it depends a lot on the size of the handle you have, as it can be much smaller or larger, but in my case it is a 5 cm circle. Once I had all the measurements, I cut it out, applied two coats of blue paint and when it was dry, I added wave-like details with white paint.


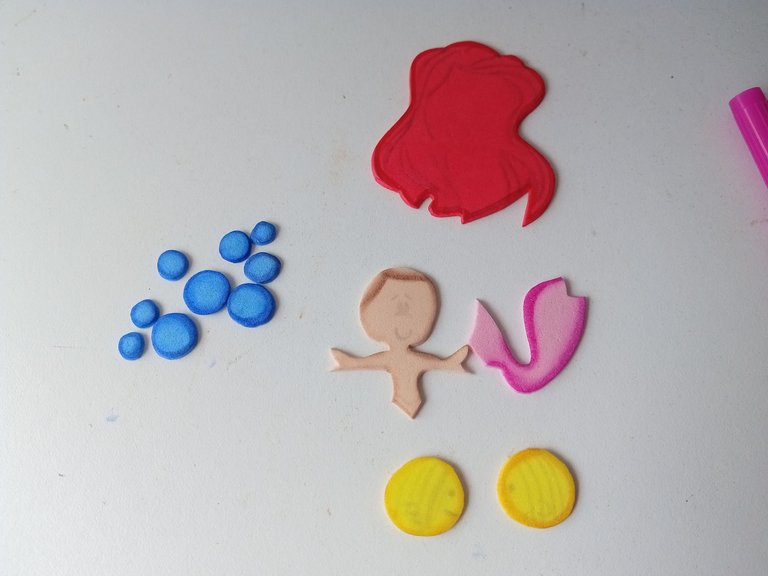
- PASO 2:
Posteriormente, dibujé los patrones con todas las decoraciones y personajes que iba a estar utilizando en una hoja blanca y luego, lo transferí a los colores correspondientes de foami como explico a continuación:
*Para la sirena; Cabeza y cuerpo en foami crema, cabello en foami rojo, cola y parte superior en foami escarchado rosa y foami rosa.
*Para los peces; cuerpo en foami amarillo, cola y cresta en foami escarchado rojo.
*Para las burbujas; foami azul.
- STEP 2:
Subsequently, I drew the patterns with all the decorations and characters that I was going to be using on a white sheet and then transferred them to the corresponding colors of foam as I explain below:
*For the mermaid; Head and body in cream foami, hair in red foami, tail and top in frosty pink foami and pink foami.
*For fish; body in yellow foam, tail and crest in frosty red foam.
*For bubbles; blue foam


- PASO 3:
Al tener todas las piezas recortadas, comencé a dar color a los bordes de cada una de las piezas, utilizando un color más oscuro de pintura. Luego, dibujé ojos y boca con marcador negro, igualmente a la cola, cabello y líneas en color naranja para al cuerpo del pez.
- STEP 3:
Having all the pieces cut out, I began to color the edges of each of the pieces, using a darker color of paint. Then, I drew eyes and mouth with black marker, as well as the tail, hair, and orange lines for the body of the fish.

- PASO 4:
Al tener todas las piezas secas, pegué la figura de la sirena, comenzando por el cabello, el cuerpo y después, la cola. Seguidamente, pegué la cola y cresta a los peces. Finalmente, los pegué a la base en el orden deseado, primero la sirena, luego los peces y posteriormente, las burbujas. Por último, di puntos de luz al cabello de la sirena, cola de los peces y a todas las burbujas.
- STEP 4:
Having all the pieces dry, I glued the mermaid figure, starting with the hair, the body and then the tail. Next, I glued the tail and crest to the fish. Finally, I glued them to the base in the desired order, first the mermaid, then the fish, and then the bubbles. Finally, I gave highlights to the mermaid's hair, the fish's tail and all the bubbles.


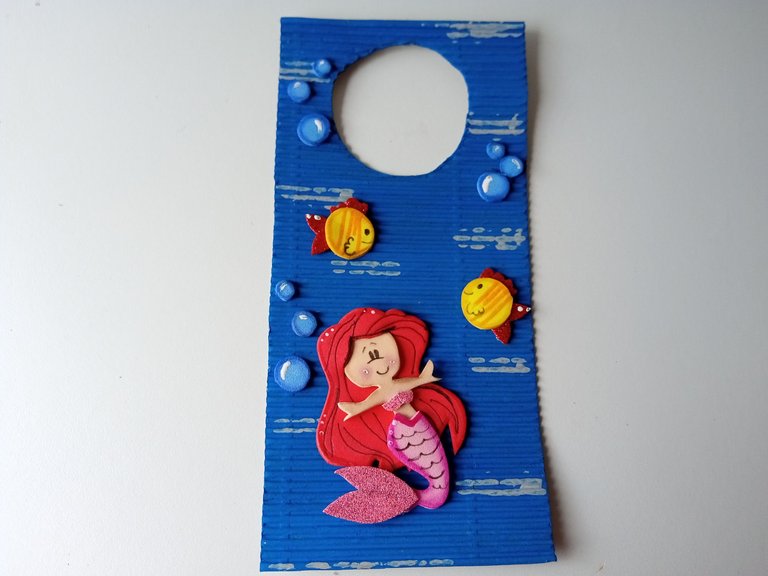
✨¡And ready!✨ This is how you can create a beautiful and simple idea to decorate your doors using this theme, or the theme you want for any room. I hope you liked the tutorial and are encouraged to make it.
❤️Until the next post.
✨RESULTADO: | ✨RESULT:


Todas las fotografías son de mi propiedad.
Separador y Fotos editadas en Canva
All photographs are my property.
Photos edited in Canva
Una hermosa decoración, los colores súper acertado y amo lo pink de esa sirena🩷🩷🩷🥹
Cómo siempre haciendo bellezas mi amiga🩷🩷
Que hermoso te quedó mi Valen, me parece precioso para decorar las puertas 💕
Gracias mi Vane bella!! Sí, para la habitación de los pequeñitos.✨❤️
Bello, excelente idea!
Muchas gracias amiga ✨
Congratulations, your post has been curated by @dsc-r2cornell. You can use the tag #R2cornell. Also, find us on Discord
Felicitaciones, su publicación ha sido votada por @ dsc-r2cornell. Puedes usar el tag #R2cornell. También, nos puedes encontrar en Discord
Gracias por el apoyo amigos.❤️
Esta muy hermosa ideal para la puerta de mis sobrinas, gracias por compartir
Muchas gracias! Espero que te animes a elaborarla para tus sobrinitas ✨💕
Congratulations @valenpba! You have completed the following achievement on the Hive blockchain And have been rewarded with New badge(s)
Your next target is to reach 9000 replies.
You can view your badges on your board and compare yourself to others in the Ranking
If you no longer want to receive notifications, reply to this comment with the word
STOPCheck out our last posts:
Este tutorial me parece una idea súper creativa y divertida. La temática marina con la sirena y los peces es encantadora, ¡seguro que a las pequeñas de la casa les encantará! Muy lindo!
Muchas gracias amigo! Sí, pienso que para la habitación de los pequeños es una buena idea 🤭. Muchas gracias por el apoyo.✨
Amigaa que linda ese sirenita! te quedo preciosa esa decoración! 😍
Muchas gracias amiga ✨💕
Que precioso adorno para la puerta ami,tu si que te destacas haciendo este tipo de cositas, sobretodo los muñequitos, la sirena te quedó muy linda 😍
Muchas gracias mi Mary bella! Poco a poco he ido mejorando jaja ❤️
Súper linda para la habitación de las nenas ami, me encantó
Muchas gracias mi rosita linda 💕