¡Sweet smile!
My first experience in the art world/ Mi primera experiencia en el mundo del arte
.jpg)

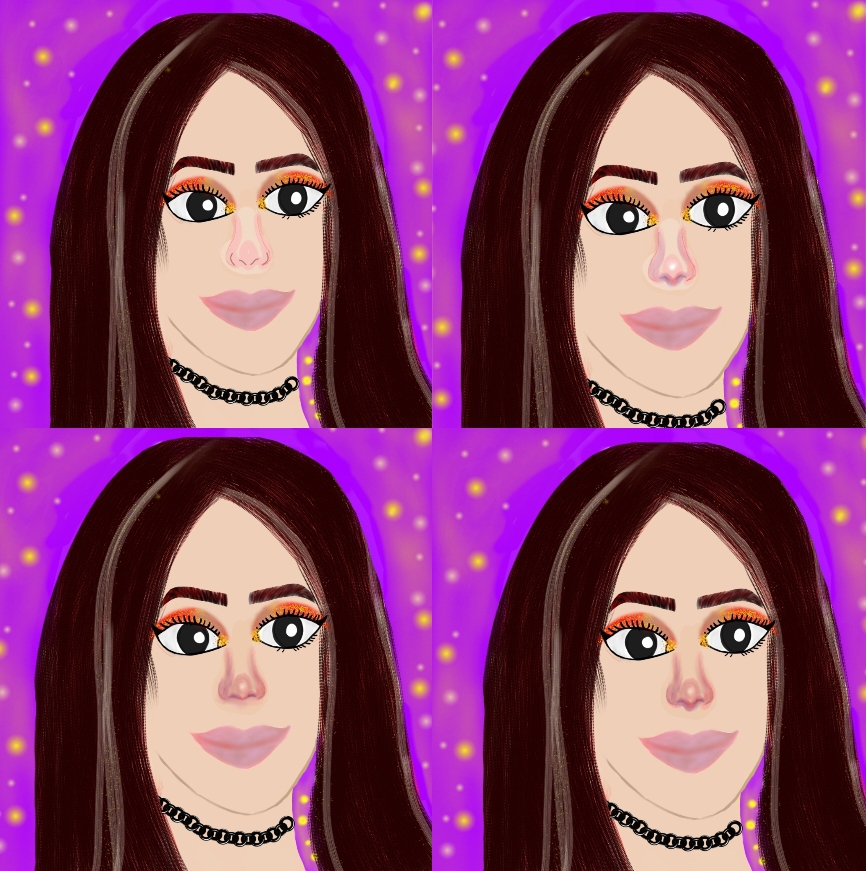
Hello friends I am pleased to greet you, I hope you are very well and have had a day provechoso❤️ This time I come to show you my first drawing made for you, at first I did not know what to draw, after much thought I decided on this girl's face, I was very eager to upload it and share it here, I hope you like it because it is my first time drawing in digital.
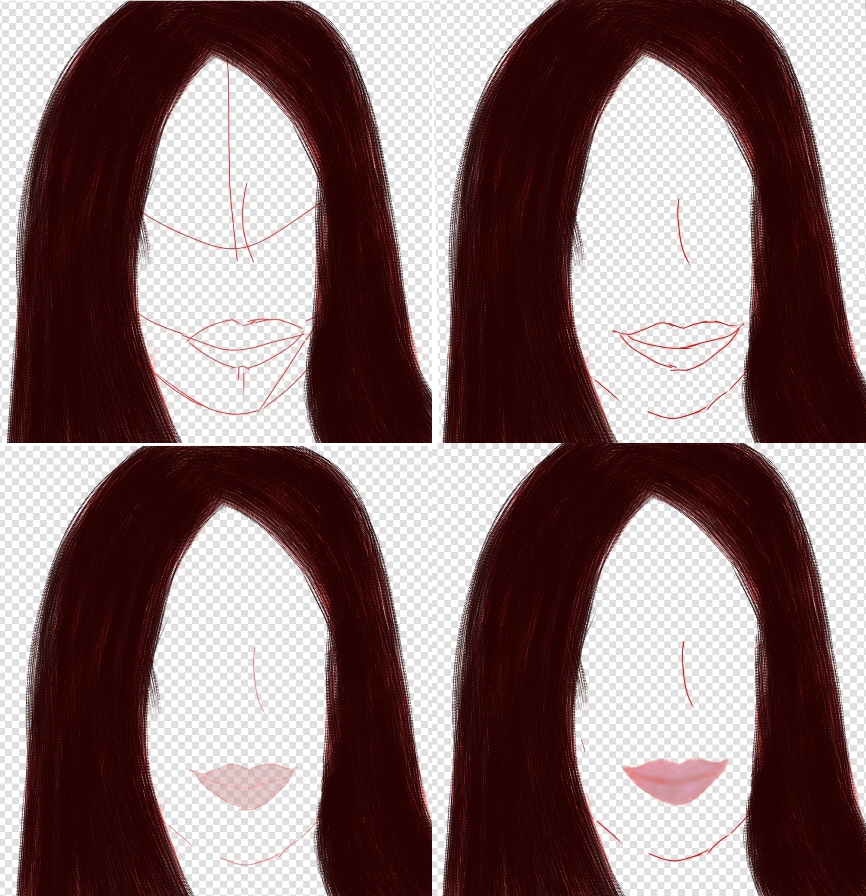
The truth is that in this drawing I started doing the hair, I found a pencil called round fan brush (it's worth mentioning that the application I'm using is Ibis Paint X) and I wanted to try how it would look, I was so excited that I forgot to take the first capture of the hair process, but I started first drawing the hair with a red color and over this I applied with the same brush the black color to create this tonality.
Then I began to make guide lines on the face that would serve me to draw the eyes, nose and mouth. I started by defining the mouth, with the lasso tool I modified it a little and gave it the shape of a smile, with the blurred brush I colored it with a light pink and then with a darker pink and the normal airbrush I began to blur, with the soft pencil and an intense red with opasity in the middle I outlined the lips and with the finger tool I blurred it so that it would look a more uniform tone.
Hola amigos me complace saludarlos, espero se encuentren muy bien y hayan tenido un día provechoso❤️ En esta oportunidad vengo a mostrarles mi primer dibujo realizado para ustedes, al principio no sabía que dibujar, después de tanto pensar me decidí por este rostro de chica, estaba muy ansiosa de subirlo y compartirlo acá, espero y les guste ya que es mi primera vez dibujando en digital.
La verdad es que en este dibujo comencé haciendo el cabello, encontré un lápiz que se llama pincel redondo de abanico (cabe destacar que la aplicación que estoy usando es Ibis Paint X) y quería probar como se vería, estaba tan emocionada que olvidé tomar el primer capture de el proceso del cabello, pero comenze primero dibujando el cabello con un color rojo y sobre este aplique con el mismo pincel el color negro para así crear está tonalidad.
Luego comencé a realizar líneas guía en el rostro que me servirían para dibujar los ojos, naríz y boca. Empeze por definir la boca, con la herramienta del lazo la modifique un poco y le di la forma de sonrisa, con el pincel difuminado la coloree de un rosa claro y luego con un rosa más oscuro y el aerógrafo normal comencé a difuminar, con el lápiz suave y un rojo intenso con opasidad a la mitad delinee los labios y con la herramienta del dedo difumine para que se viera un tono más uniforme.
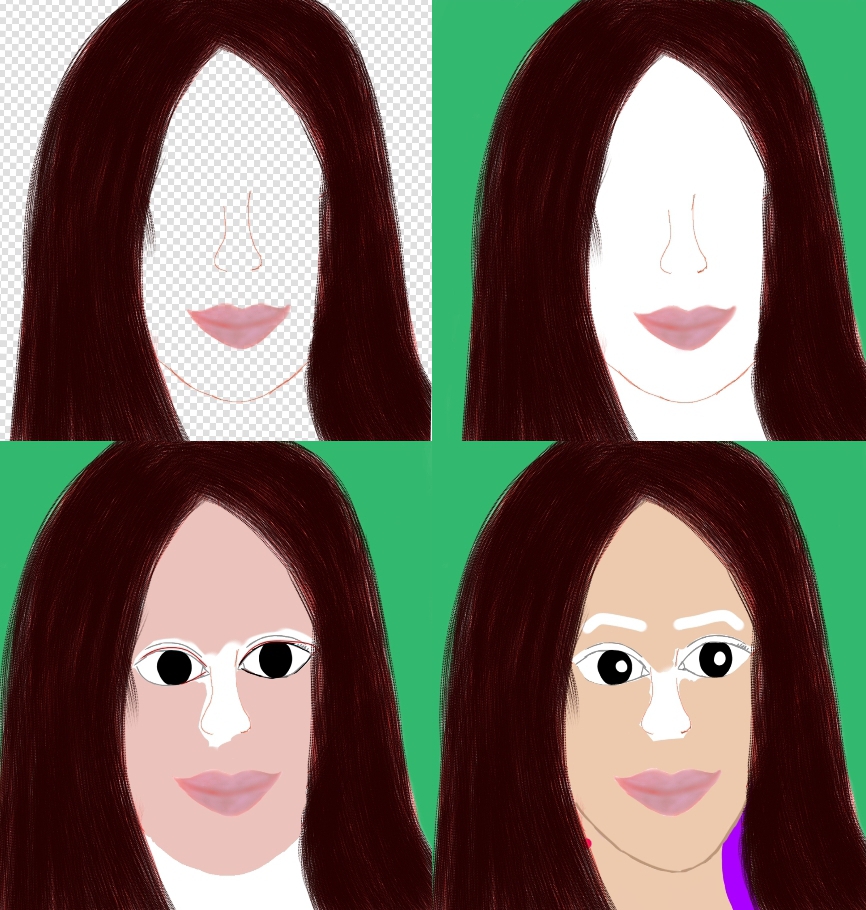
Then I started with the nose, the truth is that I didn't know how to do it, and I just drew a small sketch to guide me later. I focused on the eyes, I made an almond shape and added the eyelids, I drew the iris in black color and I put glitter on both of them and the eyebrows I just drew the eraser over the color of the skin and then I made them.
Después comencé con la nariz, la verdad es que no sabía cómo hacerla, y solo dibuje un pequeño boceto para guiarme luego. Me centre en los ojos, realice una forma almendrada y le agregue los párpados, dibuje el iris en color negro y les coloqué brillo a ambos y las cejas solo pase el borrador sobre el color de la piel para luego hacerlas.
I wanted to do a flashy makeup, I started applying light brown color from the tear to the middle of the eyelid, right in the middle I applied a yellow and finished with an orange tone the rest of the eyelid, then with the finger tool I blurred it and with the glitter brush I added glitter to the eyelid and the tear to make it look more striking, as well as a cat eye eyeliner and a few eyelashes. I used the thick oil brush and a black color, I started tracing the shape of the eyebrow and then I cleaned them with the eraser, I changed to a red color and did the same to achieve the same effect of the hair.
Quise hacerle un maquillaje llamativo, empecé aplicando color marrón claro desde el lagrimal hasta el medio del parpado, justo en el medio aplique un amarillo y finalice con un tono naranja el resto del párpado, luego con la herramienta del dedo lo difumine y con el pincel de purpurina le añadí brillos al parpado y al lagrimal para que se viera más llamativo, al igual que un delineado ojo de gato y unas cuantas pestañas. Pase a dibujar las cejas, utilice el pincel de oleo grueso y un color negro, empecé a trazar la forma de la ceja y luego las limpié con el borrador, cambie a un color rojo e hice lo mismo para lograr un poco el mismo efecto del cabello.
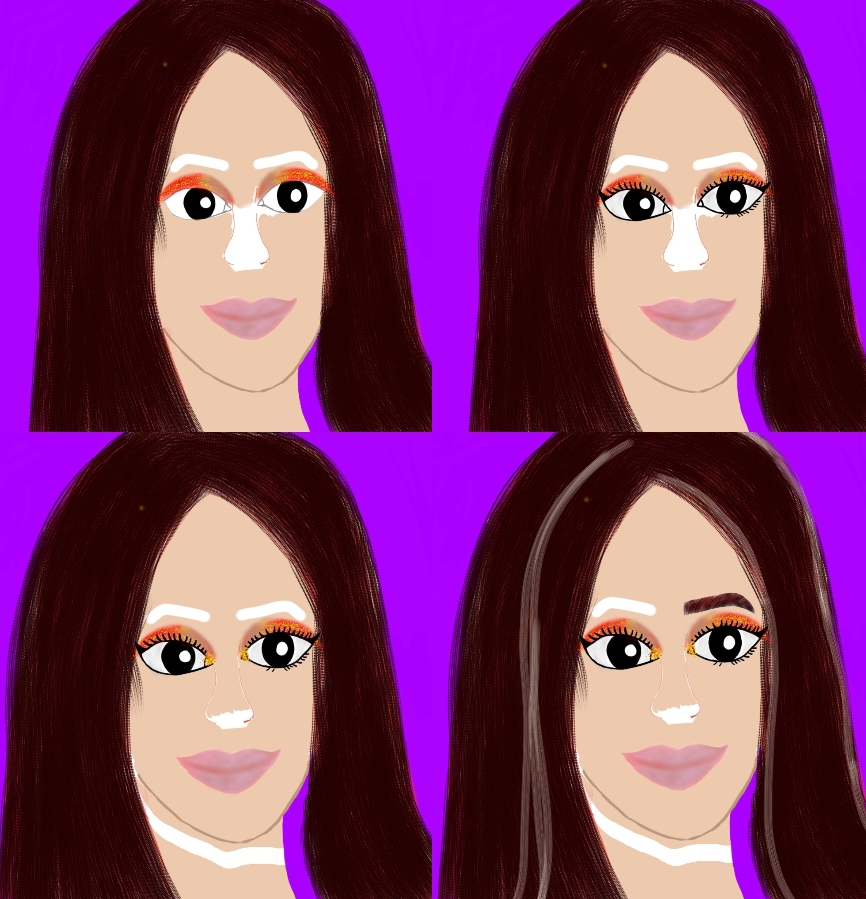
From one moment to another the ideas came to my head and I focused on the background, at first I wanted it in green, but then I realized that a purple tone would give life to the girl's face, with the airbrush and a yellow color I went over the purple color and achieved that effect of light, I also added the glitter to make it look more striking. In the neck I wanted to add an ornament, so with a chain brush I drew one and the truth is that I really liked the result. I added some white highlights to the hair to highlight it a little bit. Again I took the nose, gave it shape and added the skin color.
De un momento a otro las ideas venían llegando a mi cabeza y me enfoque en el fondo, al principio lo quería de verde, pero ya después me di cuenta que un tono morado le daria vida al rostro de la chica, con el aerógrafo y un color amarillo pase por encima del color morado y logré ese efecto de luz, igualmente le agregue los brillos para que se viera más llamativo. En el cuello queria agregarle un adorno, así que con un pincel de cadena le dibuje una y la verdad es que me gusto mucho el resultado. Le coloque unos reflejos en tonalidad blanca al cabello para resaltarlo un poco. Nuevamente retome la nariz, le di forma y le agregue el color piel.
In a new layer I started to highlight the contour, the tip and the holes with a blurred pencil and a light reddish color leaving a small white space that would be the tip, then I changed to a slightly dark blue color and highlighted the same areas so that they were blending, accentuate a little more the holes of the nose and the corners with a soft pencil and a light brown color, finally with the finger tool I started to mix the colors until I got the texture I was looking for.
En una nueva capa comencé a remarcar el contorno, la punta y los orificios con un lápiz difuminado y un color rojiso claro dejando un pequeño espacio en blanco que seria la punta, luego cambie a un color azul un poco oscuro y remarque las mismas zonas para que se fueran mezclando, acentúe un poco más los orificios de la nariz y las esquinas con un lápiz suave y un color marrón claro, por último con la herramienta del dedo empecé a mezclar los colores hasta obtener la textura que estaba deseando.
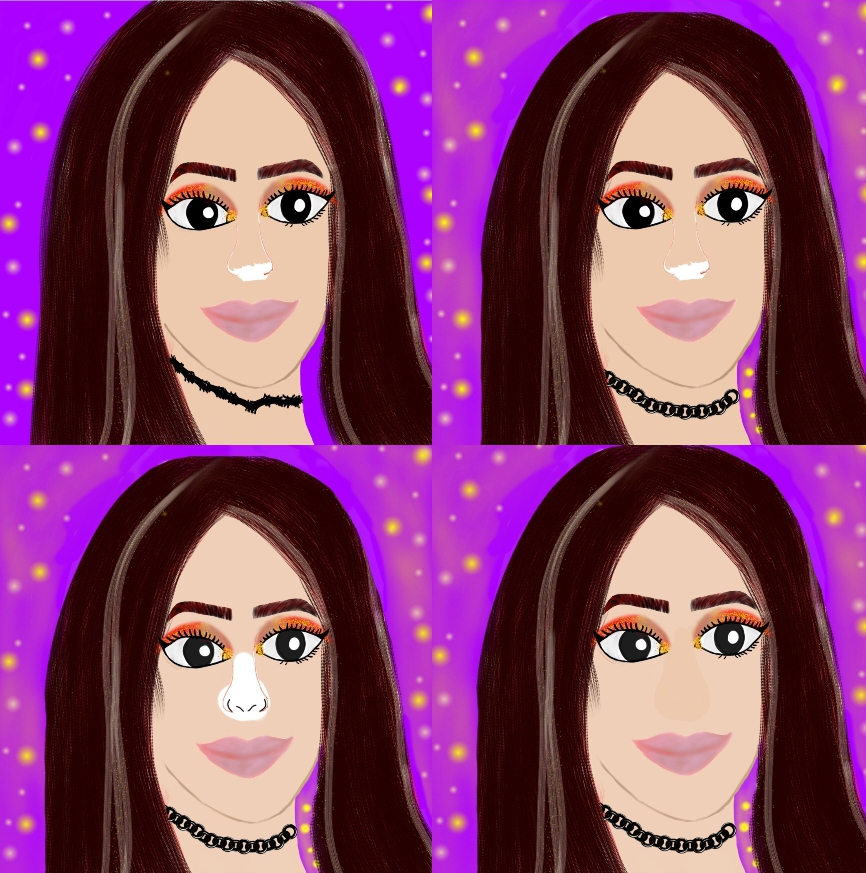
I focused on the skin, with the airbrush and a pink tone I started to mark the shadows under the neck, on the forehead under the hair, on the left side of the face because the light comes from the right side, under the lips and under the nose, I highlighted the same areas with a dark blue color to blend them and with the finger tool I blurred them to obtain a uniform tone.
To finish I looked at the face and there was something that didn't convince me yet and it was her eyes, I decided to change them from scratch, luckily each part of the drawing is layered and this way I can modify them comfortably. I erased all the inside part of the eye and I looked in the color palette for a white color with a hint of red and I applied it, then with a gray tone and the dotted water brush I started to define the edges and a little towards the center, with the circular ruler I drew the iris and painted it in dark brown, with a blurred brush I painted the bottom part of the iris in a light brown tone and in the center a black tone, I blurred a little with the finger tool to make it look more neutral everything. With the real flat pencil and a white tone I started to draw the lines of the iris to make it look a little more real, then I repeated the procedure but with a black tone to create the contrast. With the dotted water brush I added the sparkles of the eye, finally with the thick oil brush I finished drawing her eyelashes.
Me centre en la piel, con el aerógrafo y un Tono rosa empecé a marcar las sombras debajo del cuello, en la frente por debajo del cabello, en el lado izquierdo del rostro porque la luz viene del lado derecho, debajo de los labios y bajo la nariz, remarque las mismas zonas con un color azul oscuro para mezclarlos y con la herramienta del dedo difumine para obtener una tonalidad uniforme.
Para finalizar observé bien el rostro y había algo que no me convencia aún y eran sus ojos, decidí cambiarlos desde cero, por suerte cada parte del dibujo está por capas y de está manera puedo modificar con comodidad. Borre toda la parte de a dentro del ojo y busqué en la paleta de colores un color blanco con una menudencia de rojo y lo aplique, luego con un tono gris y el pincel agua punto empecé a definir los bordes y un poco hacia el centro, con la regla circular dibuje el iris y lo pinte de marrón oscuro, con un pincel difuminado pinte la parte de abajo del iris de un tono marrón claro y en el centro un tono negro, difumine un poco con la herramienta del dedo para que se viera más neutro todo. Con el lápiz plano real y una tonalidad blanca comencé a dibujar las líneas del iris para que se viera un poco más real, luego repeti el procedimiento pero con un un tono negro para crear el contraste. Con el pincel agua punto agregue los brillos del ojo, por último con el pincel óleo grueso termine de dibujar sus pestañas.
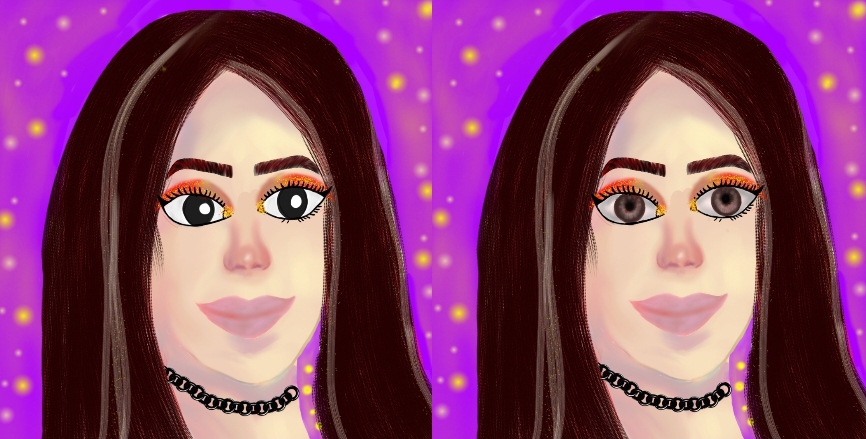
With this I finished my drawing, the truth is that I really enjoyed the experience and I hope to continue sharing more of this content with you.
Con esto di por terminado mi dibujo, la verdad es que me disfrute mucho la experiencia y espero poder seguir compartiendo mas este contenido con ustedes.
]
With love, Rosangel ❤️
Con cariño, Rosangel ❤️

Keep up the good work. 👏
Recognized by Mystic artist Gudasol
You are loved.
Interested to to help music map cXc.world spread more good vibes on Hive?.