How to disassemble a computer's processor fan and heatsink (esp-eng)
Saludos para todos los miembros de la comunidad Hive Diy.
En esta oportunidad no traeré un tutorial de reparaciones, pero aún así, no dejará de ser interesante. Lo digo porque se trata sobre la limpieza adecuado de un fan cooler que traen ciertos ordenadores, sobre todo equipos de la marca Vit que otorgó el gobierno Venezolano.
Greetings to all members of the Hive Diy community.
This time I will not bring a repair tutorial, but still, it will not cease to be interesting. I say this because it is about the proper cleaning of a fan cooler that come with certain computers, especially equipment of the Vit brand that gave the Venezuelan government.
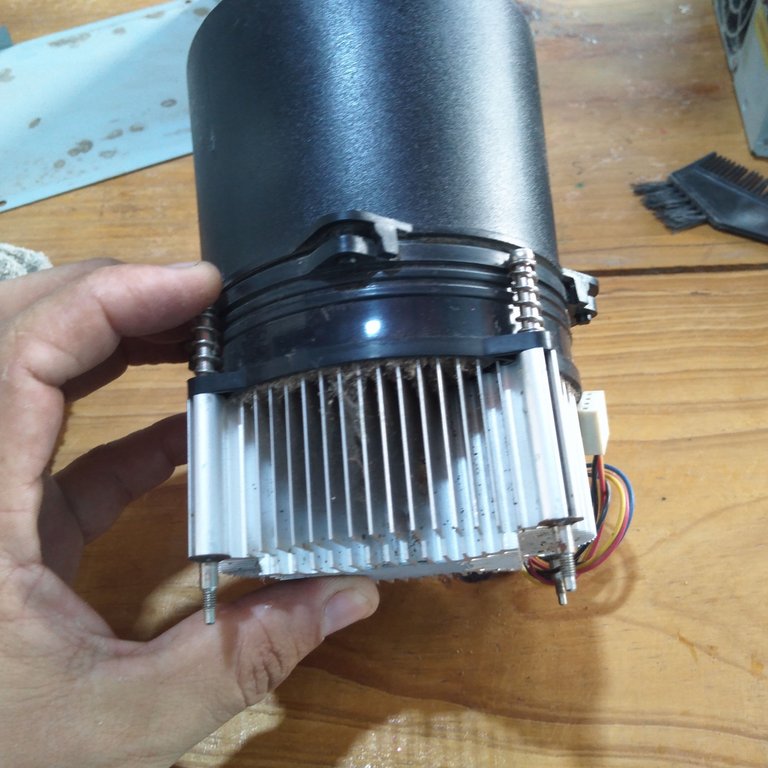
Sucede que este tipo de fan cooler viene unido al disipador de calor en una forma bastante difícil de separar y está incomodidad o imposibilidad hace que no podamos realizar una buena limpieza al ventilador encargado de enfriar el procesador.
Cuando las personas que no tienen experiencia con el mantenimiento profundo de un equipo de computación se disponen a hacer una limpieza interna a su ordenador, pueden limpiar todo y por no saber cómo desarmar el ventilador, terminan dejándolo así y el polvo se acumula de tal manera que llega a obstruir todo el flujo de aire.
Así que les enseñare como se hace.
Primero debemos separar con cuidado los seguros del cilindro plástico que se une a la carcasa del ventilador.
It happens that this type of fan cooler is attached to the heat sink in a way that is quite difficult to separate and this inconvenience or impossibility makes it impossible to perform a good cleaning of the fan responsible for cooling the processor.
When people who do not have experience with the deep maintenance of a computer equipment get ready to do an internal cleaning to their computer, they can clean everything and for not knowing how to disassemble the fan, they end up leaving it like that and the dust accumulates in such a way that it comes to obstruct the entire air flow.
So I will show you how to do it.
First we must carefully separate the locks from the plastic cylinder that attaches to the fan housing.
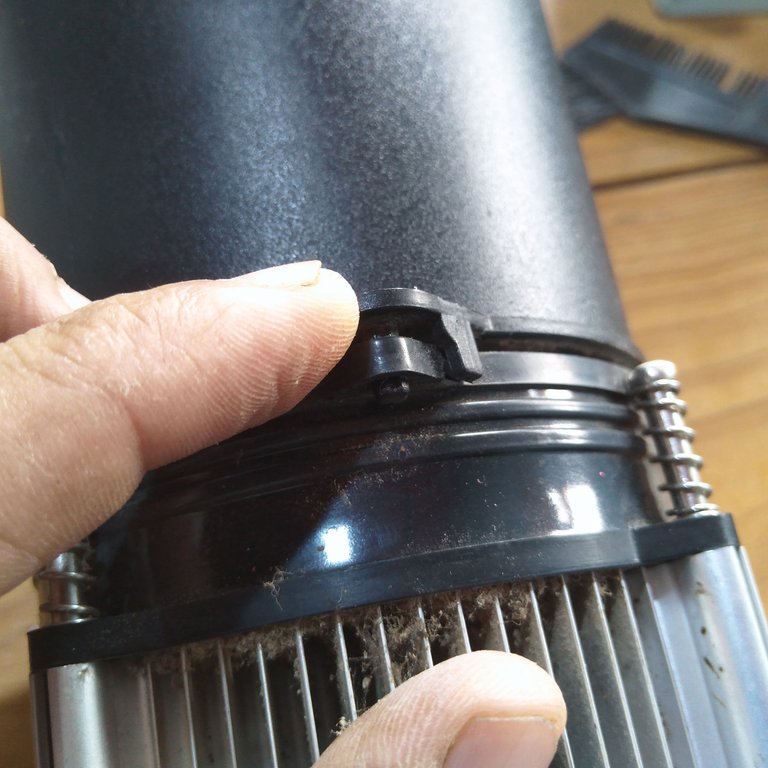
Este trabajo es uno de los más sencillos, pero de cuidado, ya que si hacemos mucha fuerza podemos romper los seguros y luego tendríamos un problema adicional.
Una vez separamos el cilindro del ventilador volteamos la pieza y veremos los tornillos que se anclan en la base de la tarjeta madre.
Allí veremos 4 arandelas de presión, sirven para mantener la tensión en los resortes y así unir firmemente el Disipador con el procesador para poder ser más eficiente.
Para sacar las arandelas debes ayudarte con un destornillador de pala para doblar un poco las clavijas. Esto se debe hacer presionando el tornillo para poder manipular la arandela.
This is one of the easiest jobs, but it is important to be careful, because if we use too much force we can break the locks and then we would have an additional problem.
Once we separate the cylinder from the fan we turn the piece over and we will see the screws that are anchored to the base of the motherboard.
There we will see 4 pressure washers, they serve to maintain the tension in the springs and thus firmly join the Heatsink with the processor in order to be more efficient.
To remove the washers you must help you with a spade screwdriver to bend the pins a little. This should be done by pressing on the screw to manipulate the washer.
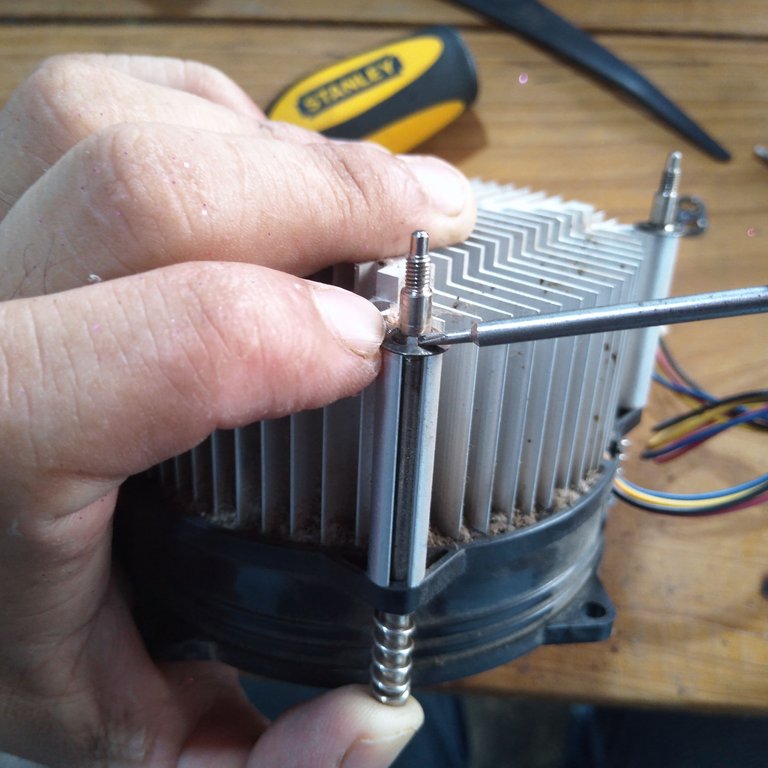
Esta operación se debe hacer en cada uno de los tornillos hasta liberar el disipador del ventilador.
Una vez hecho esto veremos el estado de suciedad en el que se encuentra está pieza tan importante para un ordenador.
En este caso el disipador estaba totalmente tapado, por consiguiente el procesador se calentaba demasiado y todo el sistema empezaba a colapsar, disminuyendo su eficiencia, incluso, apagándose para protegerse.
This operation must be done in each one of the screws until releasing the heatsink of the fan.
Once this is done we will see the state of dirt in which is located this important piece for a computer.
In this case the heatsink was totally covered, therefore the processor was getting too hot and the whole system started to collapse, decreasing its efficiency, even shutting down to protect itself.
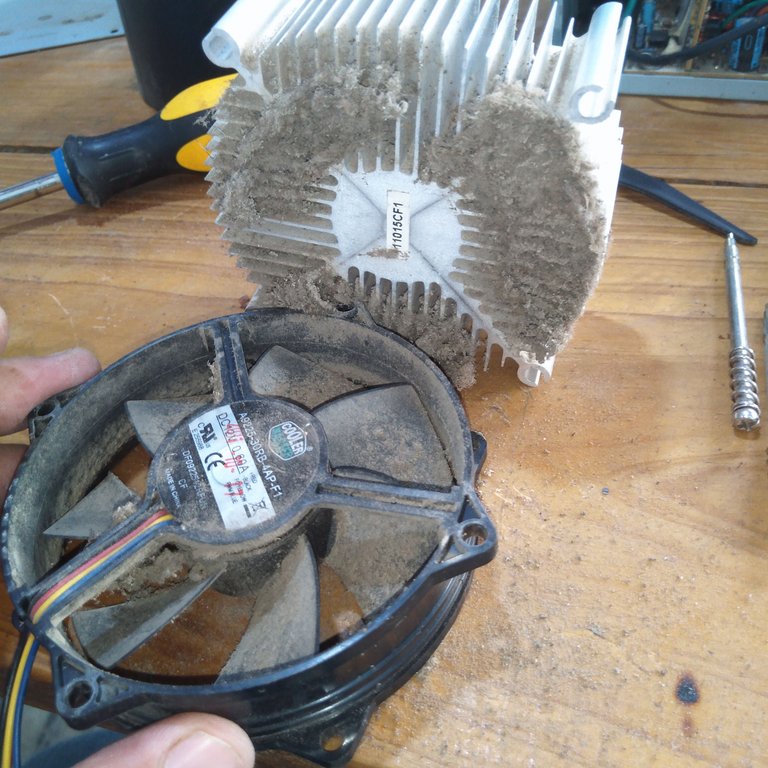
Para limpiar el disipador podemos usar agua y un cepillo y para limpiar el ventilador solo usamos cepillo, brocha y un paño húmedo.
De esta forma evitamos que entre agua en el circuito.
Limpiamos bien y luego volvemos a colocar los tornillos, el resorte y las arandelas.
To clean the heatsink we can use water and a brush and to clean the fan we only use a brush, a brush and a damp cloth.
This way we avoid water getting into the circuit.
Clean well and then replace the screws, spring and washers.
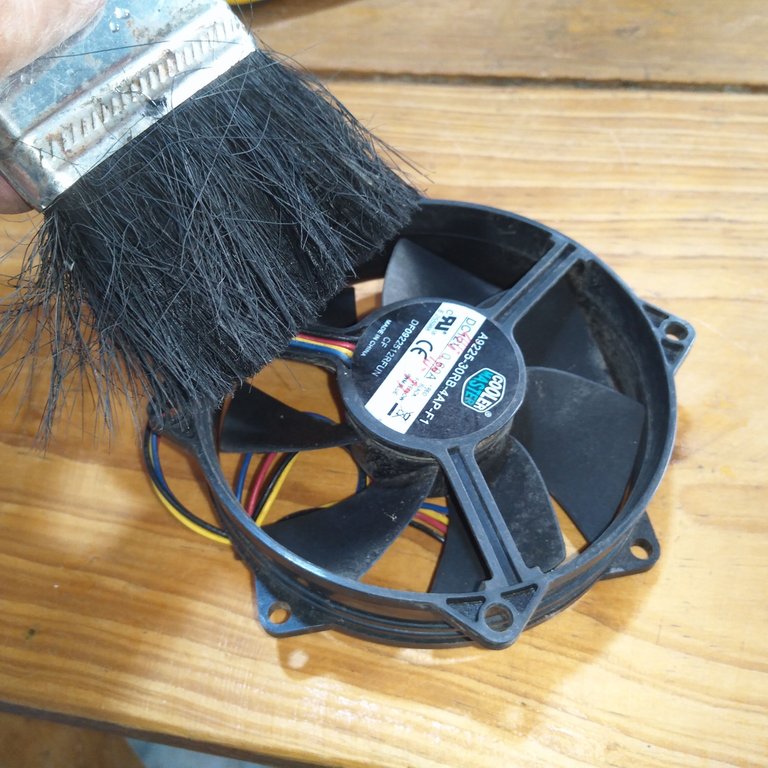
Colocar nuevamente las piezas en su lugar termin siendo más fácil que retirarlas y esto se debe a que ya sabemos cómo manipular cada pieza.
Un vez todo está en su lugar y todo está limpio, el fan cooler luce mucho mejor que antes y seguro que funcionara con eficiencia.
Putting the parts back in place ends up being easier than removing them and this is because we already know how to handle each part.
Once everything is in place and everything is clean, the fan cooler looks much better than before and is sure to work efficiently.
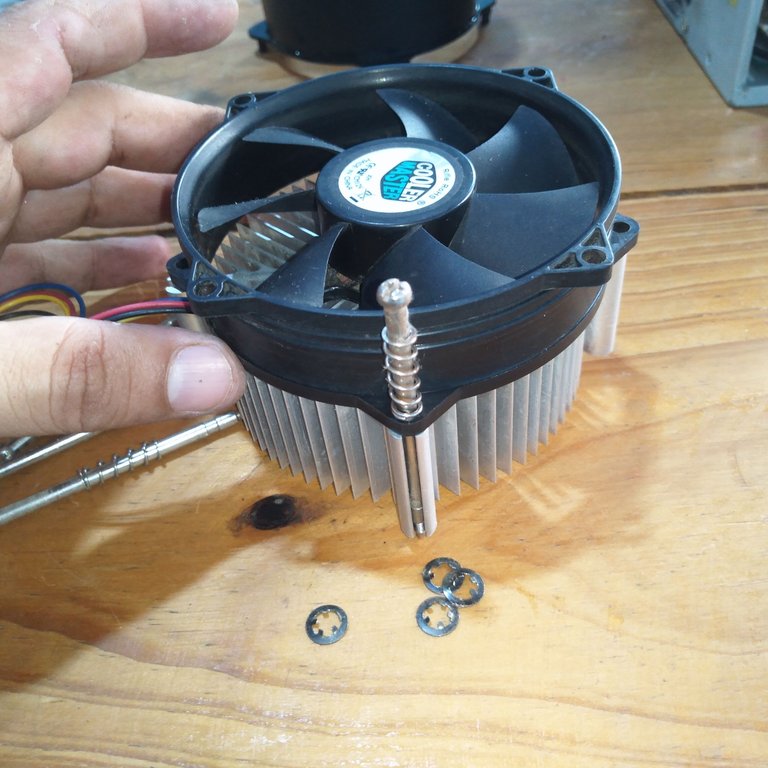
Ahora estaremos seguro de colocarlo en su lugar y hacer una limpieza total de nuestro ordenador.
A partir de ahora pueden seguir este paso a paso para no dejar por fuera la limpieza del ventilador.
Now we will be sure to put it in place and make a total cleaning of our computer.
From now on you can follow this step by step in order not to leave out the fan cleaning.
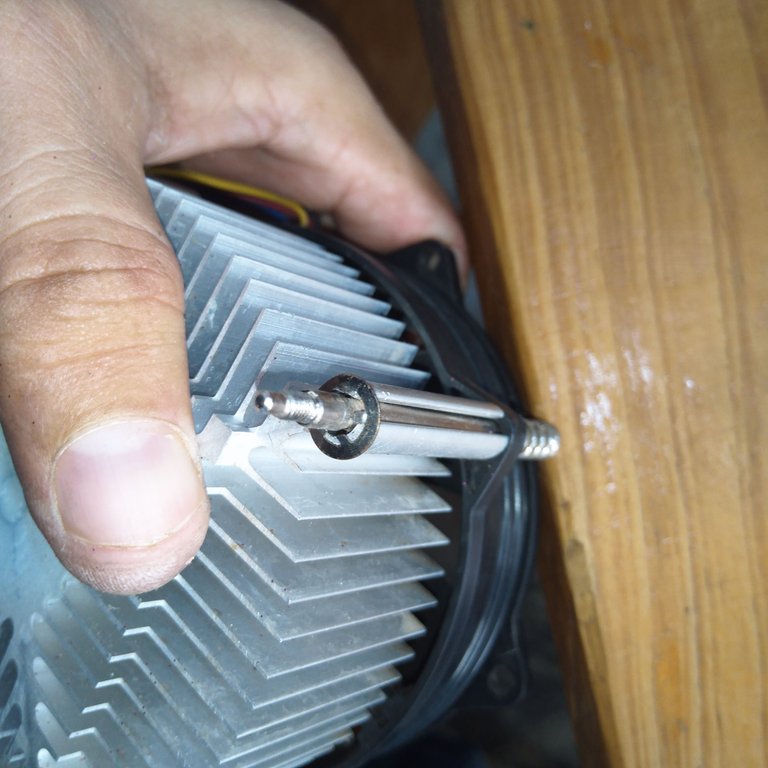
A veces al ver la dificultad en algo, no nos atrevemos a buscar la solución, simplemente lo opitimos y ya.
Y resulta que si usted tiene un ventilador en este estado, y solo coloca pasta térmica en el procesador npensando que con eso puede resolver el problema, dejé decirle que no es así, porque la pasta térmica solo es una aditivo para ayudar a disipar más calor, pero el ventilador es el que hace el mayor trabajo.
Gracias por su atención. Espero que esté artículo le sirva de orientación a otros compañeros.
Sometimes when we see the difficulty in something, we do not dare to look for the solution, we just think about it and that's it.
And it turns out that if you have a fan in this state, and you just put thermal paste on the processor thinking that with that you can solve the problem, let me tell you that it is not so, because the thermal paste is only an additive to help dissipate more heat, but the fan is the one that does the most work.
Thank you for your attention. I hope this article will be of guidance to other colleagues.
Todas las fotografías fueron tomadas con mí Smartphone Huawei Dub-Al00.

¡Felicidades! Esta publicación obtuvo upvote y fue compartido por @la-colmena, un proyecto de Curación Manual para la comunidad hispana de Hive que cuenta con el respaldo de @curie.
Si te gusta el trabajo que hacemos, te invitamos a darle tu voto a este comentario y a votar como testigo por La Colmena.
Si quieres saber más sobre nuestro proyecto, te invitamos a acompañarnos en nuestro servidor de Discord.
Excelente trabajo hermano. La verdad ese fan cooler estaba bastante sucio, no me sorprende que colapsara el ordenador por alta temperatura, suerte que hiciste el mantenimiento a tiempo. Saludos
A veces se encuentran otros en peores condiciones amigo, las personas Durán muchos años sin ver dentro los ordenadores, solo buscan hacerle mantenimiento cuando los sienten pesados. Gracias por tu apoyo
Así mismo es , lamentablemente a veces es tarde para dar una solución a un problema que se pudo evitar con sus mantenimientos regulares. Saludos
Congratulations @rmm32! You have completed the following achievement on the Hive blockchain And have been rewarded with New badge(s)
Your next target is to reach 500 replies.
You can view your badges on your board and compare yourself to others in the Ranking
If you no longer want to receive notifications, reply to this comment with the word
STOPCheck out our last posts:
Creo que necesitaba una buena limpieza🙃
Jaja sinceramente sí!! Pobre de ella.