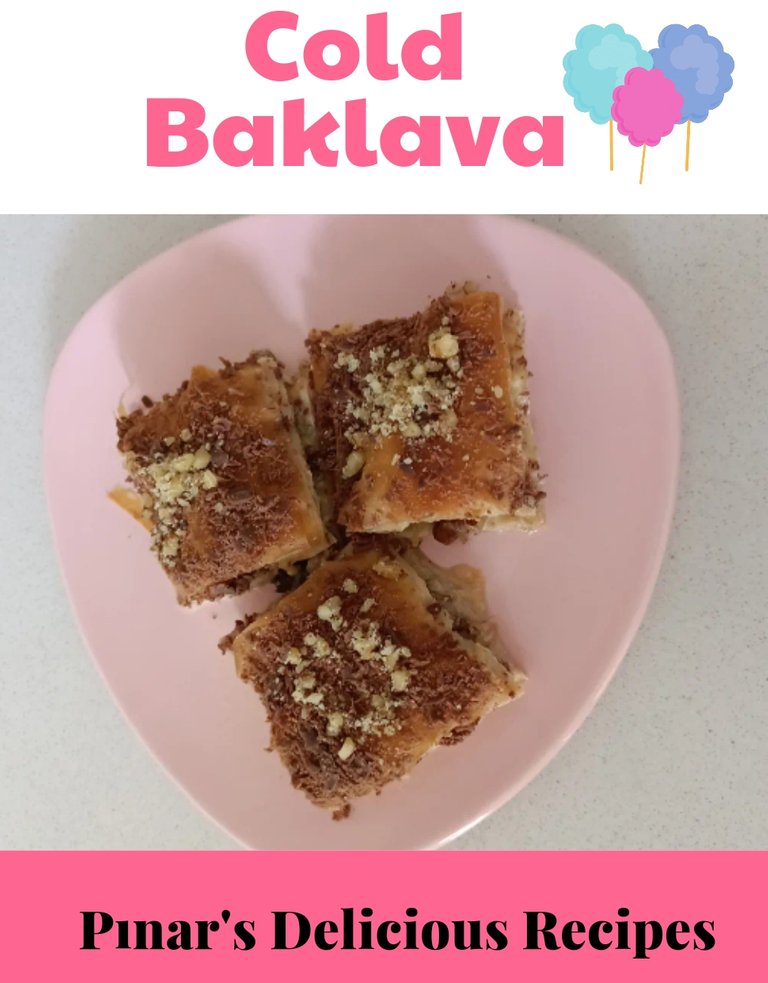
A Delicious Dessert: Cold Baklava ( ENG/ TR) 🍭
Hello everyone
Today I am here with a very delicious dessert recipe. I met this dessert last summer. I think it was one of the best desserts I've ever eaten. The name of our dessert is cold baklava.
I'm already a person who loves baklava a lot. Cold baklava is definitely a very delicious dessert.
In cold baklava, the syrup of the dessert is prepared with milk. It is a legendary flavor that can be considered both sweet with syrup and sweet with milk.
I am amazed how I have not eaten such a dessert before. In fact, I haven't seen it anywhere. My sister told me about this dessert. We both live in different cities. In fact, I live very close to Gaziantep, which is famous for its baklava. But like I said, I've never seen this dessert before.
I saw it in a dessert shop recently and bought it. I really liked its taste. I also wanted to do it myself. It was just as delicious as the one I ate at the dessert shop.
While I was preparing my dessert, I took photos of the making process one by one. In this way, I wanted to prepare a recipe post where I can tell you what I'm doing visually.
I like desserts with syrup, my wife likes desserts with milk more. This dessert was liked very much by both me and my wife. Being a dessert with milk and sherbet, it is a flavor suitable for our family.
Let's start with the recipe for our dessert.
Cold Baklava Recipe
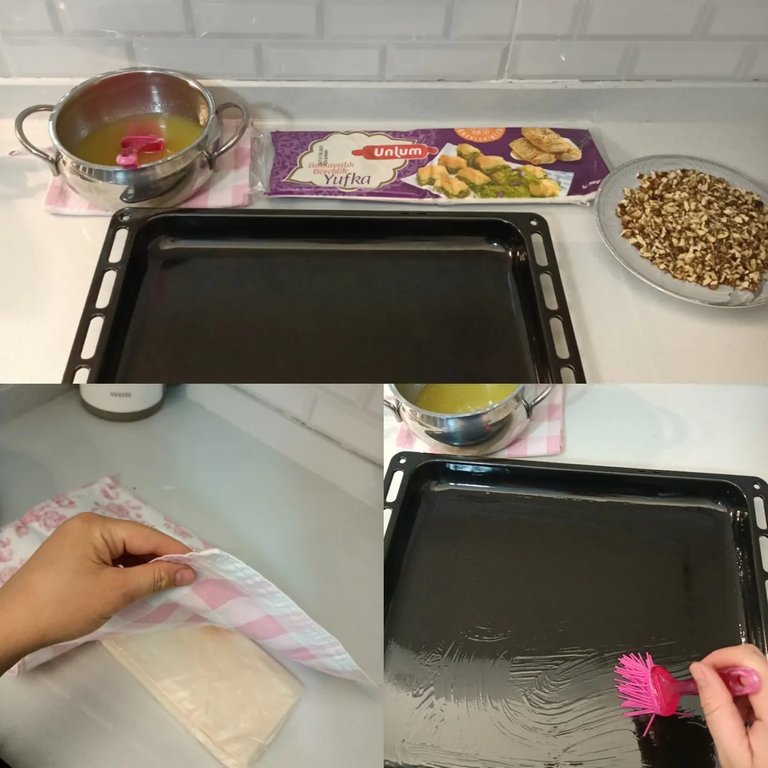
Necessary materials
- 1 pack of baklava dough
- Walnut
- Milk
- Candy
- Chocolate
- Butter
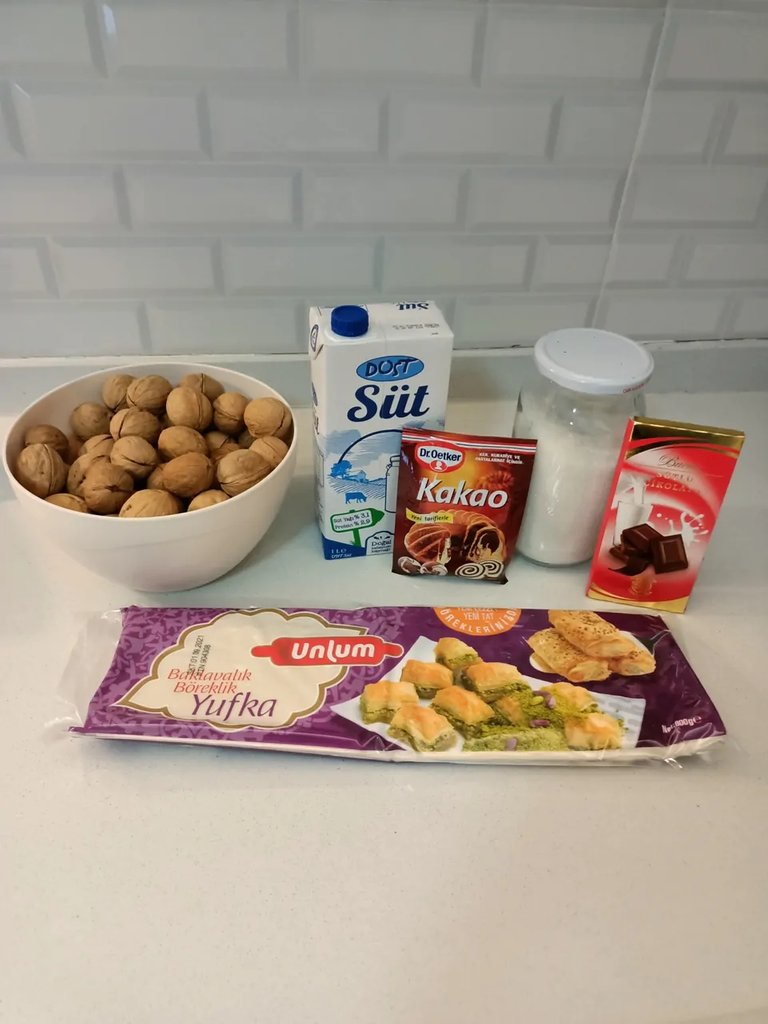
I like baklava more with walnuts, so I preferred to make cold baklava with walnuts. You can also make it with peanuts or hazelnuts if you want. The baklava that I bought ready-made was made with pistachio. Of course, there is a flavor difference between the two.
Preparation of Cold Baklava
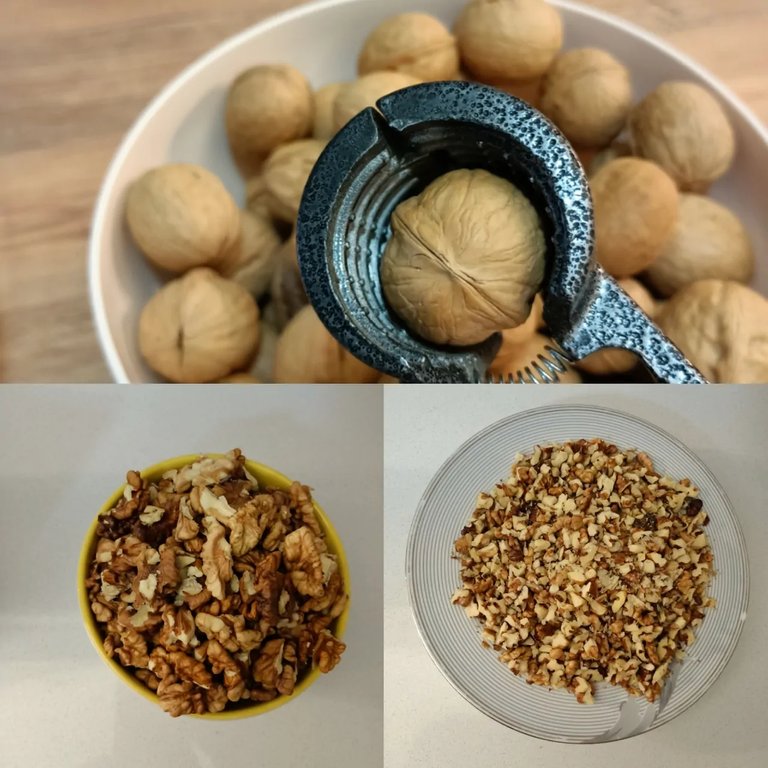
1. Stage
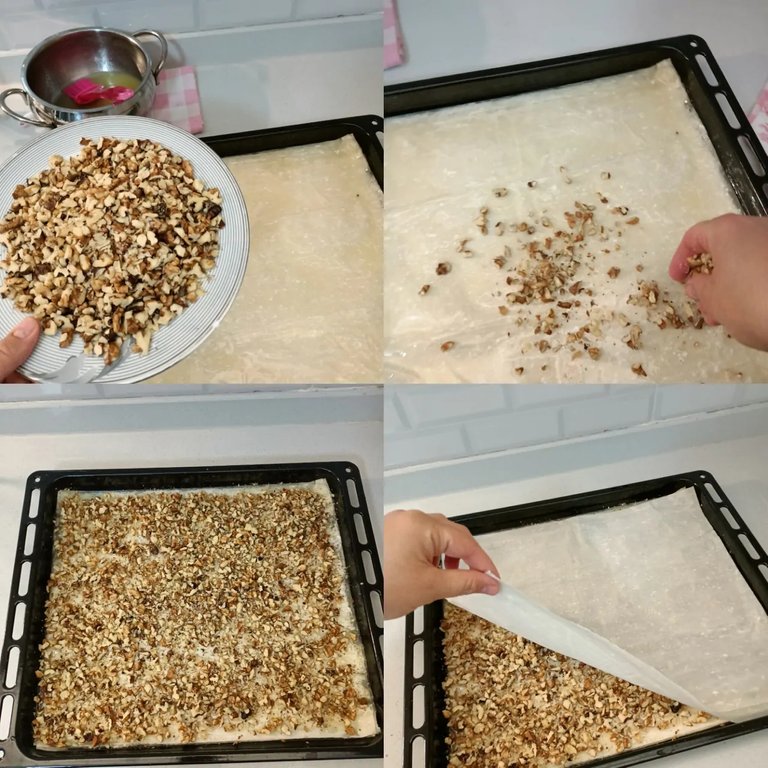
First, let's prepare our walnuts. I bought shelled walnuts. In this way, it is both more affordable and more delicious. I cracked the walnuts and cleaned them. Then I cut the walnuts into small pieces.
In this way, the inner material of our dessert is ready.
2nd. Stage
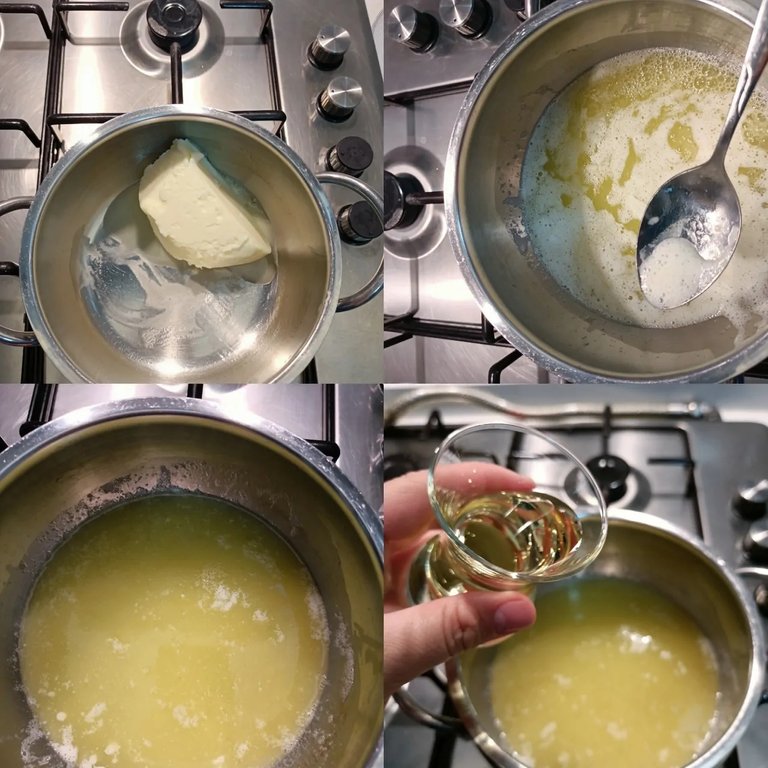
We prepare the butter. We will spread the butter between the dough. Thus, the baklava will be both crispy and tastier.
We melt the butter.
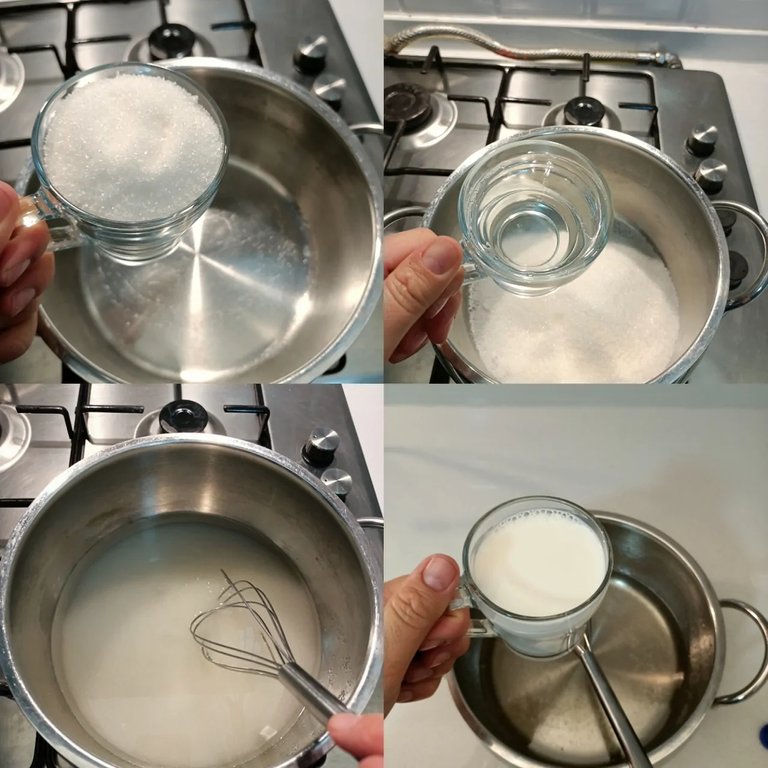
Stage 3
We are preparing our syrup.
For this, we take the sugar and milk in a saucepan and mix until the sugar dissolves.
When the sugar melts completely, our sherbet is ready.
The fact that it is a milky sherbet distinguishes the dessert from other baklava. Cold baklava is a lighter dessert than classic baklava, as it is a milky sherbet. Just like in milk desserts, it doesn't cause bloating no matter how much you eat it.
The first temperature of the syrup must pass. Therefore, it would be better to prepare the sherbet before you start making the dessert.
4th Stage
He can start preparing the baklava with the baklava dough.
You can also roll your own dough to make baklava. However, your dough must be very thin. I used ready-made phyllo dough since I couldn't roll thin baklava phyllo. I've made a sobiyet dessert with this yufka before. A delicious pastry. It is also a very good savior for those who cannot roll thin dough like me.
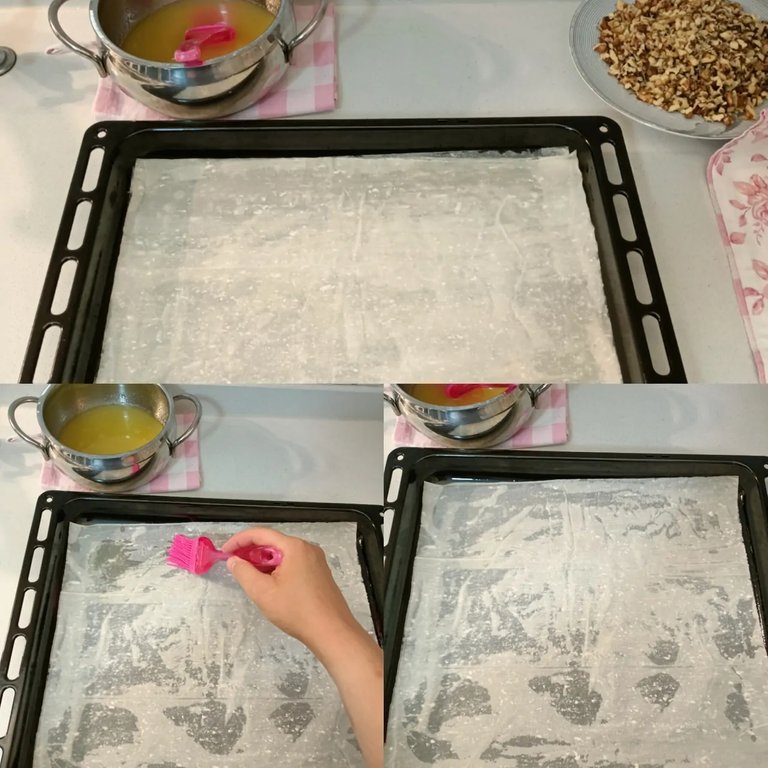
Note: There is a point you should pay attention to when using ready-made baklava dough. When you buy the dough that you will use to dry the dough, cover the remaining dough with a cloth.
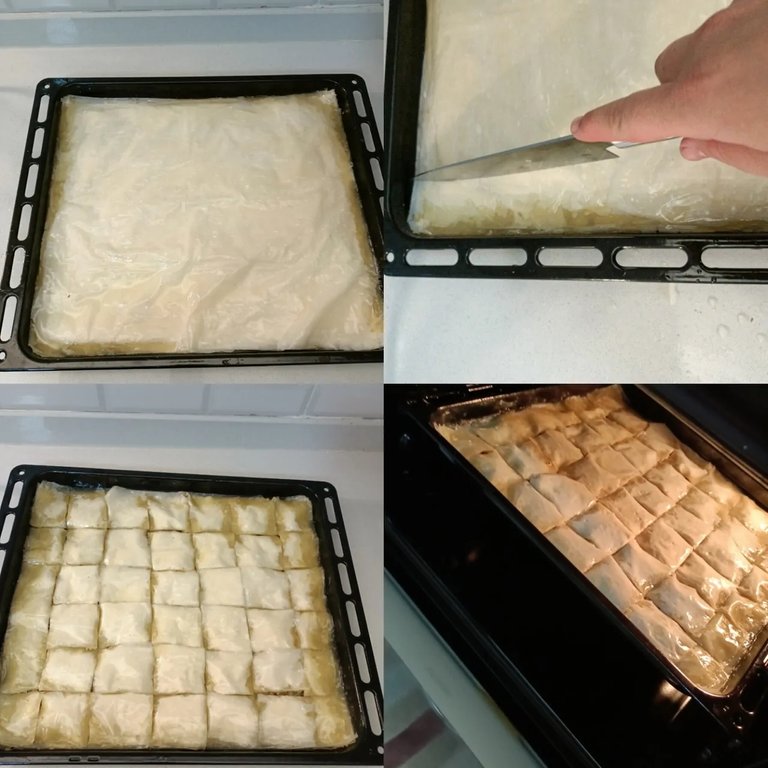
We place the phyllo dough, the walnuts and butter, which are the stuffing of the dessert, on the counter. We lay the dough on the tray on which we will make the baklava, one by one. We apply butter on it with the help of a brush. Make sure to lubricate all parts of the dough with enough butter.
After laying out a few layers of dough, we sprinkle walnuts in between. We repeat this process until the dough and walnuts are finished.
We do not neglect to apply butter to each phyllo dough.
Then we spread butter on the phyllo that we put on the top layer of the baklava.
5. Stage
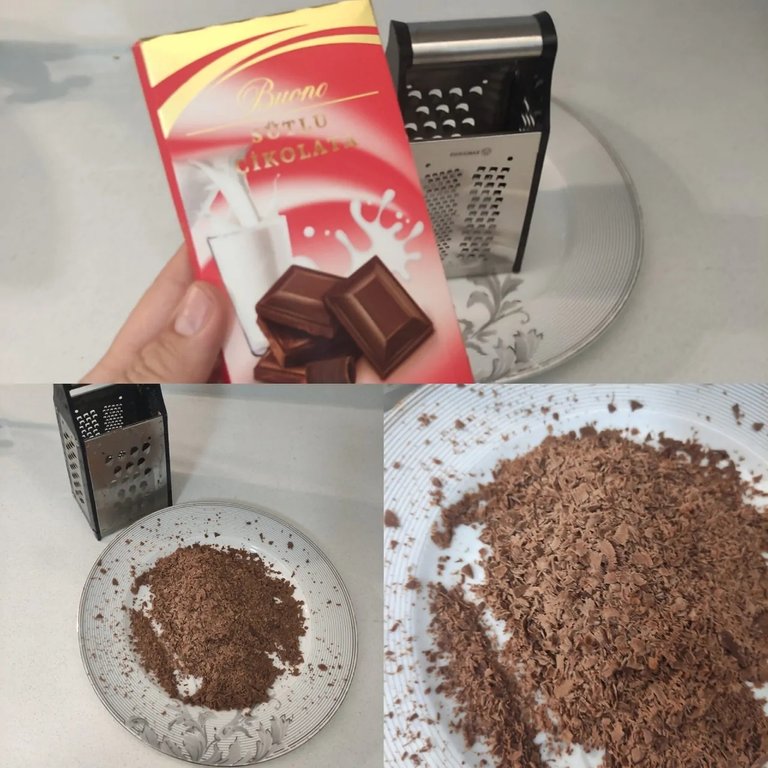
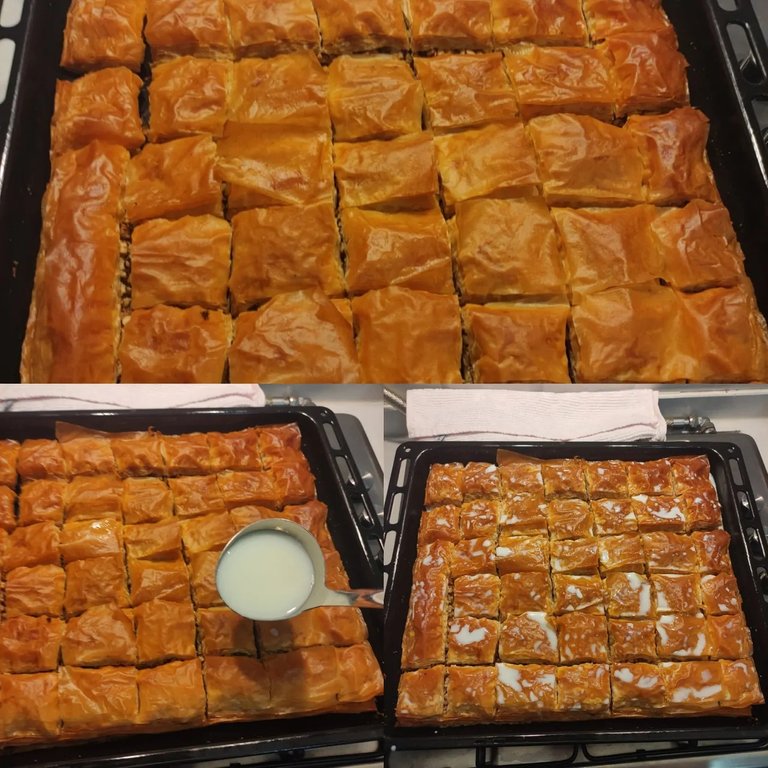
You can cut the baklava any way you want. I cut it into big squares. If you want, you can also cut the baklava slice.
We bake the ready baklava in a preheated oven at 160 degrees for 25-30 minutes in a controlled manner.
Each oven has a different cooking setting. Therefore, be sure to cook in a controlled manner. When the top of the baklava starts to brown, the baklava will be cooked. In addition, since the dough is thin, it will cook quickly.
Phase 6
While the baklava is baking in the oven, we can prepare the chocolate grater. I used milk tablet chocolate for this. I grated the chocolate to sprinkle on the baklava.
*Stage 6
After removing the baklava from the oven, we wait for the first temperature to pass. If we pour the syrup while the baklava is hot, the baklava dough will become too soft and doughy.
Pour the cold syrup slowly over the warm baklava.
Make sure the milk wets the whole baklava. Then we cover the baklava with a tray and let our dessert rest for at least two hours. Thus, our dessert will absorb the syrup.
7th Stage
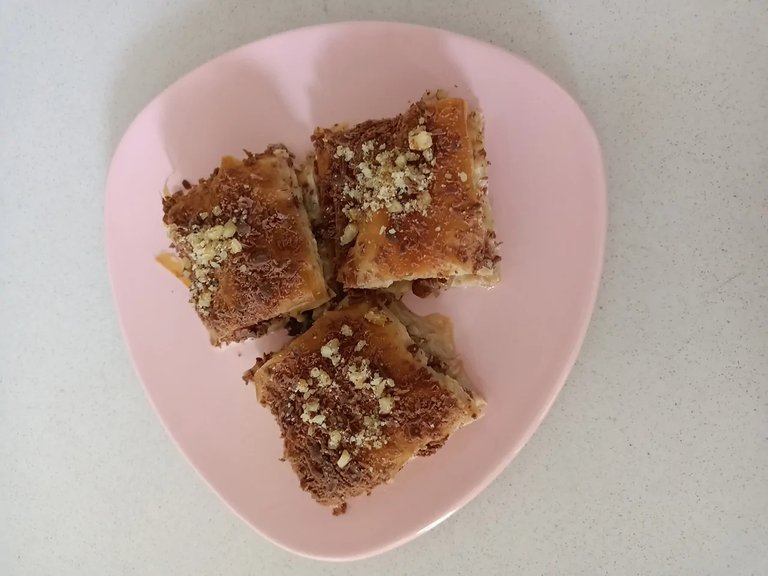
After our dessert is ready, we cover it with a chocolate grater. Chocolate baklava adds a very nice flavor. It is also visually beautiful. The most important feature of this dessert is that the syrup is made with milk and the chocolate grated on it. With these two things, it differs from the classic baklava recipe.
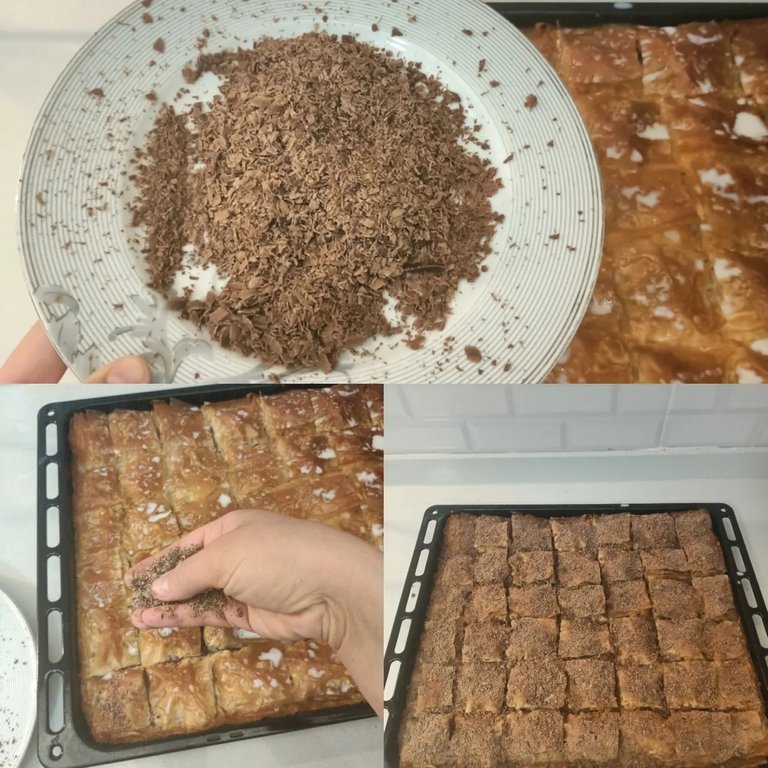
After adding the grated chocolate, our dessert is ready to be served.
I definitely recommend trying this recipe. It was a beautiful dessert. I served it to my neighbors and friends and everyone who ate it liked it very much.
Good luck to those who will try the recipe.
Thank you for taking your precious time to read my post.
Stay with love...goodbye...
TR
Herkese Merhabalar
Bugün çok lezzetli bir tatlı tarifi ile buradayım. Ben bu tatlı ile geçtiğimiz yaz tanıştım. Sanırım yediğim en güzel tatlılardan birisiydi. Tatlımızın adı soğuk baklava.
Ben zaten baklavayı da çok seven birisiyim. Soğuk baklava ise kesinlikle çok lezzetli bir tatlı.
Soğuk baklavada tatlının şerbeti süt ile hazırlanıyor. Hem şerbeti tatlı hem de sütlü tatlı sayılabilecek efsane bir lezzet.
Daha önce böyle bir tatlıyı nasıl yemediğime şaşırıyorum. Aslında hiç bir yerde de görmedim. Bana bu tatlıdan ablam bahsetti. İkimiz farklı illerde yaşıyoruz. Hatta ben baklavası ile meşhur Gaziantep iline çok yakın oturuyorum. Ama dediğim gibi daha önce bu tatlıyı hiç görmemiştim.
Geçtiğimiz günlerde bir tatlıcıda gördüm ve aldım. Lezzetini çok beğendim. Bir de kendim yapmak istedim. En az tatlıcıda yediğim kadar lezzetli oldu.
Tatlımı hazırlarken yapım aşamasını da tek tek fotoğraf çektim. Bu sayede sizlere görsel olarak da neler yaptığımı anlatabileceğim bir tarif postu hazırlamak istedim.
Ben şerbetli tatlıları çok severim eşim ise sütlü tatlıları daha çok sever. Bu tatlı hem ben hem de eşim tarafından çok beğenildi. Sütlü ve şerbetli bir tatlı olması ile tam da bizim ailemize uygun bir lezzet.
Tatlımızın tarifimi anlatmaya başlayalım.
Soğuk Baklava Tarifi
Gerekli Malzemeler
- 1 paket baklava yufkası
- Ceviz
- Süt
- Şeker
- Çikolata
- Tereyağı
Ben baklavayı cevizli olarak daha çok severim o yüzden soğuk baklavayı da cevizle yapmayı tercih ettim. Sizler isterseniz fıstık ya da fındıkla da yapabilirsiniz. Benim hazır olarak satın aldığım baklava fıstık ile yapılmıştı. Elbette ikisi arasında lezzet farkı var.
Soğuk Baklavanın Yapılışı
1. Aşama
İlk olarak cevizlerimizi hazırlayalım. Ben kabuklu ceviz aldım. Bu şekilde hem daha hesaplı hem de daha lezzetli oluyor. Cevizleri kırıp içlerini temizledim. Daha sonra çevizleri küçük parçalar haline getirdim.
Bu şekilde tatlımızın iç malzemesi hazır hale geldi.
2. Aşama
Tereyağını hazırlıyoruz. Tereyağını yufkalar arasına süreceğiz. Böylece baklava hem çıtır çıtır hem de daha lezzetli olacak.
Tereyağını eritiyoruz.
3.Aşama
Şerbetimizi hazırlıyoruz.
Bunun için şekeri ve sütü bir tencereye alıyoruz ve şeker eriyinceye kadar karıştırıyoruz.
Şeker tamamen eriyince şerbetimizmde hazır.
Sütlü bir şerbet olması tatlıyı diğer baklavada ayıran özellik. Sütlü bir şerbet olduğu için soğuk baklava klasik baklavalardan daha hafif bir tatlı oluyor. Tıpkı sütlü tatlılarda olduğu gibi ne kadar yerseniz yiyin şişkinlik yapmıyor.
Şerbetin ilk sıcaklığının geçmesi gerekiyor. Bu yüzden şerbeti tatlıyı yapmaya başlamadan önce hazırlamanız daha iyi olacaktır.
4.Aşama
Baklava yufkası ile baklavayı hazırlamaya başlayabilir.
Baklava yapmak için kendiniz de yufka açabilirsiniz. Ancak yufkanızın çok ince olması gerekiyor. Ben ince baklava yufkası açamadığım için hazır yufka kullandım. Daha önce de bu yufka ile şöbiyet tatlısı yapmıştım. Lezzetli bir yufka. Benim gibi ince yufka açamayanlar için de çok iyi bir kurtarıcı.
Not: Hazır baklava yufkası kullanacağınız zaman dikkat etmeniz gereken bir nokta var. Yufkaların kuruması için kullanacağınız yufkayı alınca kalan yufkaları mutlaka bir bez yardımı ile örtün.
Yufkaları, tatlının iç harcı olan cevizleri ve tereyağını tezgahın üzerine yerleştiriyoruz. Baklavayı yapacağımız tepsiye sırasıyla yufkayı seriyoruz. Üzerine bir fırça yardımı ile tereyağı sürüyoruz. Yufkanın her yerini yeterince tereyağı ile yağlamaya dikkat ediniz.
Bir kaç kat yufka serdikten sonra araya ceviz serpiyoruz. Bu işlemi yufka ve cevizler bitene kadar tekrarlıyoruz.
Her yufkaya da tereyağı sürmeyi ihmal etmiyoruz.
Daha sonra baklavanın en üst katına koyduğumuz yufkaya da tereyağı sürüyoruz.
5. Aşama
Baklavayı istediğiniz şekilde kesebilirsiniz. Ben büyük kareler şeklinde kestim. Sizler isterseniz baklava dilimi de kesebilirsiniz.
Hazır olan baklavayı 160 derece önceden ısıtılmış fırında kontrollü bir şekilde 25-30 dakika kadar pişiriyoruz.
Her fırının pişirme ayarı farklıdır. O yüzden mutlaka kontrollü bir şekilde pişirin. Baklavanın en üst kısmı kızarmaya başlayınca baklava pişmiş olacaktır. Ayrıca yufkası ince olduğu için de hızlı bir şekilde pişecektir.
6.Aşama
Baklava fırında pişerken çikolata rendesini hazırlayabiliriz. Ben bunun için sütlü tablet çikolata kullandım. Çikolatayı baklavanın üzerine serpmek için rendeledim.
*6.Aşama
Pişen baklavayı fırından çıkarttıktan sonra ilk sıcaklığının geçmesini bekliyoruz. Baklava sıcakken şerbeti dökersek baklava yufkası fazla yumuşayacak ve hamur olacaktır.
Soğuk şerbeti ılık baklava üzerine yavaş yavaş döküyoruz.
Sütün baklavanın her yerini ıslattığından emin olun. Daha sonra baklavanın üzerine bir tepsi kapatarak en az iki saat tatlımızı dinlendiriyoruz. Böylece tatlımız şerbeti yerlerince çekecektir.
7.Aşama
Tatlımız hazır hale geldikten sonra üzeriniikolata rendesi ile kaplıyoruz. Çikolata baklava çok güzel bir lezzet katıyor. Ayrıca görsel olarak da çok güzel oluyor.
Bu tatlının en önemli özelliği şerbetinin süt ile yapılması ve üzerindeki çikolata rendesidir. Bu iki şeyle klasik baklava tarifinden ayrılıyor.
Çikolata rendesini de ekledikten sonra tatlımız servise hazır.
Bu tarifi denemenizi kesinlikle tavsiye ediyorum. Çok güzel bir tatlı oldu. Ben komşularıma, arkadaşlarıma ikram ettim ve yiyen herkes çok beğendi.
Tarifi deneyecek arkadaşlara şimdiden afiyet olsun.
Değerli vaktinizi ayırarak gönderimi okuduğunuz için teşekkür ederim.
Sevgiyle kalın...hoşçakalın...
Elinize sağlık çok güzel görünüyor 😋
Çok teşekkür ederim ☺️
Congratulations @piinaar! You have completed the following achievement on the Hive blockchain and have been rewarded with new badge(s):
Your next target is to reach 8000 upvotes.
You can view your badges on your board and compare yourself to others in the Ranking
If you no longer want to receive notifications, reply to this comment with the word
STOPCheck out the last post from @hivebuzz:
Your post is very good.
Soğuk baklavayı ben de merak edip yapmıştım. Tadı çok güzel ve normal baklavadan hafif. Afiyet olsun :)