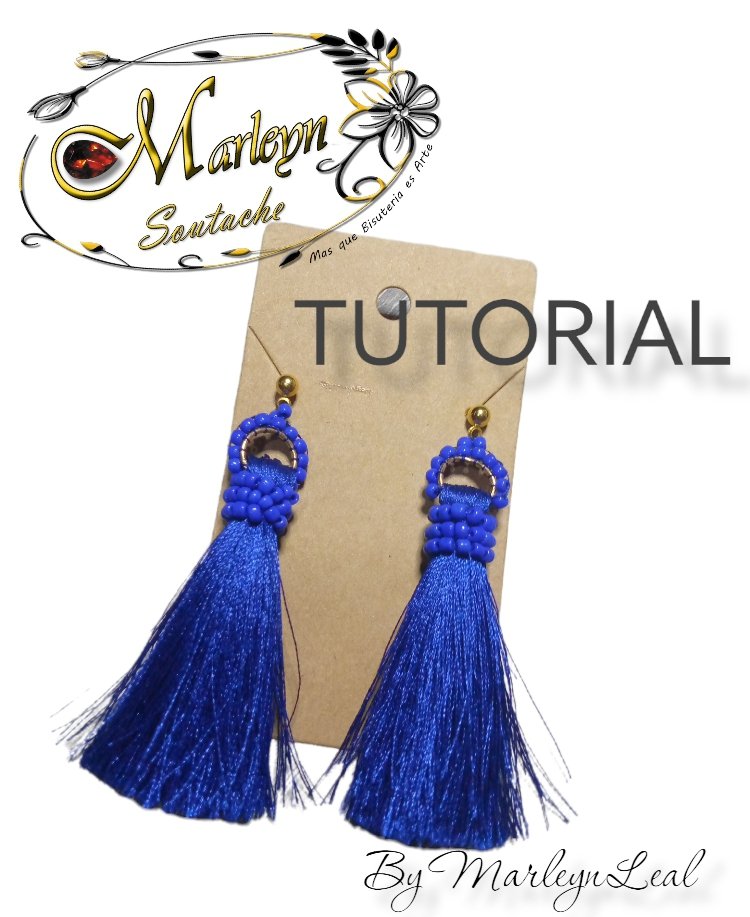

Feliz y bendecido nuevo día, espero se encuentren bien, felices, con salud, brillando creciendo, siendo su mejor versión cada día... En este día hermoso y super especial gracias a esta nueva "Comunidad de
@jewelry ", gracias por la invitación para unirme a su comunidad, y para participar en su primer concurso de zarcillos o pendientes estilo libre, Esta es mi entrada para un concurso de aretes estilo libre. El día de hoy les mostrare paso a paso como realizar unos elegantes zarcillos, fáciles, delicados y los puedes combinar con todo, juega con los colores a tu gusto. Lo explicare paso a paso a través de una secuencia de imágenes, espero que se fácil de entender, estaré atenta a cualquier duda para ayudarte! amigos, vamos a aprender con animo, con alegría, llenos de bendiciones,comenzamos este nuevo proyecto felices, brillando, llenos de energía .
Happy and blessed new day, I hope you are well, happy, healthy, shining growing, being your best version every day... On this beautiful and super special day thanks to this new "
@jewelry community ", thank you for inviting me to join your community, and to enter your first freestyle earring or earring contest, This is my entry for a freestyle earring contest. Today I will show you step by step how to make elegant, easy, delicate earrings and you can combine them with everything, play with the colors to your liking. I will explain it step by step through a sequence of images, I hope it is easy to understand, I will be attentive to any questions to help you!. friends, we are going to learn with encouragement, with joy, full of blessings, we start this new project happy, shining, full of energy.

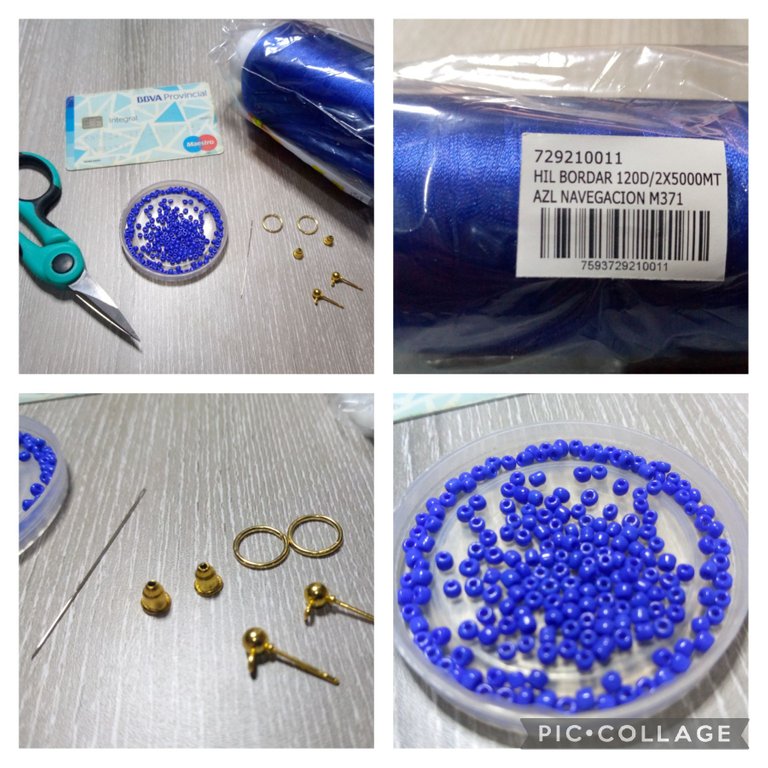
MATERIALES: Hilo de bordar del color de su elección, 2 Aros de bisutería de 1 centímetro de diámetro, 2 Bases de zarcillos redondo, 2 trancadero o tapón de zarcillo, Aguja, Mostacillas, Tijera, Una tarjeta de débito sirve perfecto para la borla, Animo y Paciencia!
MATERIALS: Embroidery thread of the color of your choice, 2 jewelry rings of 1 centimeter in diameter, 2 round earring bases, 2 earring locks or caps, needle, beads, scissors, A debit card is perfect for tassel, Animo and Patience!

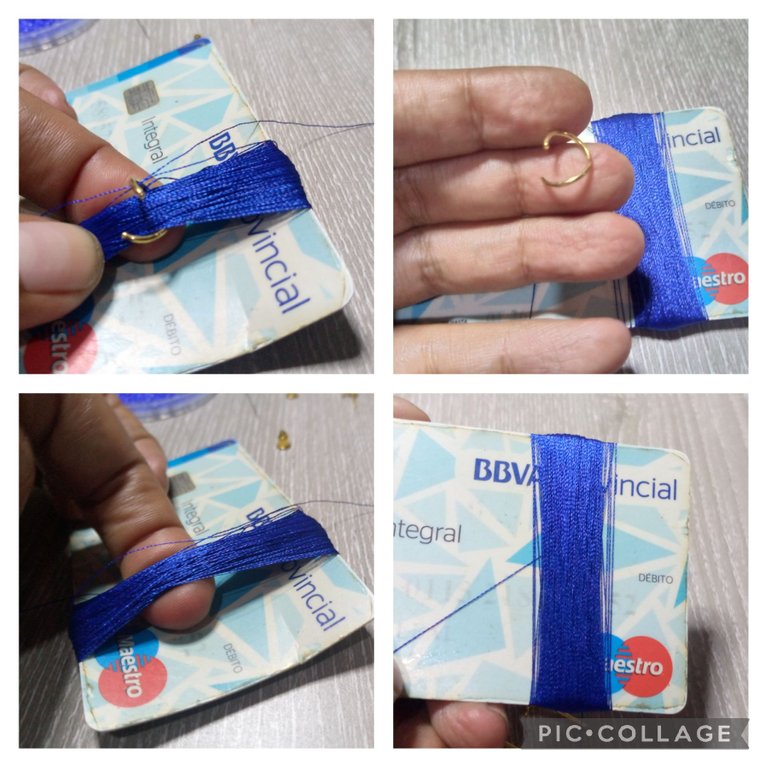
Paso 1: Con mucha paciencia vamos a enrollar el hilo en la tarjeta, dependerá del largo que quieras la borla yo la quería mediana y lo realice de lado, igual el grosor de tu borla, a mi me gusta un tamaño estándar que no quede pesado, con mucha calma le di 400 vueltas,al terminar corte el hilo sobrante, con ayuda de una pinza para bisutería abrimos el aro, con cuidado levanta los hilos e introduce el aro como ves en las imágenes.
Step 1: With a lot of patience we are going to wind the thread on the card, it will depend on the length you want the tassel, I wanted it medium and I did it on the side, equal to the thickness of your tassel, to I like a standard size that is not heavy, I very calmly gave it 400 laps, when I finished I cut the excess thread, with the help of a jewelry pliers we open the ring, carefully lift the threads and insert the ring as you see in the images.
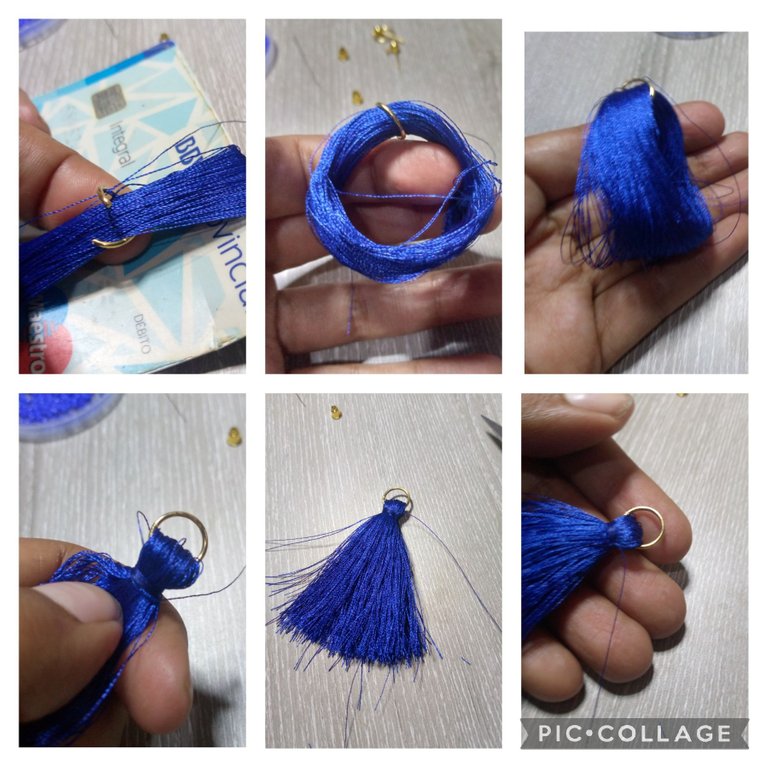
Paso 2: Cierra el aro con mucho cuidado, y sacamos los hilos de la tarjeta, hazlo con calma sin halar duro para que no deformes la pieza, ahora arreglarlo, vamos a agarrar otro hilo y justamente abajo del aro vamos a comenzar a enrollar como arropando la borla dejando la primera punta larga, al darle varias vueltas amarrarlo con la primera punta. Este hilo lo mejor que puedes hacer es tomarlo desde el mismo rollo de manera que no te falte hilo.
Step 2: Close the ring very carefully, and we take the threads out of the card, do it calmly without pulling hard so you don't deform the piece, now fix it, we are going to grab another thread and Just below the hoop we are going to begin to wind it as wrapping the tassel, leaving the first long end, by giving it several turns, tie it with the first end. The best thing you can do for this thread is take it from the same roll so that you don't run out of thread.
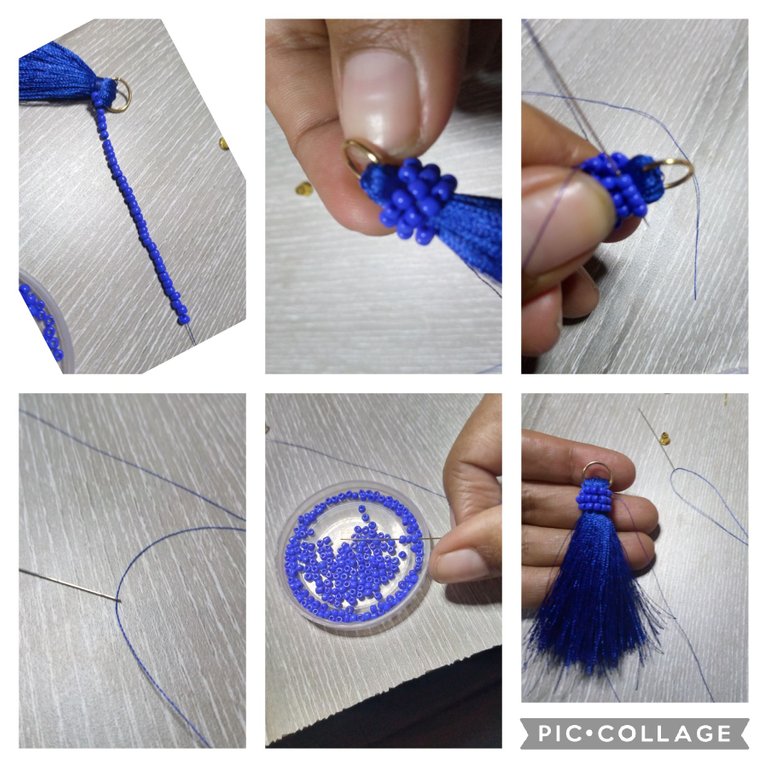
Paso 3: ensarta el mismo hilo de bordar en la aguja, toma 45 mostacillas dependerá del tamaño de la mostacilla que utilices, lo importante es que le puedas dar 3 vueltas a la borla para decorarla, realiza un amarre y sube el hilo entre las mostacillas hasta la primera linea vuelve a realizar un amarre y subirlo trata que quede justamente al lado del aro!
Step 3: thread the same embroidery thread on the needle, take 45 beads depending on the size of the bead you use, the important thing is that you can wrap the tassel 3 times to decorate it, make a tie and raise the thread between the beads until the first line make a tie again and raise it, try to make it right next to the hoop!
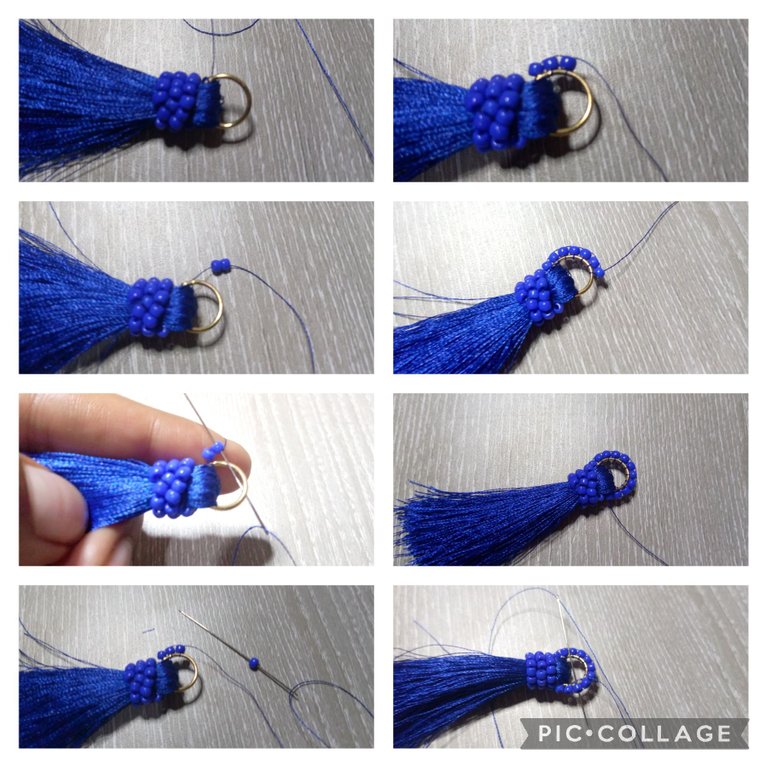
Paso 4: Vamos a bordar el aro con las mostacillas, en el hilo que acabas de sacar por donde esta el aro le darás una vuelta por el aro y lo amarras que quede bien abajo, ensartan la aguja e introduce 2 mostacillas ahora meteremos la aguja por el centro del aro y la vamos a subir por la misma mostacilla pero del lado contrario del aro, para la siguiente mostacilla realiza el mismo proceso solo que esta vez en la aguja solo vas a introducir 1 mostacilla el proceso es el mismo, vamos a pasar la aguja por adentro del aro y va a subir por la misma mostacilla del lado contrario, realiza este paso hasta llegar al final del aro, al hacer esto realiza un amarre fuerte y regresa la aguja de una en una hacia arriba hasta llegar al centro del aro en la parte superior.
Step 4: We are going to embroider the hoop with the beads, in the thread that you just took out where the hoop is, you will give it a turn around the hoop and tie it so that it is well below, thread the needle and insert 2 beads now we will insert the needle through the center of the ring and we are going to raise it through the same bead but on the opposite side of the ring, for the next bead perform the same process only this time in the needle you are only going to insert 1 bead the process is the same, we are going to pass the needle inside the ring and it will go up through the same bead on the opposite side, carry out this step until you reach the end of the ring, when doing this make a strong tie and return the needle one at a time going up until you reach the center of the hoop at the top.
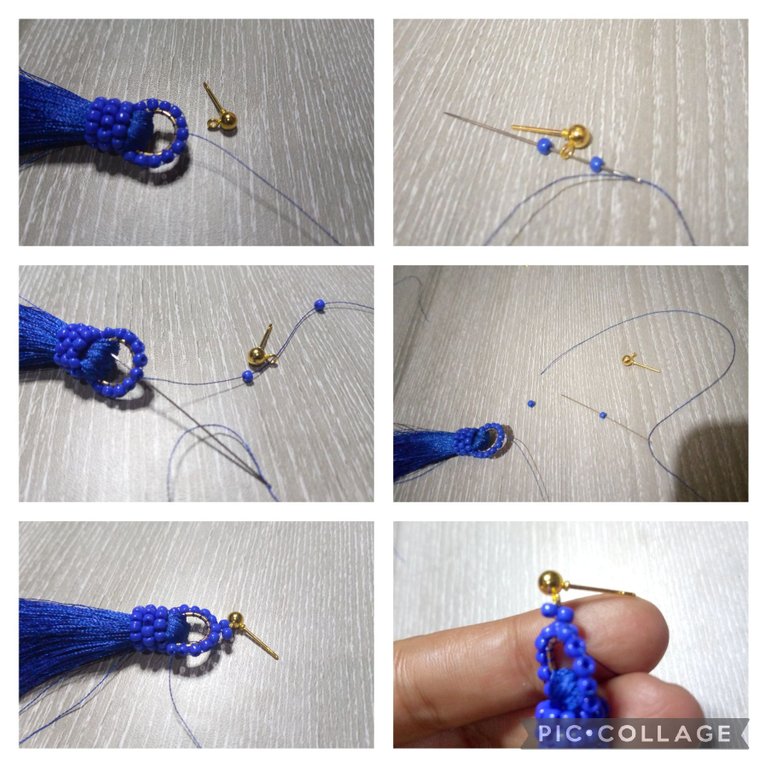
Paso 5: Al sacar el hilo por el centro superior, vamos a colocar 1 mostacilla, la base de zarcillo, y otra mostacilla y nos regresamos por la misma mostacilla, realiza un amarre y le damos unas cuantas vueltas nuevamente, terminamos realizando otro amarre.
Step 5: When we take the thread through the upper center, we are going to place 1 bead, the base of the tendril, and another bead and we return through the same bead, make a tie and give it a few turns again, we end up making another tie.
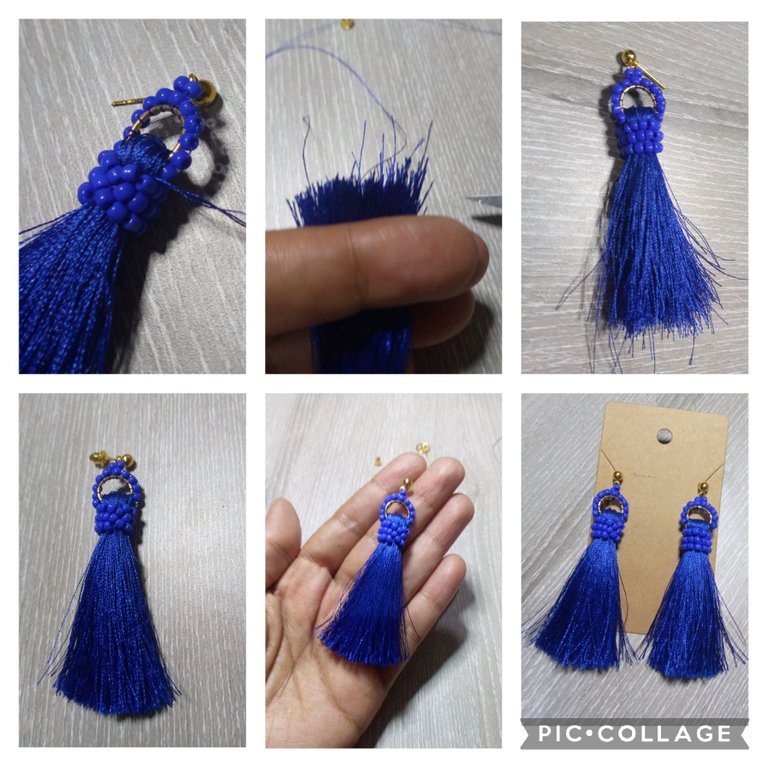
Paso 6: Al terminar de colocar la base de zarcillo, seguimos pasando el hilo con la aguja entre las mostacillas hasta llegar a ala otra punta del aro, nuevamente realizamos el amarre final e introduces la aguja por el centro hacia abajo por la borla, luego tomamos la borla y cortamos las puntas para arreglarla, realiza todos los pasos nuevamente y de esta manera tendrás el par de unos hermosos zarcillos de borla. Espero que sea de tu agrado, recuerda si tienes alguna duda puedes dejarme un comentario! Gracias por leerme.
Step 6: When we finish placing the base of the tendril, we continue passing the thread with the needle between the beads until we reach the other end of the hoop, again we make the final tie and insert the needle through the center down the tassel, then we take the tassel and cut the ends to fix it, do all the steps again and this way you will have a pair of beautiful tassel tendrils. I hope you like it, remember if you have any questions you can leave me a comment! Thanks for reading.

Si tienes una duda escríbeme un comentario, estaré feliz de ayudarte con cualquier detalle, Espero que mis diseños les gusten tanto como a mí me gusta, aprendan con placer ...!

Nunca olvides que el Poder es Querer y si quieres Puedes...
Eres Luz eres Energía, TU PUEDES ... Que el universo infinito Conspire para que todo siempre sea mejor ... Se les quiere ...

Venezuela FE
Somos Seres Abundantes! Qué las energías del universo vibren en sintonía con las de cada uno de nosotros en armonía! Cuidemos nuestras palabras, acciones y pensamientos!
If you have a question, write me a comment, I will be happy to help you with any details, I hope you like my designs as much as I like, learn with pleasure ...!

Never forget that Power is Wanting and if you want you can ...
You are Light, you are Energy, YOU CAN ... May the infinite universe Conspire so that everything is always better ... They are loved ...

Venezuela FAITH
We are Abundant Beings! May the energies of the universe vibrate in tune with those of each of us in harmony! Let's take care of our words, actions and thoughts!

Autoría del texto y todas las imágenes: @Marleyn , La edición de las imágenes las realicé yo misma, Por favor no Utilices mis fotos sin mi autorización, edites ni re-publiques mi material ¿Deseas ponerte en contacto conmigo? Escríbeme:
Correo electronico: [email protected]
Discord #Marleyn#7821
Twitter: @marleynleal1
Imstagran: @MarleynSoutache
YouTube: https://youtube.com/c/marleynlealramos
Facebook: @marleynsoutache
Authorship of the text and all the images: @Marleyn, I did the editing of the images myself, Please do not use my photos without my authorization, edit or republish my material Do you want to contact me? Write me:
Email: [email protected]
Discord #Marleyn#7821
Twitter: @marleynleal1
Imstagran: @MarleynSoutache
YouTube: https://youtube.com/c/marleynlealramos
Facebook: @marleynsoutache
 Mi trabajo es mi pasión y cuando tu trabajo es tu pasión nada es imposible / My work is my passion and when your work is your passion nothing is impossible


Muy lindos tus zarcillos, me encantaron.😍 Éxitos...💖
https://twitter.com/marleynleal1/status/1511139237453836293
The rewards earned on this comment will go directly to the person sharing the post on Twitter as long as they are registered with @poshtoken. Sign up at https://hiveposh.com.
Saludos amiga @marleyn waoo que espectaculares zarcillos nos has traído hoy, el hilo de bordar le da un toque especial a los zarcillos y las mostacillas lucen increíbles junto a él, por lo cual el resultado es muy elegante y sin duda una pieza única.
Gracias por participar en el concurso de zarcillos al estilo libre y mostrarnos tu habilidad tan maravillosa, te deseo mucho éxito en este hermoso concurso 😉🤗
Saludos amiga me encanta el resultado de estos zarcillos, me gustan los zarcillos con borlas gracias por mostrarnos este paso a paso.
Congratulations, your post has been upvoted by @dsc-r2cornell, which is the curating account for @R2cornell's Discord Community.
Bellos y el color azul intenso me encanta. Bendecido día amiga