Iniciativa: Accesorios Halloween || Zarcillo Diferentess Loco
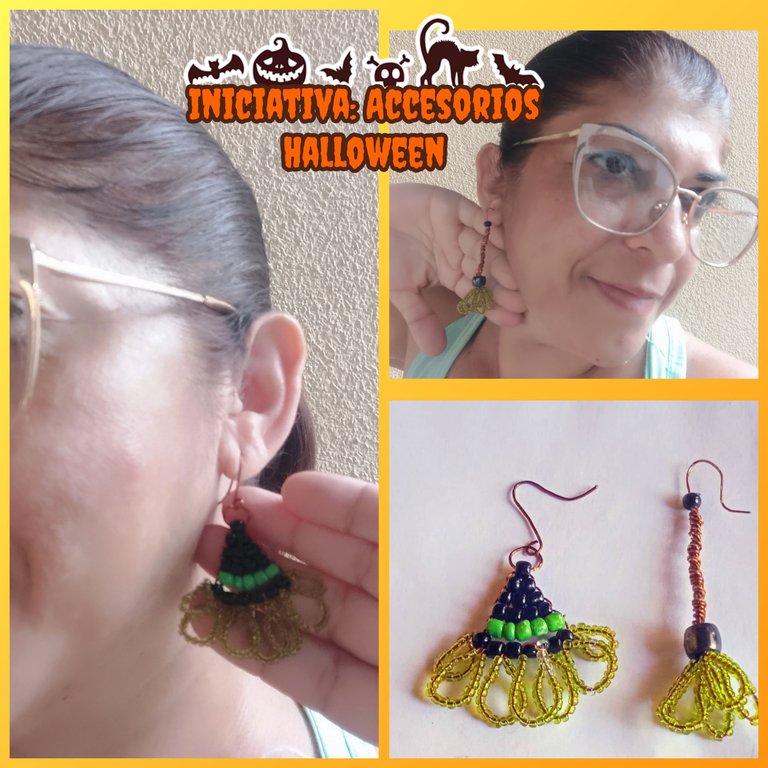
Feliz sábado familia Hive y amig@s de esta excelente comunidad, espero que todos esten sanos y felices, es un placer para mí compartir una vez con ustedes aunque tenía un tiempo sin pasarme por aquí. Creo que vengo un poco atrasada ya que la comunidad tiene un excelente concurso sobre Accesorios de Hallowen y justo termina hoy pero la verdad quise participar. Así que sin más aquí les comparto mi tarea creativa la cual espero sea de su agrado, quédate conmigo hasta el final y verás.
Agradezco a @nhaydu, por la invitación a participar en la iniciativa.
MATERIALES USADOS:
✓Mostacillas verdes transparentes.
✓Mostacillones negros.
✓Mostacillones verdes
✓Una chaquira negra.
✓Alambre de cobre calibre 26 pulgadas.
✓Alambre de cobre 28 pulgadas.
✓Pinzas.
✓Regla.

Mi manualidad son unos Aretes y los realicé en diseños diferentes para que se vieran más divertidos, con estos pasos voy a elaborar la imagen de un sombrero puntiagudo del que usan las brujitas.
Primer Paso:
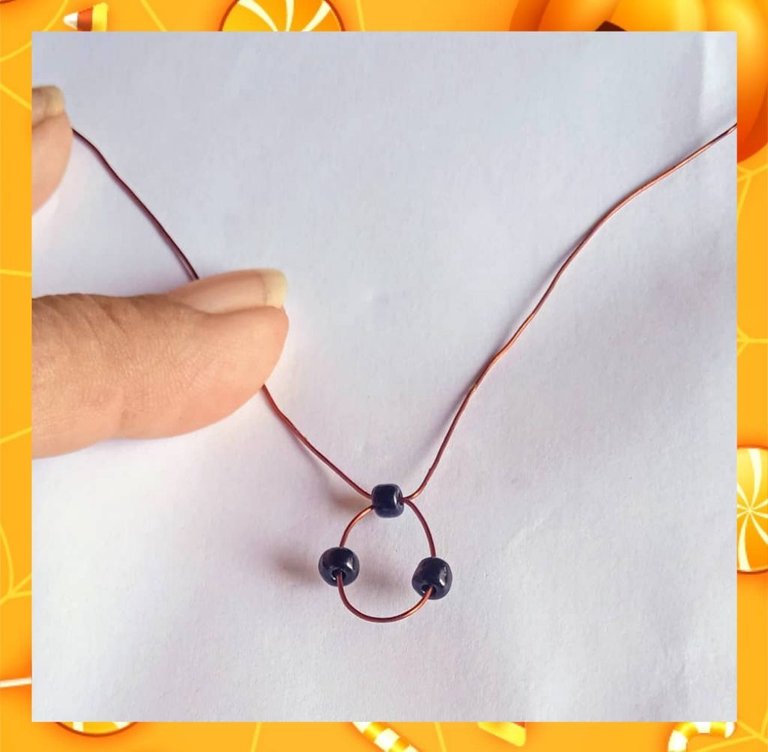
En un alambre calibre 26 pulgadas de cuarenta centímetros de largo inserto por una punta tres mostacillones negros, con la otra punta cruzo dos de los mostacillones halo las dos puntas y me queda esta especie de pequeño triángulo que muestro en la imagen.
Paso Dos:
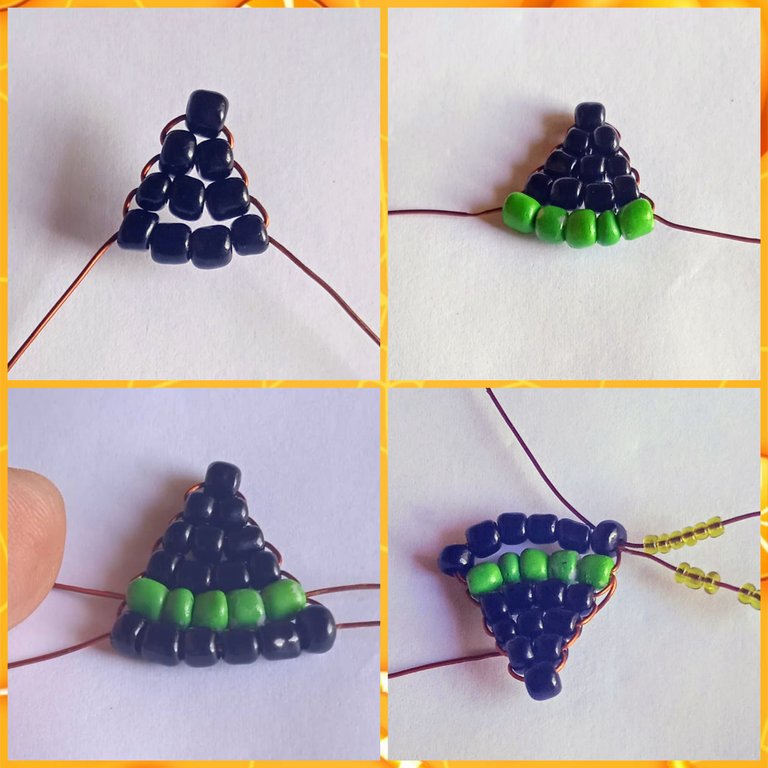
Sigo la ejecución del sombrero puntiagudo y por una punta inserto tres mostacillones negros los cruzo con la otra punta y halo las dos puntas para ajustar; de nuevo por una punta inserto cuatro mostacillones negros realizó el mismo procedimiento que vengo ejecutando halo las dos puntas y va quedando como muestra la imagen.
Ahora inserto por una punta cinco mostacillones verdes para una especie de adorno que usan los sombreros, cruzo los mostacillones con la otra punta y continúo insertando seis mostacillones negros que cruzo, halo las dos puntas y las paso de nuevo por la vuelta de arriba, halo fuerte las puntas para ajustar bien y corto los excedentes.
Tercer Paso:
Aquí voy a elaborar los cabellos que supuestamente salen del sombrero, los hago verdes porque este como el naranja, negro, plateado, amarillo son los colores iconos de estás festividades, me gusta más el verde.
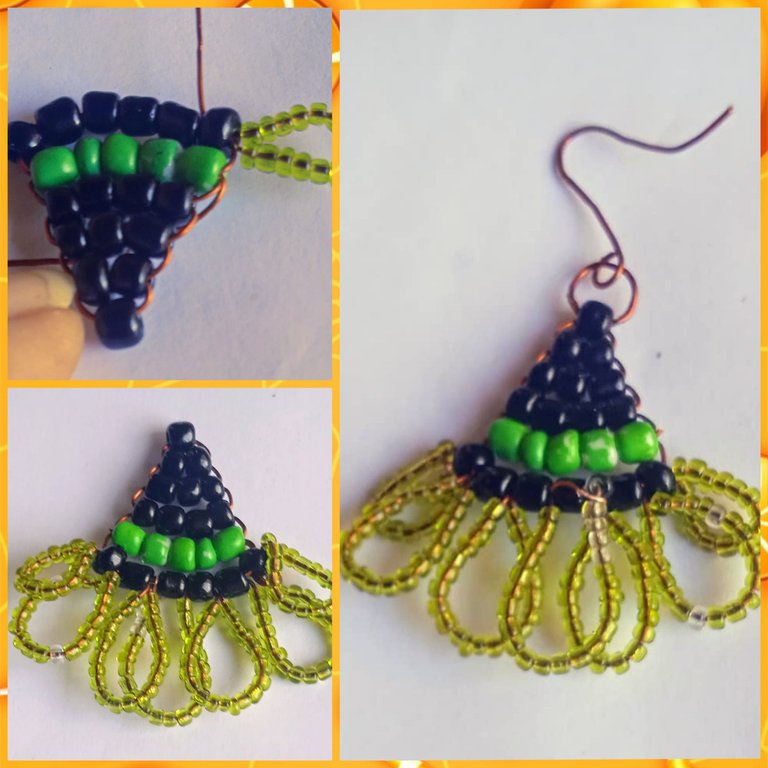
Corto de un alambre de 28" cuarenta centímetros de largo y lo paso por el primer mostacillón negro de los seis, inserto dieciséis mostacillas verdes transparentes y las llevo hasta la punta allí uno las puntas hago un entorchado y halo el alambre por dentro del mostacillón hasta el otro lado del mostacillón, va a quedar una especie de óvalo, inserto veinte mostacillas verdes transparentes y meto la punta del alambre por el mostacillón negro siguiente lo saco por el otro extremo del mostacillón, ahora inserto veintidós mostacillas verdes transparentes y luego veinticuatro, después hago el otro lado igual pero al revés veintidós veinte , dieciséis. Ahora paso el alambre de vuelta por las líneas de todos los mostacillones halando fuerte para asegurar, corto el excedente para rematar.
Realicé con anterioridad un anzuelo y una argolla que coloco en la parte de arriba del sombrero y este es el resultado.
Paso Cuatro:
Ahora voy a realizar mi otro Arete se trata de una escoba uno de los accesorios muy común entre las brujas, lo hice así:
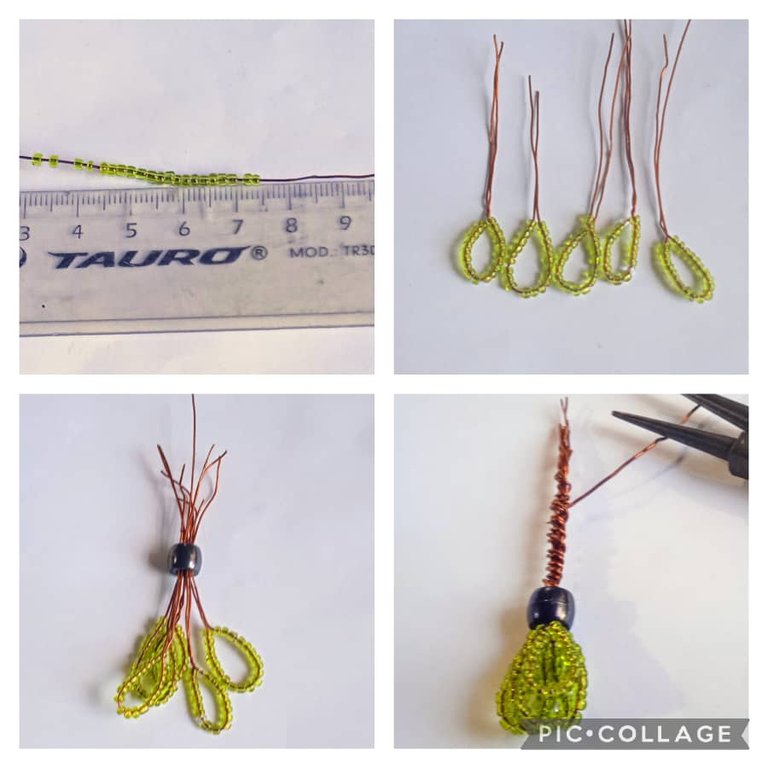
Corto del alambre calibre 26 pulgadas cinco trocitos de diez centímetros de largo; en tres de los trocitos pongo veinte mostacillas verdes transparentes y en los otros dos veintidós mostacillas verdes transparentes, voy a doblar a la mitad para igualar, tomo la chaquira negra y paso por el orificio todos los alambres y halo para asegurar que queden todos unidos, ahora los entorcho y con uno de los alambres hago un entorchado por los demás, uso la pinza plana y doy forma, coloco un pequeño trozo de alambre en la punta, pongo una gota de pegamento universal, coloco un mostacillón negro para cubrir los alambres, hago el anzuelo y este es el resultado.
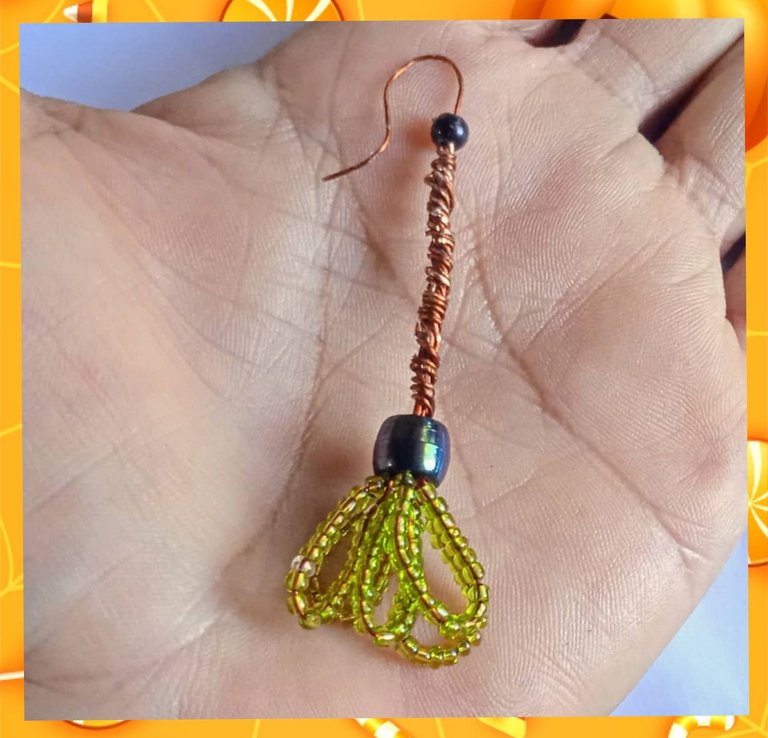
Este es el resultado final de mi proyecto el cual espero que haya sido de su agrado y sirva de inspiración a otros.
Invito @egarysv, @naty16 y @katiuskamata
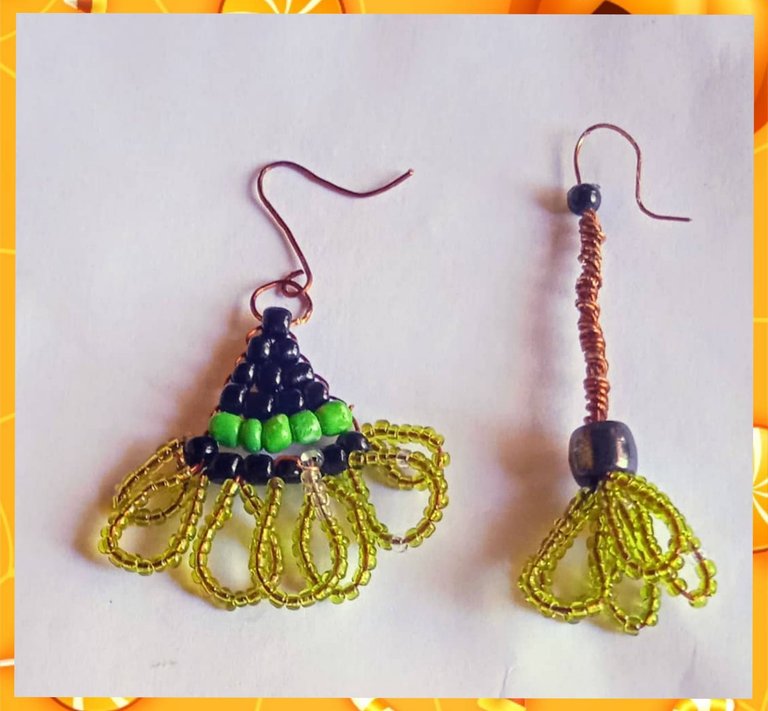
Todas las imágenes son de mi propiedad, capturadas con mi Tecno Spark 20 Go.📸 Editadas con GridArt versión gratuita.
Imagen principal y Banner final editado con Canva versión libre.
🔁Deeptraductor fue utilizado para esta publicación.📶
Happy Saturday Hive family and friends of this excellent community, I hope everyone is healthy and happy, it is a pleasure for me to share once with you although I had a while without stopping by here. I think I'm a little late because the community has an excellent contest about Halloween Accessories and it ends today but I really wanted to participate. So without further ado here I share with you my creative task which I hope will be to your liking, stay with me until the end and you will see.
I thank @nhaydu for the invitation to participate in the initiative.
MATERIALS USED:
✓Clear green beads.
✓Black microscillions.
✓Green microscils.
✓A black chaquira.
✓26-inch gauge copper wire.
✓Copper wire 28 inches.
✓Pins.
✓Ruler.
My craft are some Earrings and I made them in different designs to make them look more fun, with these steps I am going to elaborate the image of a pointy hat that little witches wear.
First step:
In a twenty-six inch wire, forty centimeters long, I insert three black beads at one end, and with the other end I cross two of the beads and pull the two ends and I get this kind of small triangle that I show in the image.
Step two:
I continue the execution of the pointed hat and by one end I insert three black beads and I cross them with the other end and I pull the two ends to adjust; again by one end I insert four black beads and perform the same procedure that I have been executing and I pull the two ends and it looks as shown in the image.
Now I insert through one end five green beads for a kind of ornament that hats use, I cross the beads with the other end and continue inserting six black beads that I cross, I pull the two ends and pass them again through the top loop, I pull the ends tightly to adjust well and cut the excess beads.
and cut off the excess.
Third step:
Here I am going to elaborate the hairs that are supposed to come out of the hat, I make them green because this as well as orange, black, silver, yellow are the iconic colors of these festivities, I like green best.
I cut a 28" wire forty centimeters long and pass it through the first black bead of the six, I insert sixteen transparent green beads and take them to the tip, there one the tips I make a twist and pull the wire inside the bead to the other side of the bead, it will be a kind of oval, I insert twenty transparent green beads and I put the tip of the wire through the black bead and then I pull it out through the other end of the bead, now I insert twenty-two transparent green beads and then twenty-four, then I do the other side the same but the other way around, twenty-two twenty, sixteen. Now I pass the wire back along the lines of all the beads pulling hard to secure, I cut the excess to finish.
I previously made a hook and a ring that I place on the top of the hat and this is the result.

Step Four:
Now I am going to make my other Earring it is a broom one of the very common accessories among witches, I did it like this:
I cut from the 26 inch wire five small pieces of ten centimeters long; In three of the pieces I put twenty transparent green beads and in the other two twenty-two transparent green beads, I am going to fold in half to equalize, I take the black chaquira and pass through the hole all the wires and pull to ensure that they are all united, now I twist them and with one of the wires I make a twist through the others, I use the flat tweezers and give shape, I put a small piece of wire on the tip, I put a drop of universal glue, I put a black bead to cover the wires, I make the hook and this is the result.
This is the final result of my project which I hope has been to your liking and will inspire others.
Invito @egarysv, @naty16 and @katiuskamata
All images are my property, captured with my Tecno Spark 20 Go.📸 Edited with GridArt free version.
Main image and final Banner edited with Canva free version.
🔁Deeptranslator was used for this publication.📶
Muy original este diseño @lorennys se ve diferente me gusta la idea para usarla con otros motivos, después de halloween por supuesto 🤭 saluditos.
Están muy coquetos y originales este par de pendientes que creaste para la nuestra iniciativa de Halloween.
Excelente participación mi bella.
Saluditos...
Hola amiga gracias por tu comentario me alegro que te hayan gustado. Me encantó participar.