[Esp | Eng] Preciosa Pulsera enrrejada doble | Precious Double Entwined Bracelet
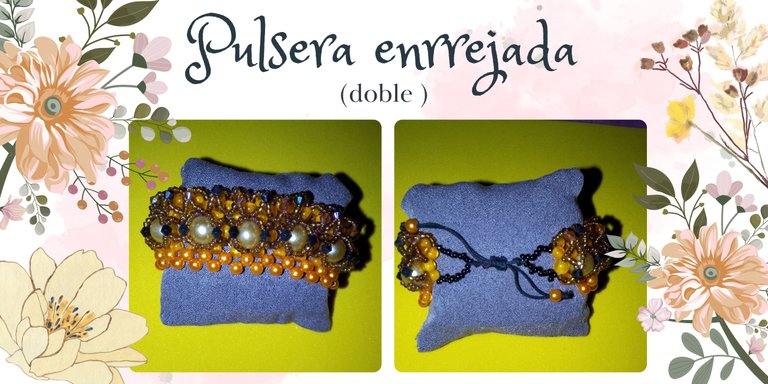
Buenas tardes, comunidad de Jewelry en esta oportunidad preparé un tutorial sobre una pulsera enrejada doble, en relidad es como si fueran tres pulseras en una, se necesita bastante mostacilla y bastantes perlitas de varios tamaños asi que preparen su material porque queda muy bonita la verdad.
La forma de cerrar la pulsera es siempre con hilo chino, esto es menos engorroso y problemático para el uso que los aros y el gancho pico de loro, ya que a veces el aro se sale o el gancho se abre. El hilo chino nos evita esos problemas, solo debemos asegurarnos de hacer fuertes los nudos y tendremos pulsera para rato.
Good afternoon, Jewelry community, this time I prepared a tutorial on a double lattice bracelet, in fact it is like three bracelets in one, you need a lot of beads of various sizes so prepare your material because it is very nice indeed.
The way to close the bracelet is always with Chinese thread, this is less cumbersome and problematic to use than the hoops, and the parrot beak hook, because sometimes the hoop comes off or the hook opens. The Chinese thread avoids these problems, we just have to make sure to make the knots strong and we will have bracelet for a while.
Materiales | Materials
- 35 perlas de 6mm , apariencia anaranjadanacarada.
- 85 perlas anaranjadas de 6mm.
- 9 perlas de 9 mm, de otro color.
- Mostacilla marron. Aproximadamente 2 dedales.
- 32 cristales de swarovski negro o marron, el que sea de tu preferencia.
- 3,5 mts de hilo nylon de 0.20
- 25 cms de hio chino negro
- 35 pearls of 6mm, orange-tan-scarlet appearance.
- 85 orange pearls of 6mm.
- 9 beads of 9 mm, other color.
- Brown mustard. Approximately 2 thimbles.
- 32 black or brown swarovski crystals, the one you prefer.
- 3.5 mts of 0.20" nylon thread.
- 25 cms of black chinese thread
Procedimiento | Procedure
Paso 1 | Step 1
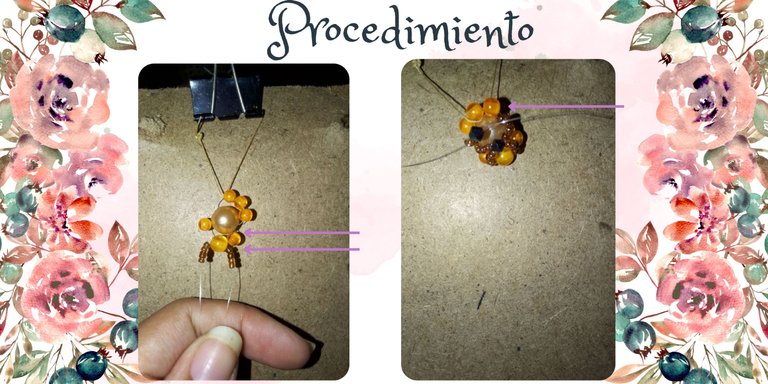
Primero colocamos tres perlas naranjas de 6mm pasamos una blanca de 9 cm y cruzamos los hilos en esta. Agregamos dos perlas naranja de cada lado y pasamos otra naranja y cruzamos en esta.
First we place three orange beads of 6mm and pass a white one of 9 cm and cross the threads on this one. We add two orange beads on each side and pass another orange bead and cross on this one.
Paso 2 | Step 2
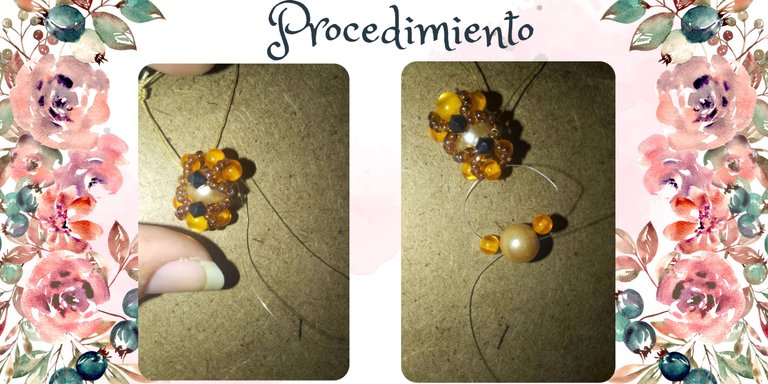
Luego colocamos 4 mostacillas en cada hilo, colocamos un ccristal negro de swarovski y cruzamos los hilos, volvemos a colocar 4 mostacillas de cada lado y pasamos los hilos detras de la perla grandeblanca de 9 mm. Luego volvemos a repetir este paso y cruzamoslos hilos en la perla naranja, que está justo arriba de la blanca.
Then we place 4 beads on each strand, place a black swarovski crystal and cross the strands, place again 4 beads on each side and pass the strands behind the 9 mm large white pearl. Then we repeat this step again and cross the threads on the orange pearl, which is just above the white one.
Paso 3 | Step 3
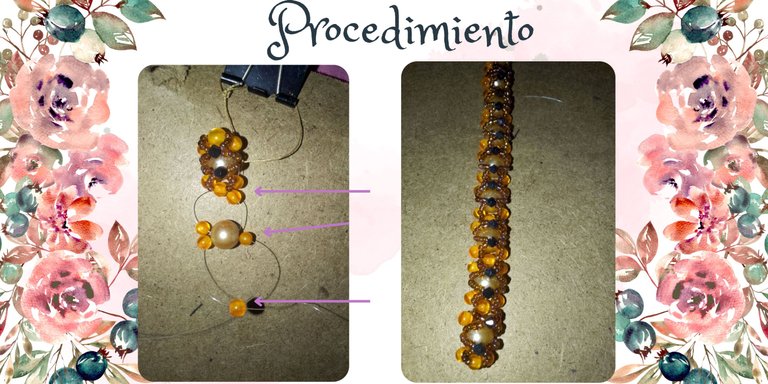
Vamos pasando los hilos por las perlas hacia abajo, y colocamos una perla naranja de cada lado y cruzamos en la perla blanca grande de 9 mm. Esta pulsera se puede hacer de dos formas. Repitiendo continuamente el paso 1 y 2, o como despues lo segui haciendo porque me di cuenta de que iba a gastar demasiado hilo nylon. Lo que hice fue seguir el patrón de este paso 3 y colocar una perla naranja de cada lado y una grande y cruzar en esta, asi se ahorra muchisimo hilo. Y luego hacer el enrrejado con las mostacillas.
We pass the threads through the beads downwards, and we place an orange bead on each side and cross on the large 9 mm white bead. This bracelet can be made in two ways. Continuously repeating step 1 and 2, or as I later continued to do because I realized I was going to waste too much nylon thread. What I did was to follow the pattern of this step 3 and place an orange bead on each side and a large bead and cross on this one, this saves a lot of thread. And then make the lattice with the beads.
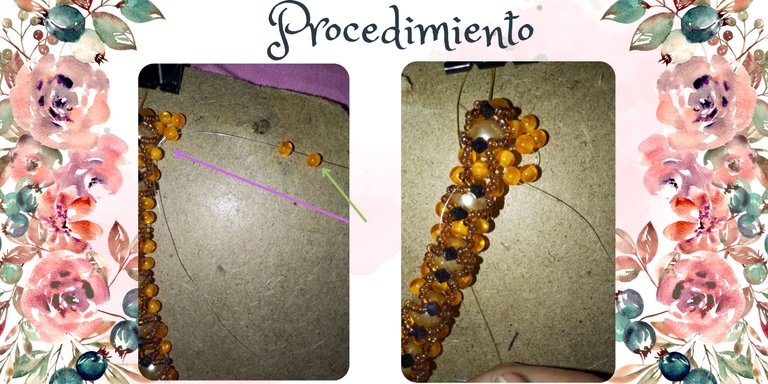
Paso 4 | Step 4
Ahora lo que haremos sera unir mas perlas como si fuesen dos pulseras juntas. Sacamos el hilo en partes iguales por una perl naranja de al lado, colocamos tres perlas y cruzamos en la ultima.
Now what we will do is to join more beads as if they were two bracelets together. We draw the thread in equal parts through an orange bead next to it, place three beads and cross on the last one.
Luego para seguir con este patrón debemos pasar el hilo que queda a la izquierda por la perla que se ve a la izquierda que ya estaba colocada y volvemos a colocar esta vez 2 perlas y cruzamos los hiulos por la ultima. Repetimos esto hasta completar el largo de la pulsera. y luego hacemos el enrrejado.
Then to continue with this pattern we must pass the thread that remains on the left through the bead that you see on the left that was already placed and we place again this time 2 beads and we cross the loops through the last one. We repeat this until we complete the length of the bracelet and then we make the lattice.
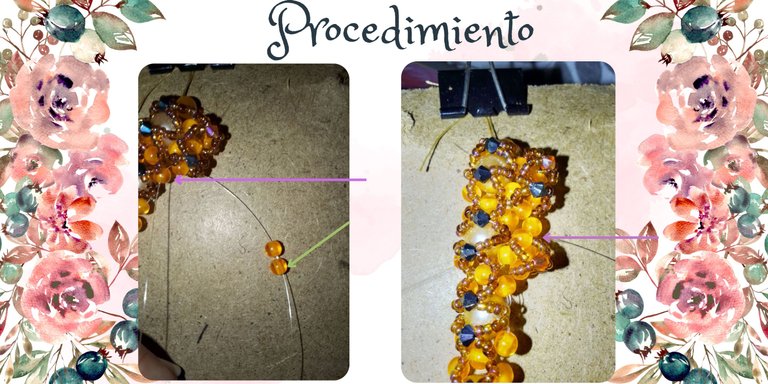
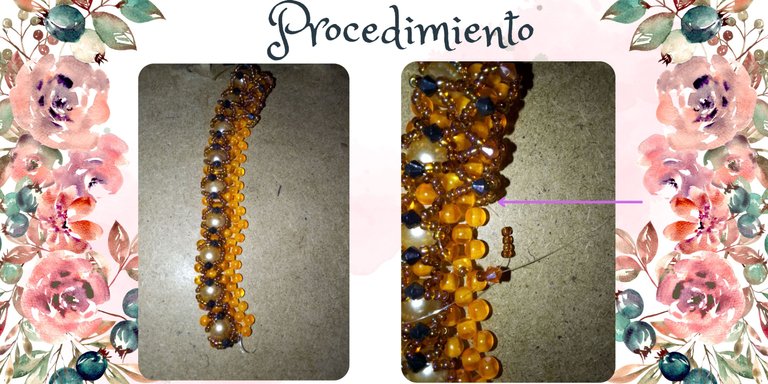
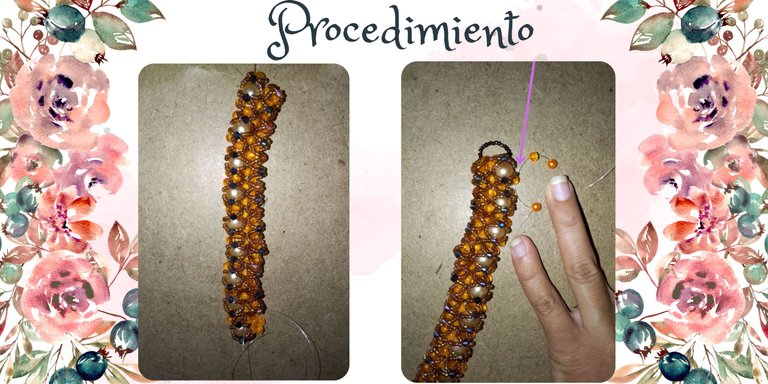
Paso 5 | Step 5
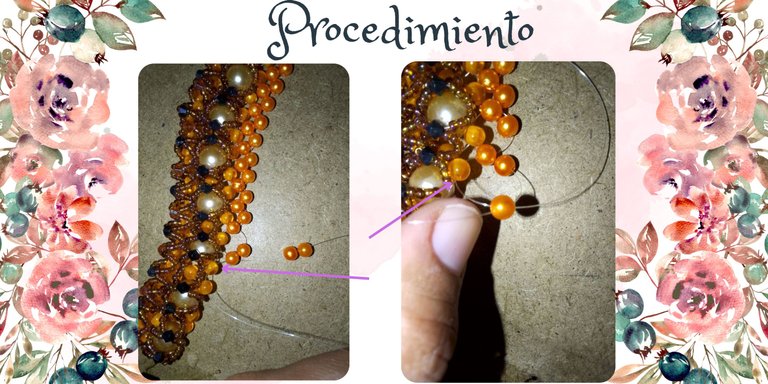
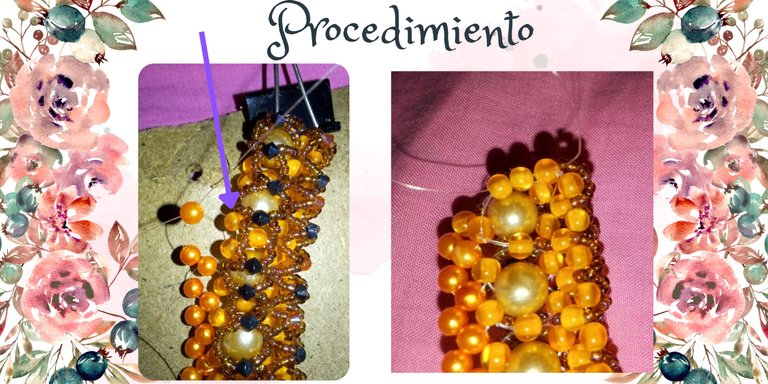
Ya en estre paso prepare la parte de las mostacilas negras que salen de la esquina de la pulsera, aqui se van a pasar los hilos chinos.
Luego pasamos mas perlas, estas tienen apariencia nacarada yno llevan enrrejado, me aprece que se ve mas bonito y llamativo asi. Aqui lo que se hace es cortar otro hilo nylon de aproximadamente 1 mt y colocarlo por partes iguales a una perla de al lado colocamos tres perlas y cruzamos en la ultima. Volvemos a hacer lo que hicimos en el paso 4, pasar el hilo nylon por la perla del lado izquiero que ya estaba colocada en la pulsera y pasamos solo 2 perlas y cruzamos los hilos por la ultima, entonces va quedadon el parón que vemos a continuación. Finalmente sacamos cada hilo por cada lado de la pulsera y pasamos mostacilla negra y hacemos nudos y cortamos.
Already in the next step prepare the part of the black beads that come out of the corner of the bracelet, here are going to pass the Chinese threads.
Then we pass more pearls, these have a pearly appearance and do not have a lattice, I think it looks prettier and more striking this way. Here what is done is to cut another nylon thread of approximately 1 mt and place it in equal parts to a bead next to it, we place three beads and cross in the last one. We do again what we did in step 4, pass the nylon thread through the bead on the left side that was already placed on the bracelet and pass only 2 beads and cross the threads through the last one, then we will have the stop that we see below. Finally we pull out each thread on each side of the bracelet and pass black beads and make knots and cut.
Paso 6 | Step 6
El último paso es hacer el cierre de la pulsera, cortar dos tiras de hilo chino, anudarlas a la pulsera, pasar una perla en cada par de hilos hacer un nudo al final para que no se salga cada perla y luego colocar cada tira en sentido horizontal pero en direcccion, opuesta una a la derecha y otra a la izquierda y hacer un nudo plano entre estas dos tiras de hilo. Este nudo asegura la pulsera y hace que podamos deslizar las tiras sin deshacer la pulsera.
The last step is to make the clasp of the bracelet, cut two strips of Chinese thread, knot them to the bracelet, pass a bead on each pair of threads, make a knot at the end so that each bead does not come off, and then place each strip horizontally but in opposite direction, one to the right and one to the left and make a flat knot between these two strips of thread. This knot secures the bracelet and allows us to slide the strips without undoing the bracelet.
Resultado | Result
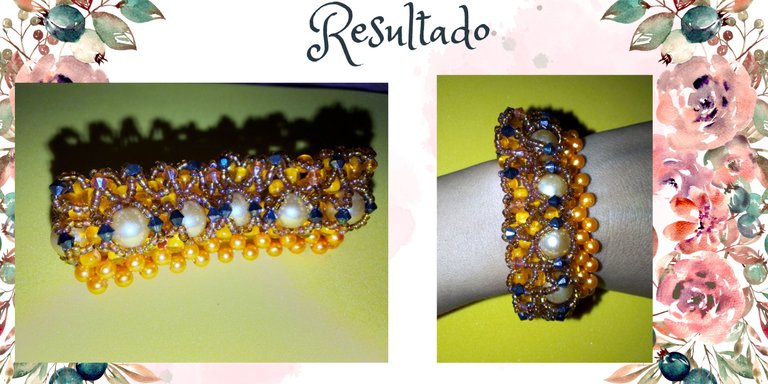
Bueno, quede fascinada por los colores de esta pulsera, me gustó mucho el resultado estoy comoda y contenta. Ya tengo una colección grande de pulseras! Espero poder publicar pronto un post sobre esto!
Well, I was fascinated by the colors of this bracelet, I really liked the result, I am comfortable and happy. I already have a big collection of bracelets! I hope to publish a post about it soon!
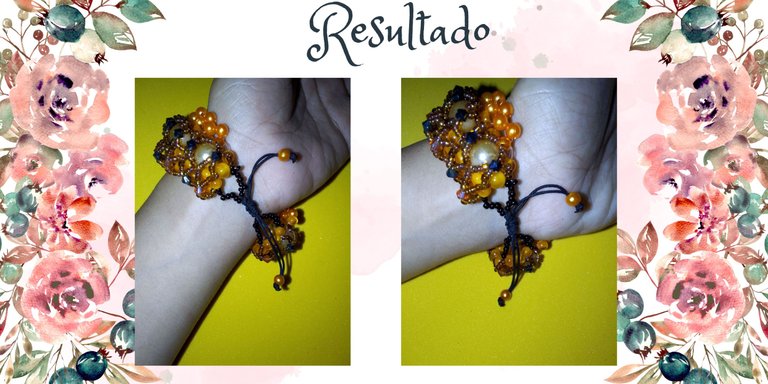
Aquí se puede ver el cierre de los hilos chinos con nudo plano.
Here you can see the closing of the Chinese yarns with flat knot.
Gracias por ver mi post!!
Thanks for seeing my post!!!
Créditos | Credits
Utilicé Canva para editar imágenes y personalicé un poco una plantilla de Canva.
I used Canva to edit images and customize a Canva template a bit.
Utilicé https://www.deepl.com/es/translator para la traducción
I used https://www.deepl.com/es/translator to traduction.
Todas las imagenes del paso a paso son mías, tomadas con un telefono Tecno Pop 7 y un telefono yez liv 1.
All the step by step images are mine, taken with Tecno Pop 7 phone and yez liv 1 phone.
| |
Congratulations @lismarcarolina2! You have completed the following achievement on the Hive blockchain And have been rewarded with New badge(s)
Your next payout target is 1000 HP.
The unit is Hive Power equivalent because post and comment rewards can be split into HP and HBD
You can view your badges on your board and compare yourself to others in the Ranking
If you no longer want to receive notifications, reply to this comment with the word
STOPTo support your work, I also upvoted your post!
Check out our last posts:
Muy bonita pulsera @lismarcarolina2, me gustó, saluditos 🌹
Gracias
Muy Linda pulsera amiga excelente quedó bendiciones para ti 🏵️
Gracias amiga!!
Muy linda amiga, me fascinaron los colores... gracias por compartir
Gracia a ti por comentar
!WOC
Keep up the good work with Woc, @lismarcarolina2! buiitre(4/5) is appreciative of the time and dedication you've put into writing this post. Your efforts are truly valued.
Your post was so good that @buiitre sent you 0.2 WGOLD as a gift! We are your biggest fan!
BTW! WGOLD is the token of the War of Clans ecosystem, you can use it to have discounts in all our games or stake it and earn rewards now!
Es una pulsera bastante elaborada. Se ve que dominas muy bien la técnica. Me gustó mucho como trabajaste primero con el nylon y luego incorporaste el hilo chino, es una idea muy creativa y que nos evita algunos inconvenientes con los otros métodos de cierre. Gracias por compartirlo.
Saludos
Gracias por comentar
Hermoso el resultado espectacular que lo disfrutes bendiciones.