Fraisier, cremosa, dulce y sobretodo delicioso, un pastel majestuoso. (ESP/ENG)
La fraisier es por mucho una de las tortas más emblemáticas de la cocina francesa, una combinación de un fino bizcocho embebido con almíbar de cereza, relleno de una cremosa crema diplomática, y chantilly que se contrastan muy bien con el Coulis de fresa y las fresas frescas, creo que no hay palabras para describir está combinación más en mi caso que Sony amante de las fresas con locura , y realmente súper fácil, y lo mejor es que podemos hacerlo con la fruta de temporada como durazno, melocotones, parchita y hasta mango lo que nos permite obtener variedad de sabores en este postre tan hermoso, sobre todo como se las diferentes capas.
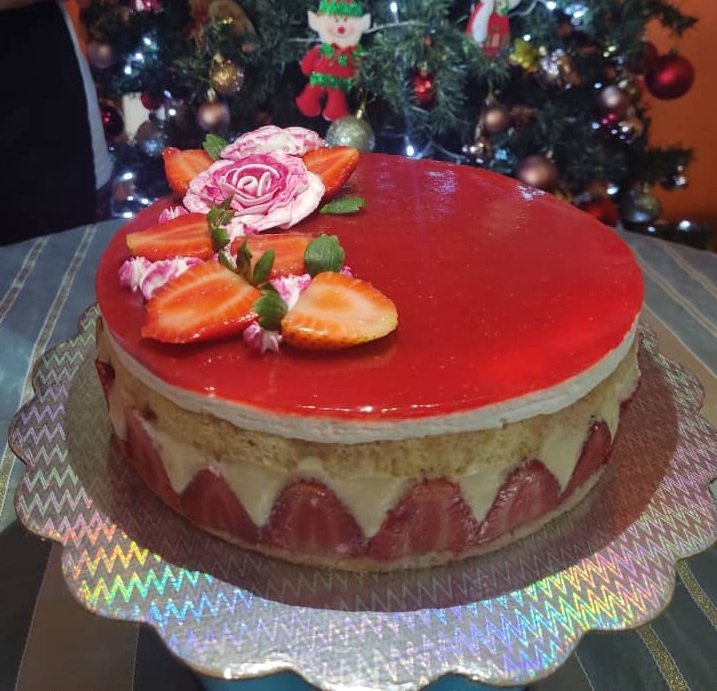
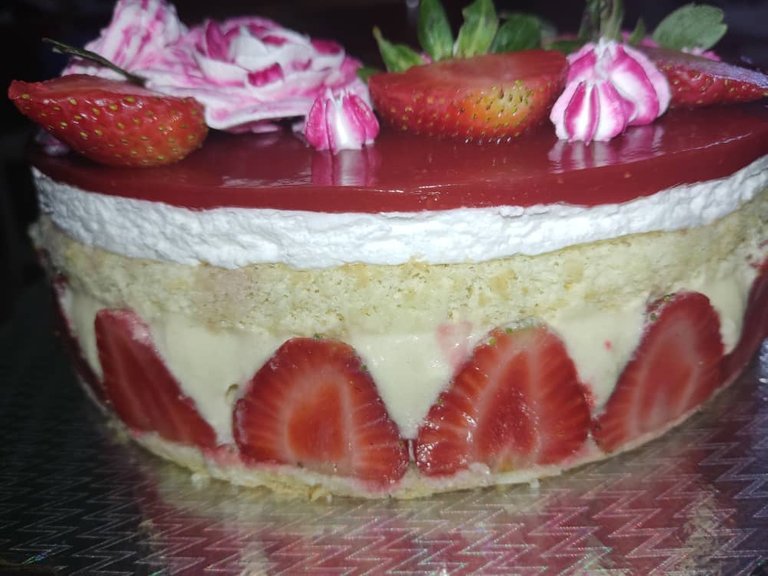
Este tipo de postre mantiene tradicionalmente su base de decoración, que son las fresas alrededor en lajas dejando ver el interior de las fresas, así como que la altura de la crema dependerá del alto de las fresas, y la parte de arriba un Coulis de fresa realmente hacen el contraste perfecto. Ahora vamos con esta receta tan deliciosa, súper francesa y bastante hermosa.
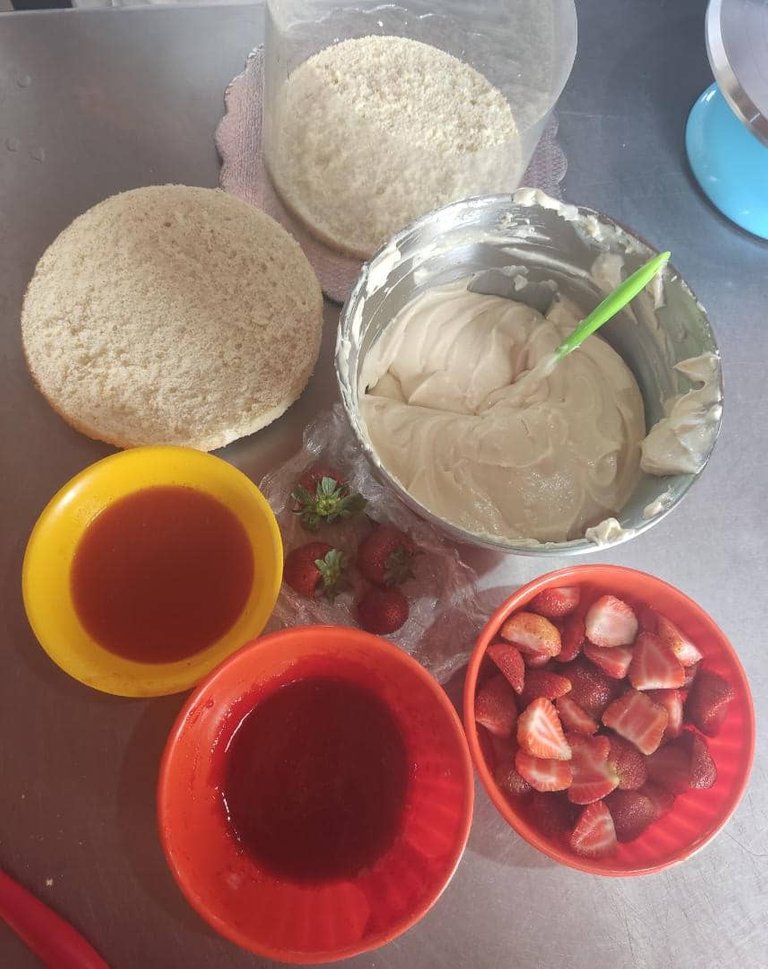
Necesitaremos para la elaboración de nuestra Fraisier
• 2 planchas fina de bizcocho.
• 6 tazas de crema pastelera, o crema muselina, debe tener una consistencia homogénea, la crema muselina la realizamos con 500 gramos de pastelera y 180 gramos de mantequilla sin sal.
• 2 tazas de crema para batir.
• 2 tazas de Coulis de fresa, este lo realizamos con 100% del peso de la fruta con 30$ de azúcar, se procesa y se lleva al fuego hasta obtener la consistencia deseada.
• 1 kilo de fresas no muy maduras, se cortan en láminas a lo largo, en lo posible similar, para ser utilizadas en contorno del molde donde se va armar el pastel, apartamos unas cuantas cortadas a la mitad para la decoración.
• Almíbar para hidratar el pastel de fresa o cereza.
• 1 aro o un molde desmontable, forrado con acetato a los lados, y sobre salga de la altura del molde, para que no se pegue la torta a la hora de desmoldar, si no tenemos el aro lo hacemos con el acetato y cinta plástica.
• Brillo gel de fresa. o gelatina sin sabor, para el coulis
• Colorante rojo
• 30 gramos gelatina sin sabor y agua para hidratar (Éste se coloca a la preparación de crema pastelera para que tome cuerpo.
Armado de la torta:
Cortar dos capas finas del bizcocho, Colocamos una lámina de acetato alrededor, o utilizamos un molde desmoldable, en este caso utilice un bizcocho de 22 centímetros y empezamos colocando una capa de bizcocho en el molde, humedecerlo con el almíbar de cerezas o fresas.
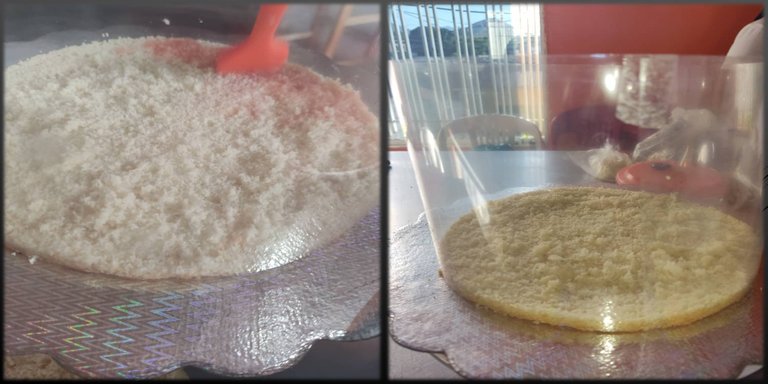
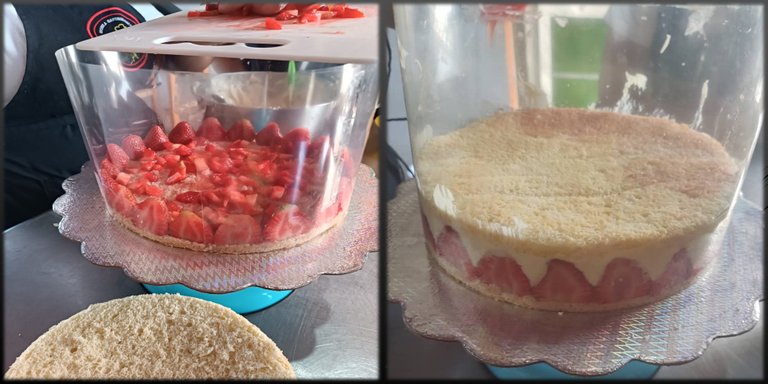
Ahora bien, colocaremos alrededor, lajas de fresas o fresas cortadas a la mitad y fresas cortada en cuadros pequeños por encima de nuestro bizcocho, rellenamos con nuestra crema pastelera o muselina con la gelatina sin sabor incorporada previamente, esta le dará firmeza, tapamos con la siguiente capa de bizcocho, y lo embebemos, recordemos que no debemos agregar mucho líquido porque esta debe quedar firme, y no queremos se rompa el bizcocho. Llevamos a la nevera por 1 hora aproximadamente.
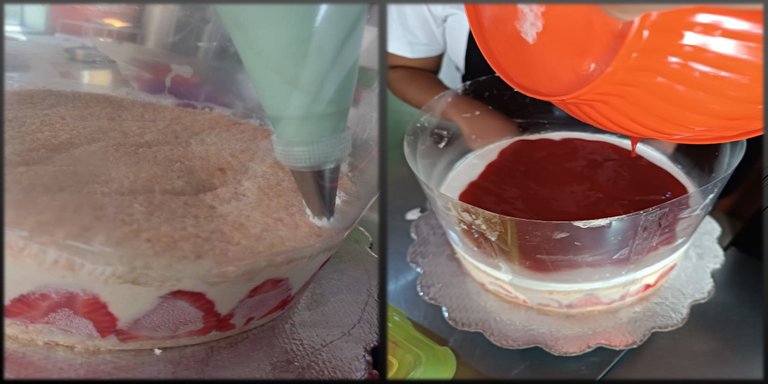
A continuación, agregaremos con ayuda de una manga con boquilla nuestra crema montada , debemos tratar en lo posible de que nuestras mezclas queden bien pegaditas a la acetato, prolijas y limpio para luego obtener el resultado deseado, y se note cada capa, tratemos que nuestro acetato no se mueva, el mío está colocado sobre una base dura de cartón, alisamos con una espátula o taroco, y llevamos por 1 hora a la nevera para que este bien firma, por ultimo colocamos el coulis de fresa, hidratado también con gelatina sin sabor, y llevamos 2 horas a la nevera o hasta que al tocarlo no se pegue de nuestros dedos.
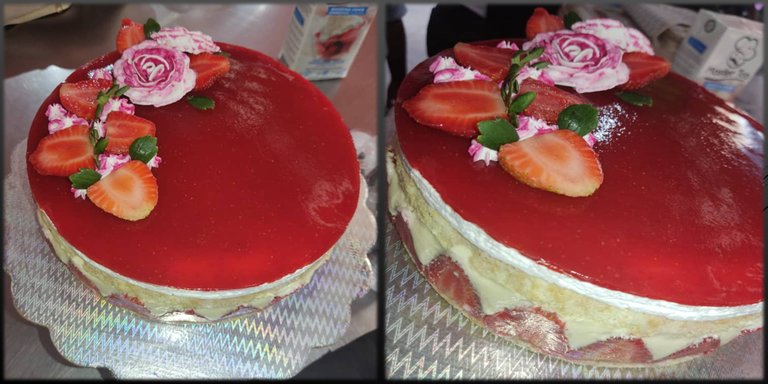
Ahora, pasado este tiempo sacamos de la nevera y decoramos a nuestro gusto yo decore con fresas frescas, y algo de crema batida con colorante rojo. Recordemos que este tipo de postre es preferible dejarlo en la nevera de un día para otro para obtener mejor consistencia.
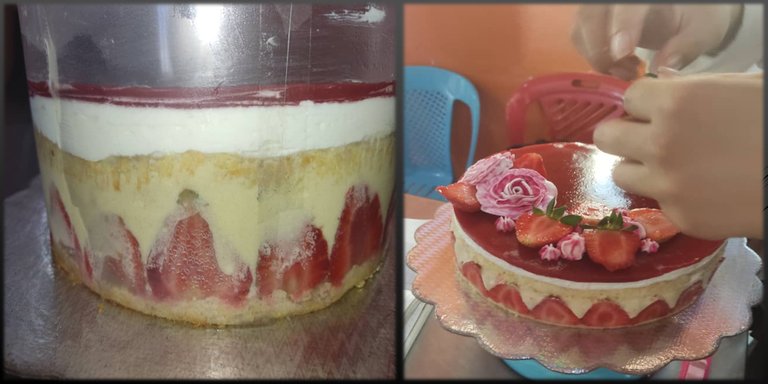
Y así de hermosa quedara nuestra Fraisier.

Todas las imágenes son de mi propiedad, tomadas con la cámara de mi teléfono Poco X3 Pro y otras están publicadas en mis Instagram personal Valeria.sweet.and.cake. Traducido con https://www.deepl.com/es/translator

Este tipo de postre mantiene tradicionalmente su base de decoración, que son las fresas alrededor en lajas dejando ver el interior de las fresas, así como que la altura de la crema dependerá del alto de las fresas, y la parte de arriba un Coulis de fresa realmente hacen el contraste perfecto. Ahora vamos con esta receta tan deliciosa, súper francesa y bastante hermosa.

Necesitaremos para la elaboración de nuestra Fraisier
Ingredientes
• 2 planchas fina de bizcocho.
• 6 tazas de crema pastelera, o crema muselina, debe tener una consistencia homogénea, la crema muselina la realizamos con 500 gramos de pastelera y 180 gramos de mantequilla sin sal.
• 2 tazas de crema para batir.
• 2 tazas de Coulis de fresa, este lo realizamos con 100% del peso de la fruta con 30$ de azúcar, se procesa y se lleva al fuego hasta obtener la consistencia deseada.
• 1 kilo de fresas no muy maduras, se cortan en láminas a lo largo, en lo posible similar, para ser utilizadas en contorno del molde donde se va armar el pastel, apartamos unas cuantas cortadas a la mitad para la decoración.
• Almíbar para hidratar el pastel de fresa o cereza.
• 1 aro o un molde desmontable, forrado con acetato a los lados, y sobre salga de la altura del molde, para que no se pegue la torta a la hora de desmoldar, si no tenemos el aro lo hacemos con el acetato y cinta plástica.
• Brillo gel de fresa. o gelatina sin sabor, para el coulis
• Colorante rojo
• 30 gramos gelatina sin sabor y agua para hidratar (Éste se coloca a la preparación de crema pastelera para que tome cuerpo.

**Paso a paso**
Armado de la torta:
Cortar dos capas finas del bizcocho, Colocamos una lámina de acetato alrededor, o utilizamos un molde desmoldable, en este caso utilice un bizcocho de 22 centímetros y empezamos colocando una capa de bizcocho en el molde, humedecerlo con el almíbar de cerezas o fresas.

Ahora bien, colocaremos alrededor, lajas de fresas o fresas cortadas a la mitad y fresas cortada en cuadros pequeños por encima de nuestro bizcocho, rellenamos con nuestra crema pastelera o muselina con la gelatina sin sabor incorporada previamente, esta le dará firmeza, tapamos con la siguiente capa de bizcocho, y lo embebemos, recordemos que no debemos agregar mucho líquido porque esta debe quedar firme, y no queremos se rompa el bizcocho. Llevamos a la nevera por 1 hora aproximadamente.

A continuación, agregaremos con ayuda de una manga con boquilla nuestra crema montada , debemos tratar en lo posible de que nuestras mezclas queden bien pegaditas a la acetato, prolijas y limpio para luego obtener el resultado deseado, y se note cada capa, tratemos que nuestro acetato no se mueva, el mío está colocado sobre una base dura de cartón, alisamos con una espátula o taroco, y llevamos por 1 hora a la nevera para que este bien firma, por ultimo colocamos el coulis de fresa, hidratado también con gelatina sin sabor, y llevamos 2 horas a la nevera o hasta que al tocarlo no se pegue de nuestros dedos.

Ahora, pasado este tiempo sacamos de la nevera y decoramos a nuestro gusto yo decore con fresas frescas, y algo de crema batida con colorante rojo. Recordemos que este tipo de postre es preferible dejarlo en la nevera de un día para otro para obtener mejor consistencia.

Y así de hermosa quedara nuestra Fraisier.


English
The fraisier is by far one of the most emblematic cakes of French cuisine, a combination of a thin sponge cake soaked with cherry syrup, filled with a creamy pâtisserie cream and whipped cream that contrasts very well with the strawberry coulis and fresh strawberries, I think there are no words to describe this combination more in my case that Sony is a crazy strawberry lover, and really super easy, and the best thing is that we can do it with seasonal fruit such as peaches, peaches, parchita and even mango which allows us to obtain a variety of flavors in this beautiful dessert, especially as the different layers.

This type of dessert traditionally keeps its base of decoration, which are the strawberries around in slices letting see the inside of the strawberries, as well as that the height of the cream will depend on the height of the strawberries, and the top a strawberry Coulis really make the perfect contrast. Now let's go with this recipe so delicious, super French and quite beautiful.

For the preparation of our Fraisier we will need
• 2 thin sheets of sponge cake.
• 6 cups of pastry cream, or muslin cream, it must have a homogeneous consistency, the muslin cream is made with 500 grams of pastry cream and 180 grams of unsalted butter.
• 2 cups of whipping cream.
• 2 cups of strawberry coulis, this is made with 100% of the weight of the fruit with $30 of sugar, it is processed and heated until the desired consistency is obtained.
• 1 kilo of not very ripe strawberries, cut in slices lengthwise, as much as possible similar, to be used in the contour of the mold where the cake will be assembled, set aside a few cut in half for decoration.
• Syrup to hydrate the strawberry or cherry pie.
• 1 ring or a removable mold, lined with acetate on the sides, and over it comes out of the height of the mold, so that the cake does not stick when unmolding, if we do not have the ring we do it with acetate and plastic tape.
• Strawberry gel gloss. or unflavored gelatin, for the coulis.
• Red dye
• 30 grams of unflavored gelatin and water to hydrate (This is added to the pastry cream preparation to give it body.

Armado de la torta:
Cut two thin layers of the sponge cake, place a sheet of acetate around it, or use a mold, in this case use a 22 centimeter sponge cake and start by placing a layer of sponge cake in the mold, moisten it with the cherry or strawberry syrup.

Now, we will place around, slices of strawberries or strawberries cut in half and strawberries cut into small squares on top of our cake, fill with our pastry cream or muslin with the previously incorporated unflavored gelatin, this will give it firmness, cover with the next layer of cake, and soak it, remember not to add much liquid because it must be firm, and we do not want the cake to break. Place in the refrigerator for approximately 1 hour.

Next, we will add with the help of a sleeve with nozzle our whipped cream, we must try as much as possible that our mixtures are well stuck to the acetate, neat and clean to then obtain the desired result, and each layer is noticeable, try that our acetate does not move, mine is placed on a hard cardboard base, we smooth it with a spatula or taroco, and take it to the refrigerator for 1 hour so that it is well signed, finally we place the strawberry coulis, also hydrated with unflavored gelatin, and take 2 hours in the refrigerator or until it does not stick to our fingers when we touch it.

Now, after this time we take it out of the refrigerator and decorate it as we like. I decorated it with fresh strawberries and some whipped cream with red coloring. Remember that this type of dessert is best left in the refrigerator overnight for better consistency.

And this is how beautiful our Fraisier will look.


All images are my own, taken with my Poco X3 Pro phone camera and others are posted on my personal Instagram Valeria.sweet.and.cake.Translated with https://www.deepl.com/es/translator

This type of dessert traditionally keeps its base of decoration, which are the strawberries around in slices letting see the inside of the strawberries, as well as that the height of the cream will depend on the height of the strawberries, and the top a strawberry Coulis really make the perfect contrast. Now let's go with this recipe so delicious, super French and quite beautiful.

For the preparation of our Fraisier we will need
Ingredientes
• 2 thin sheets of sponge cake.
• 6 cups of pastry cream, or muslin cream, it must have a homogeneous consistency, the muslin cream is made with 500 grams of pastry cream and 180 grams of unsalted butter.
• 2 cups of whipping cream.
• 2 cups of strawberry coulis, this is made with 100% of the weight of the fruit with $30 of sugar, it is processed and heated until the desired consistency is obtained.
• 1 kilo of not very ripe strawberries, cut in slices lengthwise, as much as possible similar, to be used in the contour of the mold where the cake will be assembled, set aside a few cut in half for decoration.
• Syrup to hydrate the strawberry or cherry pie.
• 1 ring or a removable mold, lined with acetate on the sides, and over it comes out of the height of the mold, so that the cake does not stick when unmolding, if we do not have the ring we do it with acetate and plastic tape.
• Strawberry gel gloss. or unflavored gelatin, for the coulis.
• Red dye
• 30 grams of unflavored gelatin and water to hydrate (This is added to the pastry cream preparation to give it body.

**Step by step**
Armado de la torta:
Cut two thin layers of the sponge cake, place a sheet of acetate around it, or use a mold, in this case use a 22 centimeter sponge cake and start by placing a layer of sponge cake in the mold, moisten it with the cherry or strawberry syrup.

Now, we will place around, slices of strawberries or strawberries cut in half and strawberries cut into small squares on top of our cake, fill with our pastry cream or muslin with the previously incorporated unflavored gelatin, this will give it firmness, cover with the next layer of cake, and soak it, remember not to add much liquid because it must be firm, and we do not want the cake to break. Place in the refrigerator for approximately 1 hour.

Next, we will add with the help of a sleeve with nozzle our whipped cream, we must try as much as possible that our mixtures are well stuck to the acetate, neat and clean to then obtain the desired result, and each layer is noticeable, try that our acetate does not move, mine is placed on a hard cardboard base, we smooth it with a spatula or taroco, and take it to the refrigerator for 1 hour so that it is well signed, finally we place the strawberry coulis, also hydrated with unflavored gelatin, and take 2 hours in the refrigerator or until it does not stick to our fingers when we touch it.

Now, after this time we take it out of the refrigerator and decorate it as we like. I decorated it with fresh strawberries and some whipped cream with red coloring. Remember that this type of dessert is best left in the refrigerator overnight for better consistency.

And this is how beautiful our Fraisier will look.


0
0
0.000
I loved
Thanks You. Regards.☺️
Mi mamá estaría alucinando con tan solo ver el post.
Mía felicitaciones por la introduction, la receta y como quedó esa maravillosa torta de fresas que bien como dijiste es clásica dela pastelería francesa.
Seguramente la dejaré en mi recetario ya que quedó tal cual como de una pastelería y me encanta que haya sido casera.
¡El mejor de los éxitos!
¡Saludos!
Gracias por el apoyo!! ☺️
Para mí realmente fue todo un reto, porque siempre los que vemos en vitrinas son fantástico y quería que el mío fuera fascinante además de delicioso, creo que ahora soy fans de este pastel y más con comentarios como estos. Gracias!! 😊
Wow, se ve deliciosa🤤 Tengo que hacerla🤩🤩 Gracias por compartir la receta❤️
Si es súper deliciosa, si la haces seguro te encantará!! Saludos ☺️
Has sido curado por @visualblock / You've been curated by @visualblock
Bienvenidas delegaciones / Delegations welcome
Encuentra nuestra comunidad aquí / Find our community here
Trail de Curación / Curation Trail
Gracias por el apoyo 😊
Realmente espectacular éste postre que hoy nos muestras! Con bastante técnica pastelera. Gracias por compartir.
Si eso es lo más relevante de este tipo de postre su técnica! Es súper deliciosa y fácil de hacer. Gracias por tu comentario. Saludos ☺️
https://twitter.com/1327070381216309249/status/1597280067616669698
https://twitter.com/150356289/status/1597287751002755074
https://twitter.com/1500464943317008386/status/1597577814538346496
The rewards earned on this comment will go directly to the people( @edwing357, @noalys, @visualblock ) sharing the post on Twitter as long as they are registered with @poshtoken. Sign up at https://hiveposh.com.
Gracias por el apoyo! ☺️
Como siempre compartiendo postres espectaculares 🤤🤤🤤
Gracias! Siempre trato de ir mejorando que bueno que te gustan . Saludos 🤗🤗
¡Felicidades! Esta publicación obtuvo upvote y fue compartido por @la-colmena, un proyecto de Curación Manual para la comunidad hispana de Hive que cuenta con el respaldo de @curie.
Si te gusta el trabajo que hacemos, te invitamos a darle tu voto a este comentario y a votar como testigo por La Colmena.
Si quieres saber más sobre nuestro proyecto, te invitamos a acompañarnos en nuestro servidor de Discord.
Gracias por el apoyo!! ☺️
Este pastel es precioso y realmente presentable para cualquier festividad u obsequio. Estás haciendo un excelente trabajo como repostera @irenebarreto, felicitaciones.
Gracias!!! Palabras muy halagadoras y siempre tratando de hacer lo mejor que se pueda, amo la pastelería y creo que está es la mejor forma de demostrarlo. Saludos 😊
Es evidente el cuidado, el cariño y la buena energía con que haces tus recetas. Sigue así, la cocina es un arte, y todo arte requiere amor. Que tengas feliz día.
Gracias, si increíblemente la pasión, el cuidado y el cariño son los ingredientes fundamentales para el éxito en este mundo de la repostería, me encantó tu comentario.Saludos! 🤗
How cute)
Se ve delicioso, me encanta la presentación ❤️
Si es un pastel súper hermoso y delicado digno de cualquier celebración. Gracias por tu comentario ☺️
Join the foodie fun! We've given you a FOODIE boost. Come check it out at @foodiesunite for the latest community updates. Spread your gastronomic delights on and claim your tokens.
woowww amiga @irenebarreto que deliciosa y bella presentación tiene este postre, esa combinación de fresas con crema pastelera es lo máximo. Gracias por compartir tus conocimientos de pastelería. Aprendemos cada día más.
Hola si es una combinación sublime, entre lo dulce de la crema y lo ácido de las fresas, es espectacular, gracias por tu comentario.Saludos ☺️
Congratulations @irenebarreto! You have completed the following achievement on the Hive blockchain And have been rewarded with New badge(s)
Your next target is to reach 500 comments.
Your next target is to reach 700 replies.
Your next target is to reach 25000 upvotes.
You can view your badges on your board and compare yourself to others in the Ranking
If you no longer want to receive notifications, reply to this comment with the word
STOPCheck out the last post from @hivebuzz:
Support the HiveBuzz project. Vote for our proposal!