Brazo gitano paso a paso, deliciosos, fácil y muy esponjoso.(ESP/ENG)
El brazo gitano es de esos postres que no dejan de ser tendencias y que son excelentes tanto como un postre de vitrina o como pastel de cumpleaños, hoy en día existen de diversos rellenos, cuando yo era niña en mi casa se acostumbraba a comer relleno de mermelada de fresa y chocolate, y lo decoraban espolvoreándolo con un poco de azúcar glas, realmente era sumamente delicioso, era casi una tradición de domingo, porque además de ser muy económico, ya que, básicamente solo contiene 3 ingredientes básicos como azúcar, harina y huevos, es este caso para mí lo más complicado sería la técnica que se realiza para obtener un pionono flexible, suave y elástico que sea fácil de enrollar y así obtener un brazo gitano prolijo y sin aberturas es la meta, además de que tenga un relleno cremoso, y nos quede delicioso. Así como fue con estos un pionono suave de vainilla relleno de crema batida, tropezones de fresa y virutas de chocolate, para mí la combinación perfecta entre cremosidad, textura y sabor.
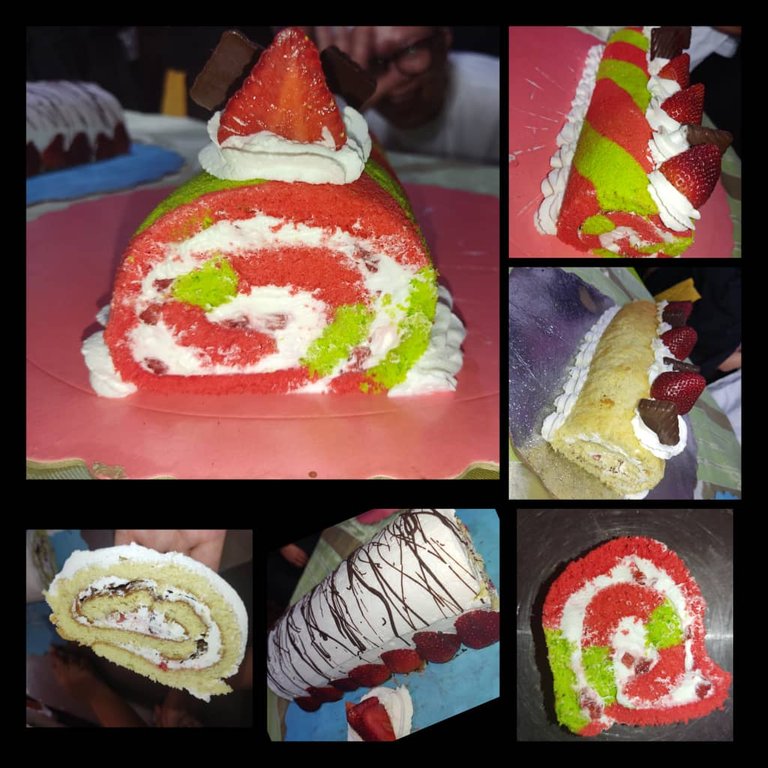
En esta oportunidad preparamos tres en mis estudios de maestro pastelero, el primero lo hicimos con la batidora, pero el segundo se fue la luz y como en mi país a veces duramos horas sin ella, me tocó levantar las claras a punto de nieve manualmente con un batidor de mano, la verdad nunca lo había hecho y no pensé que las claras doblarían su tamaño tan rápido, yo misma estaba sorprendida por el volumen y consistencia obtenida y la verdad quedé agotada pero feliz con los resultados, así que quiero mostrarle el paso a paso y algunas técnicas para obtener unos brazo gitano exquisito y hermoso que seguro les encantará. Así que vamos con esta receta para que ustedes también puedan hacerlos en casa y degustar.


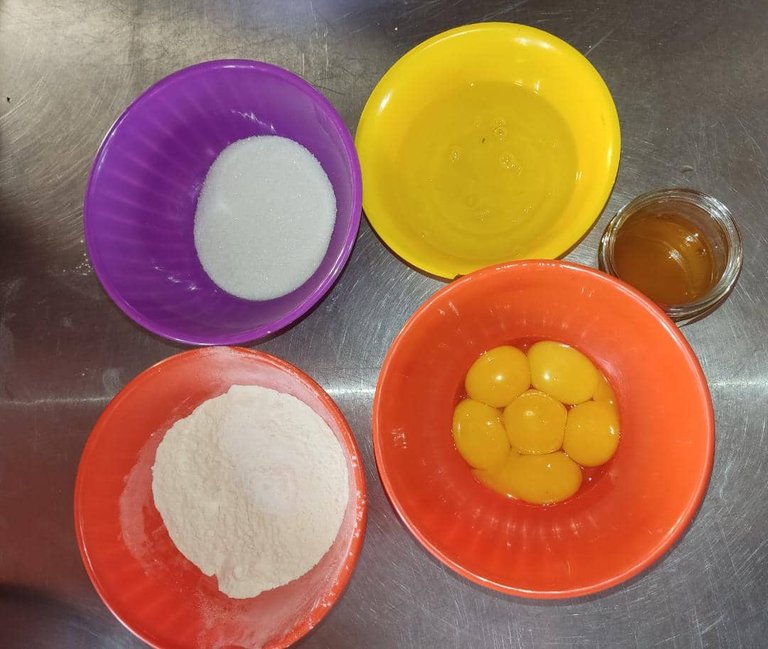

Previamente tendremos una bandeja de 30cm por 35 cm con papel engrasado, y precalentamos nuestro horno a 180º
En la batidora colocamos a batir las claras de huevos luego que doblen su volumen agregaremos el azúcar, seguidamente de las yemas, hasta obtener el punto de letra, a continuación, retiramos la batidora e incorporamos en forma envolvente la miel.
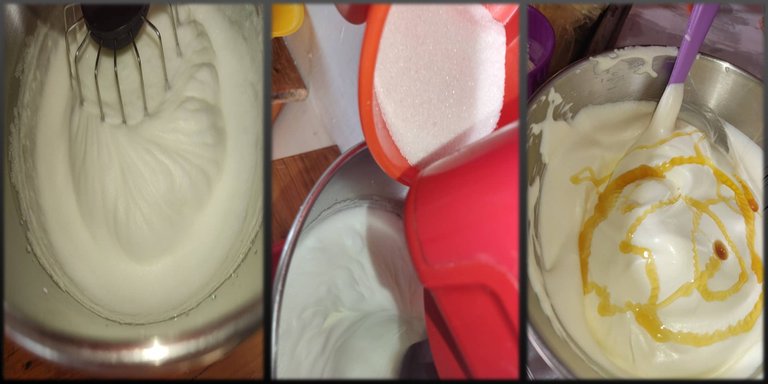
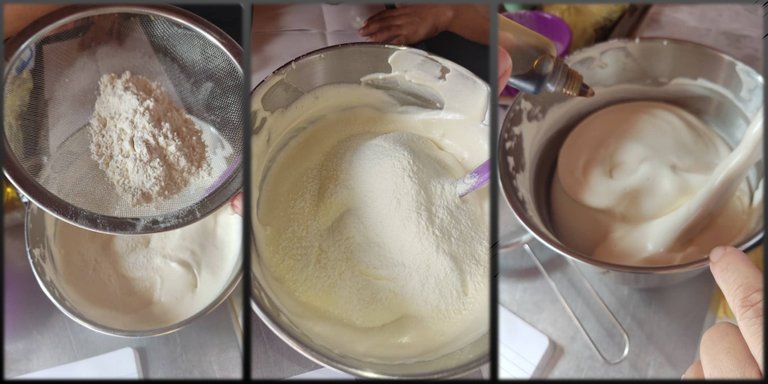
A continuación, agregaremos la harina cernida con un tamizador en tres partes y la incorporaremos con una paleta de forma envolvente para no bajar el volumen de las claras, por ultimo colocamos la esencia.
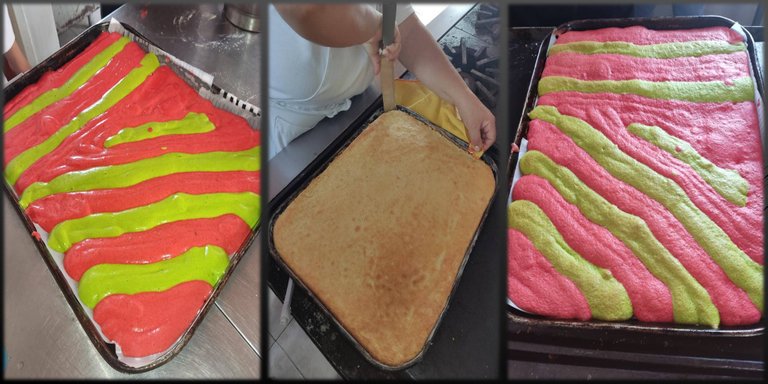
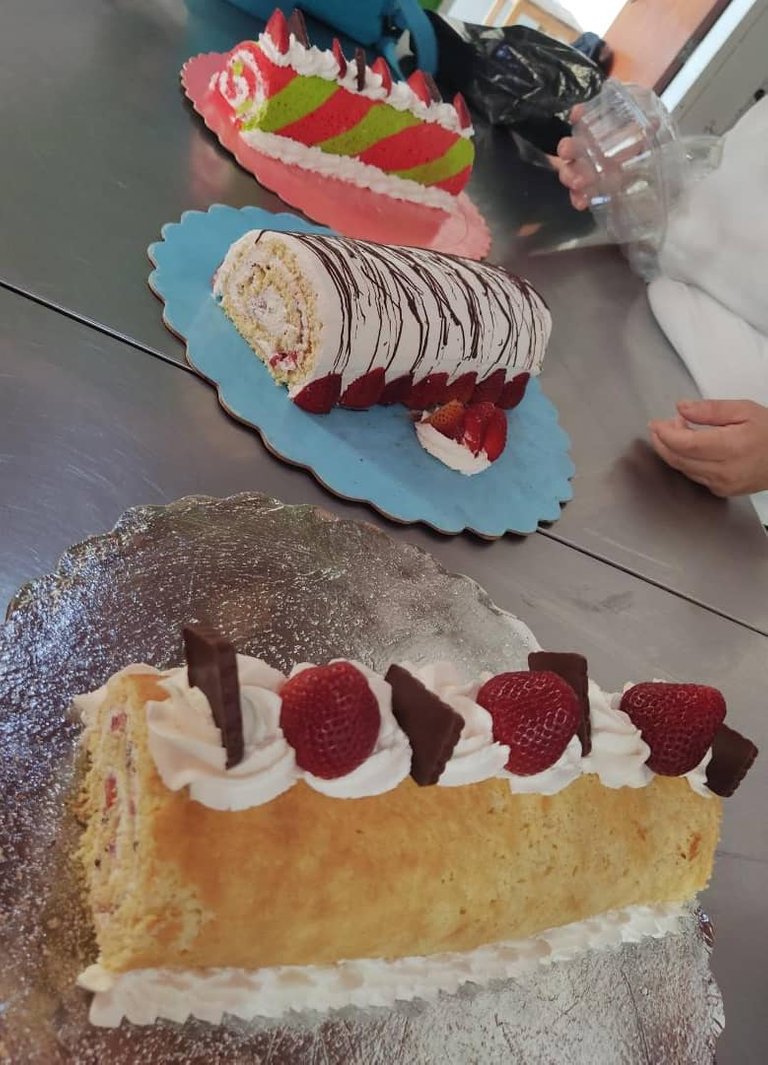
Colocamos en nuestras bandejas con el papel engrasado y horneamos durante 10 minutos. Podemos hacerlo de colores dividiendo la mezcla y coloreando cada parte con ayuda de una boquilla hacemos la forma de nuestra preferencia.
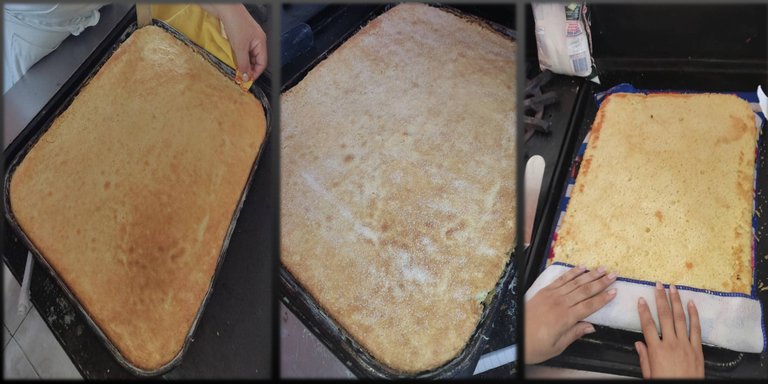
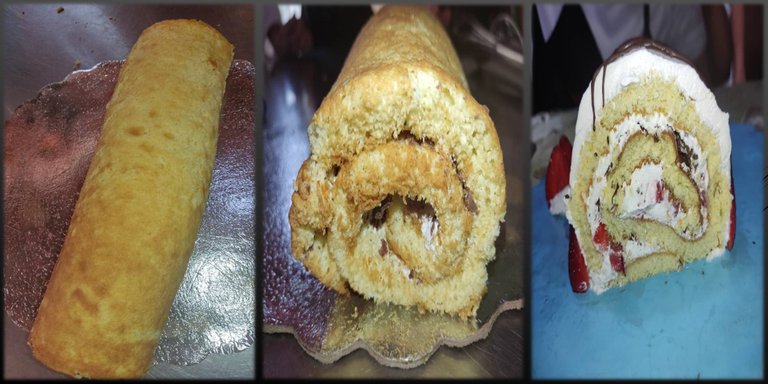
Sacamos del horno y nos aseguramos con una espátula que este bien desprendido y rápidamente espolvoreamos nuestro pionono con azúcar granulada, volteamos sobre un paño húmedo desprendemos el papel encerado y procedemos a enrollar, por el lado más angosto, llevamos a la nevera enrollado por un par de horas.
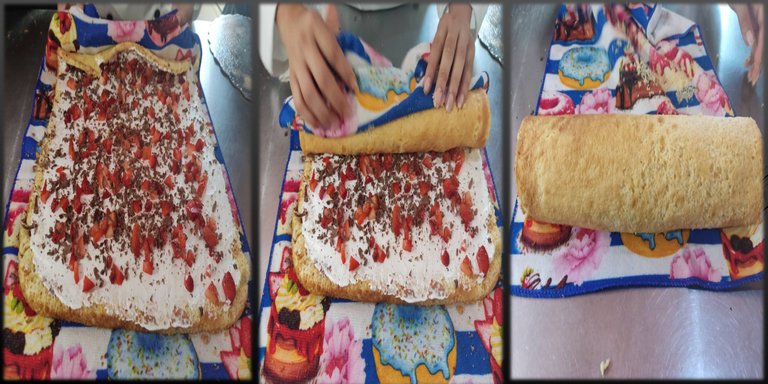
Transcurrido este tiempo sacamos nuestro pionono de la nevera y rellenamos como sea de nuestra preferencia en esta oportunidad yo rellene con crema batida, trozos de fresa y virutas de chocolate, y con ayuda del paño vamos enrollando de manera que se valla apretando, no muy fuerte para que no se le salga el relleno. La parte de la unión debe quedar hacia abajo.
A continuación, con cuidado y ejerciendo presión vamos enrollando nuestro brazo gitano por el lado más ancho, es importante que el relleno no sea muy líquido para que se nos salga por los lados o no rompa nuestra plancha. Llevamos a la nevera por 1 hora y recortamos las puntas del brazo gitano para que se vea prolijo.
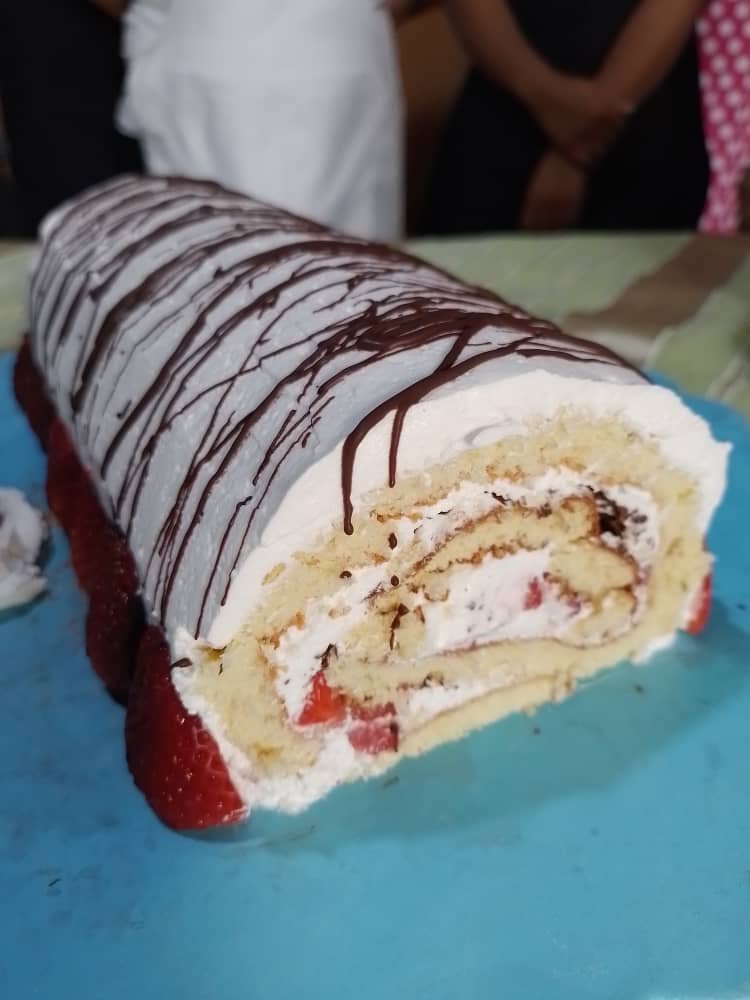
Ahora, decoramos con más crema o simplemente espolvoreamos con azúcar glas.
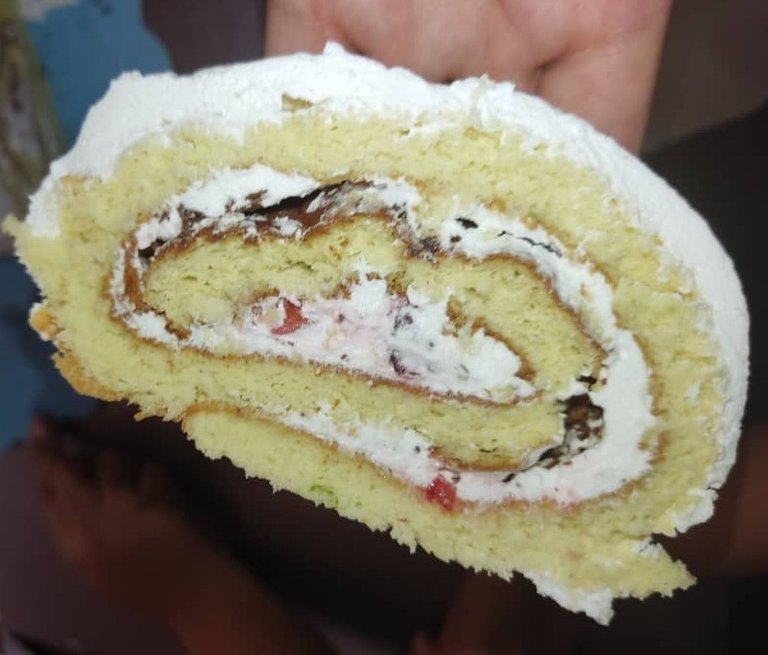
El resultado final

Todas las imágenes son de mi propiedad, tomadas con la cámara de mi teléfono Poco X3 Pro y otras están publicadas en mis Instagram personal Valeria.sweet.and.cake. Traducido con https://www.deepl.com/es/translator


En esta oportunidad preparamos tres en mis estudios de maestro pastelero, el primero lo hicimos con la batidora, pero el segundo se fue la luz y como en mi país a veces duramos horas sin ella, me tocó levantar las claras a punto de nieve manualmente con un batidor de mano, la verdad nunca lo había hecho y no pensé que las claras doblarían su tamaño tan rápido, yo misma estaba sorprendida por el volumen y consistencia obtenida y la verdad quedé agotada pero feliz con los resultados, así que quiero mostrarle el paso a paso y algunas técnicas para obtener unos brazo gitano exquisito y hermoso que seguro les encantará. Así que vamos con esta receta para que ustedes también puedan hacerlos en casa y degustar.


**Pionono**

| Cantidad | Ingrediente | ||
|---|---|---|---|
| 6 | Huevos Separados | ||
| 120 gramos | Azúcar | ||
| 120 gramos | Harina | ||
| 1 cucharadas | Miel | ||
| 1 cucharadita | Esencia de nata o mantecado |


Paso a paso
Previamente tendremos una bandeja de 30cm por 35 cm con papel engrasado, y precalentamos nuestro horno a 180º
En la batidora colocamos a batir las claras de huevos luego que doblen su volumen agregaremos el azúcar, seguidamente de las yemas, hasta obtener el punto de letra, a continuación, retiramos la batidora e incorporamos en forma envolvente la miel.

A continuación, agregaremos la harina cernida con un tamizador en tres partes y la incorporaremos con una paleta de forma envolvente para no bajar el volumen de las claras, por ultimo colocamos la esencia.

Colocamos en nuestras bandejas con el papel engrasado y horneamos durante 10 minutos. Podemos hacerlo de colores dividiendo la mezcla y coloreando cada parte con ayuda de una boquilla hacemos la forma de nuestra preferencia.

Sacamos del horno y nos aseguramos con una espátula que este bien desprendido y rápidamente espolvoreamos nuestro pionono con azúcar granulada, volteamos sobre un paño húmedo desprendemos el papel encerado y procedemos a enrollar, por el lado más angosto, llevamos a la nevera enrollado por un par de horas.

Transcurrido este tiempo sacamos nuestro pionono de la nevera y rellenamos como sea de nuestra preferencia en esta oportunidad yo rellene con crema batida, trozos de fresa y virutas de chocolate, y con ayuda del paño vamos enrollando de manera que se valla apretando, no muy fuerte para que no se le salga el relleno. La parte de la unión debe quedar hacia abajo.

A continuación, con cuidado y ejerciendo presión vamos enrollando nuestro brazo gitano por el lado más ancho, es importante que el relleno no sea muy líquido para que se nos salga por los lados o no rompa nuestra plancha. Llevamos a la nevera por 1 hora y recortamos las puntas del brazo gitano para que se vea prolijo.

Ahora, decoramos con más crema o simplemente espolvoreamos con azúcar glas.


English
The gypsy arm is one of those desserts that never cease to be trends and are excellent both as a showcase dessert or as a birthday cake, today there are several fillings, when I was a child in my house used to eat filled with strawberry jam and chocolate, and decorated it sprinkling it with a little powdered sugar, it really was extremely delicious, it was almost a Sunday tradition, because besides being very economical, since it basically contains only 3 basic ingredients such as sugar, flour and eggs, in this case for me the most complicated thing would be the technique that is performed to obtain a flexible, soft and elastic pionono that is easy to roll and thus obtain a neat gypsy arm without openings is the goal, besides having a creamy filling, and it is delicious. As it was with these soft vanilla pionono filled with whipped cream, strawberry pieces and chocolate shavings, for me the perfect combination of creaminess, texture and flavor.

In this opportunity we prepared three in my studies of master pastry chef, the first one we did with the mixer, but the second one the power went out and as in my country sometimes we last hours without it, I had to raise the egg whites manually with a hand mixer, I myself was surprised by the volume and consistency obtained and the truth is that I was exhausted but happy with the results, so I want to show you the step by step and some techniques to obtain an exquisite and beautiful gypsy arm that I'm sure you will love. So let's go with this recipe so you can also make them at home and taste them.


Previously we will have a tray of 30cm by 35 cm with greaseproof paper, and preheat our oven to 180º.
In the mixer, beat the egg whites until they double their volume, then add the sugar, followed by the egg yolks, until the egg whites reach the desired consistency, then remove the mixer and add the honey in an enveloping way.

Next, add the flour sifted with a sieve in three parts and incorporate it with a paddle in an enveloping way so as not to lower the volume of the egg whites, and finally add the essence.

Place on our trays with greaseproof paper and bake for 10 minutes. We can make it colored by dividing the mixture and coloring each part with the help of a nozzle to make the shape of our preference.

Remove from the oven and make sure with a spatula that it is well detached and quickly sprinkle our pionono with granulated sugar, turn it over on a damp cloth, remove the waxed paper and proceed to roll it up, on the narrowest side, take it to the refrigerator rolled up for a couple of hours.

After this time we take our pionono out of the refrigerator and fill it as we prefer, this time I filled it with whipped cream, strawberry pieces and chocolate shavings, and with the help of the cloth we roll it up so that it gets tight, not too tight so that the filling does not come out. The joint should be facing downwards.

Next, carefully roll the gypsy arm on the wider side, it is important that the filling is not too liquid so that it does not come out on the sides or break our plate. Place in the refrigerator for 1 hour and trim the ends of the gypsy arm so that it looks neat.

Now, decorate with more cream or simply sprinkle with powdered sugar.

The final result


All images are my own, taken with my Poco X3 Pro phone camera and others are posted on my personal Instagram Valeria.sweet.and.cake.Translated with https://www.deepl.com/es/translator


In this opportunity we prepared three in my studies of master pastry chef, the first one we did with the mixer, but the second one the power went out and as in my country sometimes we last hours without it, I had to raise the egg whites manually with a hand mixer, I myself was surprised by the volume and consistency obtained and the truth is that I was exhausted but happy with the results, so I want to show you the step by step and some techniques to obtain an exquisite and beautiful gypsy arm that I'm sure you will love. So let's go with this recipe so you can also make them at home and taste them.


**Pionono**

| Quantity | Ingredient | |||||
|---|---|---|---|---|---|---|
| 6 | Separated eggs | |||||
| 120 grams | Sugar | |||||
| 120 grams | 120 grams | Flour | ||||
| 1 tablespoons | Honey | |||||
| 1 teaspoon | Cream or butter essence |


Step by step
Previously we will have a tray of 30cm by 35 cm with greaseproof paper, and preheat our oven to 180º.
In the mixer, beat the egg whites until they double their volume, then add the sugar, followed by the egg yolks, until the egg whites reach the desired consistency, then remove the mixer and add the honey in an enveloping way.

Next, add the flour sifted with a sieve in three parts and incorporate it with a paddle in an enveloping way so as not to lower the volume of the egg whites, and finally add the essence.

Place on our trays with greaseproof paper and bake for 10 minutes. We can make it colored by dividing the mixture and coloring each part with the help of a nozzle to make the shape of our preference.

Remove from the oven and make sure with a spatula that it is well detached and quickly sprinkle our pionono with granulated sugar, turn it over on a damp cloth, remove the waxed paper and proceed to roll it up, on the narrowest side, take it to the refrigerator rolled up for a couple of hours.

After this time we take our pionono out of the refrigerator and fill it as we prefer, this time I filled it with whipped cream, strawberry pieces and chocolate shavings, and with the help of the cloth we roll it up so that it gets tight, not too tight so that the filling does not come out. The joint should be facing downwards.

Next, carefully roll the gypsy arm on the wider side, it is important that the filling is not too liquid so that it does not come out on the sides or break our plate. Place in the refrigerator for 1 hour and trim the ends of the gypsy arm so that it looks neat.

Now, decorate with more cream or simply sprinkle with powdered sugar.


0
0
0.000
https://twitter.com/150356289/status/1583457971794628609
The rewards earned on this comment will go directly to the people( @noalys ) sharing the post on Twitter as long as they are registered with @poshtoken. Sign up at https://hiveposh.com.
Gracias por el apoyo!! 😊
En casa nunca he preparado uno pero siempre que alguien de mi familia los realiza es diferente su relleno utilizan arequipe al igual que para decorarlo, pero está variación con fresas, crema y chocolate me gusto bastante. Te recomiendo colocar en los ingredientes que empleaste para su relleno y decoración.
Hola gracias!! Si es muy delicioso y pueden ser muy variados sus ingrediente incluso pueden hacerce salado rellenos de atún e ingredientes así, y los ingredientes y cantidades si están abajo del texto introductorio.Gracias por pasar por mi post y comentar.😊
Esto se ve increíblemente delicioso 🤤 hasta me dieron mucha ganas de probarlo, todos los ingredientes en conjunto deben hacer que el sabor sea algo de otro mundo, me encantó
Hola si además de delicioso es muy fácil de hacer deberías intentarlo, seguro te encantará!! 😊
@tipu curate 4
Gracias por el apoyo 😊
You are welcome :)
The one with a pink accent is very lovely, I love it.
Thank you, they are very beautiful and delicious. Greetings! 😊
You're welcome and have a nice day ahead.