STEP BY STEP TUTORIAL: SEMI CUT CREASE BLUE, GREEN AND WHITE [ESP// ING]
(Edited)
✨HOLA MI LINDA COMUNIDAD ✨
✨HELLO MY BEAUTIFUL COMMUNITY ✨

Está vez no tengo que disculparme por estar perdida, porque realmente estoy bastante activa en la comunidad (sientanse orgullosos de mi). Pero bueno, ese no es el punto, éste post es para hablarles de que, el día de hoy decidí hacerme un pequeño máquillaje usando azul, blanco y verde, por lo que obviamente fui documentando el paso a paso, para poderselos enseñar, así que aquí se los dejo:
This time I don't have to apologize for being lost, because I'm really quite active in the community (be proud of me). But well, that's not the point, this post is to tell you that, today I decided to do a little makeup using blue, white and green, so obviously I was documenting the step by step, so I can show you, so here you have it:
Paso a paso | Step by step
Como siempre, vamos a comenzar nuestro maquillaje hidratando nuestro rostro (que está previamente limpio). Luego de eso vamos a peinar nuestras cejas para poderlas maquillar, darle forma y corregirlas, lo que haremos con un corrector claro y una brocha plana. Recuerda siempre extender éste mismo corrector por todo tu párpado; de esa forma lo prepararás para la aplicación de sombras.
As always, we are going to start our makeup by moisturizing our face (which is previously clean). After that we are going to comb our eyebrows to be able to make them up, shape and correct them, which we will do with a light concealer and a flat brush. Remember to always spread this same concealer all over your eyelid; that way you will prepare it for the application of shadows.

Sobre nuestro corrector difuminado, aplicaremos una sombra de color claro o nuestro polvo, ya sea compacto o translúcido para sellarlo (este paso es opcional). Ahora que nuestro párpado está listo, colocaremos una sombra verde oscuro por toda nuestra cuenca, justo debajo todo el hueso de nuestro ojo, formando un arco; esto lo haremos a toquecitos, para así saturar muy bien el color.
Ahora toca difuminar el verde oscuro, esto lo haremos con un verde claro haciendo movimientos circulares sobre el verde oscuro con una brocha para difuminar
On top of our smudged concealer, we will apply a light-colored shadow or our powder, compact or translucent Whether to seal it (this step is optional). Now that our eyelid is ready, we will place a dark green shadow all over our eye socket, just below our eye bone, forming an arc; we will do this in small touches, in order to saturate the color very well. Now it is time to blend the dark green, we will do this with a light green, making circular movements over the dark green with a blending brush.

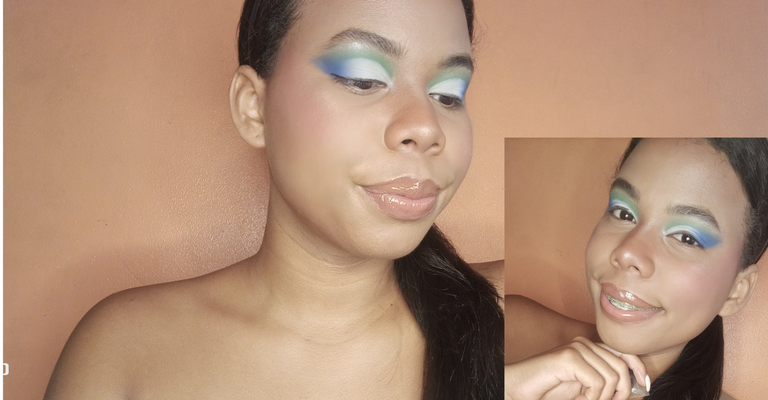
Ahora debemos aplicar sombra azul en la esquina externa de nuestro ojo, de forma tal que cerremos el arco que armamos con el verde. Ya que colocamos el azul, debemos hacer el corte de cuenca, por lo que tomaremos un corrector claro y una brochita plana y con mucho cuidado haremos un corte desde el lagrimal hasta donde se encuentra el azul. Éste corrector, lo cubriremos un una sombra blanca, que aplicaremos con una brocha plana o nuestro dedo, para saturar más el color. Algo súper importante, es que luego de colocar el blanco, debes difuminar la línea de corte que existe entre azul y blanco en el extremo del ojo; para ellos tomaremos la sombra azul y hacemos movimientos de Zig zag entre ambos colores , así tú maquillaje se verá mucho más limpio y bonito.
Now we must apply blue shadow on the outer corner of our eye, in such a way that we close the arc we made with the green. Once we have placed the blue, we must make the eye socket cut, so we will take a light concealer and a flat brush and carefully make a cut from the tear trough to where the blue is. We will cover this concealer with a white shadow, which we will apply with a flat brush or our finger, to saturate the color more. Something super important, is that after placing the white, you must blur the cut line that exists between blue and white at the end of the eye; for them we will take the blue shadow and make zig zag movements between the two colors, so your makeup will look much cleaner and prettier.

Ahora viene el rostro, para ello inicio corrigiendo mis ojeras, bozo y manchitas con un corrector naranja, que luego voy a difuminar para poder aplicar mi base. Luego de esto aplico un labial para que funcione como mi rubor en crema y posterior a esto hago mi contorno. Algo que yo hago, es que voy aplicando cada producto y difuminando lo de una vez; siento que evito que todo se dañe de ésta forma
Now comes the face, for this I start by correcting my dark circles, puffiness and blemishes with an orange concealer, which I will then blend to be able to apply my foundation. After this I apply a lipstick to work as my cream blush and after that I do my contouring. One thing I do, is that I apply each product and blend it all at once; I feel like I keep everything from getting damaged this way.

Ya para terminar mi maquillaje, voy a sellar cada producto en crema o líquido con su versión en polvo. Luego de eso, aplico iluminador y labial, les debo las pestañas, porque las rompí sacándolas del empaque 🥲
Now to finish my makeup, I'm going to seal each cream or liquid product with its powder version. After that, I apply highlighter and lipstick, I owe you the eyelashes, because I broke them taking them out of the packaging 🥲.

Fotos finales | Final photos

Sin más que agregar, éste fue mi tutorial paso a paso de un maquillaje semi cut crease usando verde, azul y blanco, espero que les haya gusto, y haberlos inspirado a probarlo. Besos y hasta un próximo post.
Without further ado, this was my step by step tutorial of a semi cut crease makeup using green, blue and white, I hope you liked it, and that I inspired you to try it. Kisses and see you in a future post.
Gracias por leerme y hasta un próximo post
Thanks for reading and see you in a future post
Traducción: Deepl // Traslation: Deepl

9
0
0.000 PAL
Dear @gabyr02, we need your help!
The Hivebuzz proposal already got important support from the community. However, it lost its funding a few days ago and only needs a few more HP to get funded again.
May we ask you to support it so our team can continue its work this year?
You can do it on Peakd, ecency, Hive.blog or using HiveSigner.
https://peakd.com/me/proposals/199
Your support would be really appreciated.
Thank you!