Macramé woven bracelets for gifts // Pulseras tejidas en macramé para regalo [ENG-ESP]
ENGLISH
When I was a teenager I learned how to weave macramé knots :)
With macramé weaving you can make an infinite number of handicrafts: rugs, lampshades, furniture, coasters, tablecloths, belts, among others.
I have used this weave to make bracelets, necklaces, earrings and bags :) In fact, since I was a teenager I started a business making this kind of accessories. It has been a wonderful venture, the techniques of macramé, wire weaving and goldsmithing, sustained me for many years and led me to participate in countless entrepreneurship fairs. However, since the year 2020 with the beginning of the pandemic I had to put on pause my entrepreneurship.
Today I will show you a craft I made a few days ago, for my daughter's teacher's birthday.
It is always nice to have a detail or a gesture, with those people who are part of our daily lives, especially with those who have the beautiful job of helping us to educate and train our children. Besides, a handmade gift has a unique meaning, because it is made with love especially for someone.
My daughter of course helped me as usual, after all it was a gift for her teacher :)
We made two bracelets, with the flat and straw knots. These are some of the knots of macramé weaving.
I will show you how to make them :)
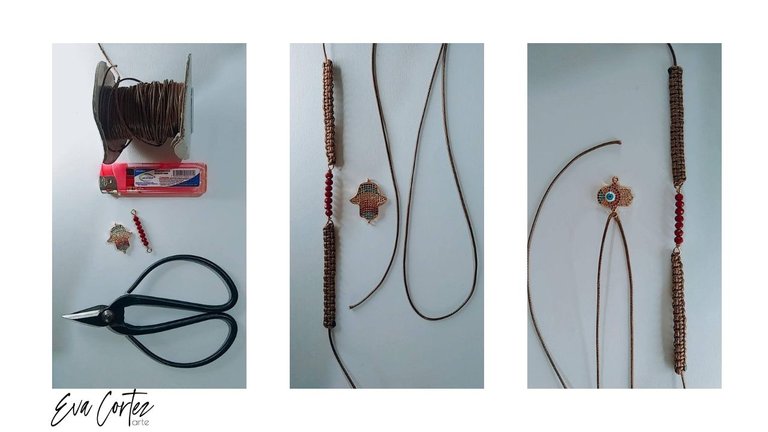
For each bracelet you will need the following materials:
- 1mm snakeskin thread or other similar material and the color of your choice, I used brown.
- Tinder to make the finishing touches.
- Two (2) charms.
- A scissors to cut leather.
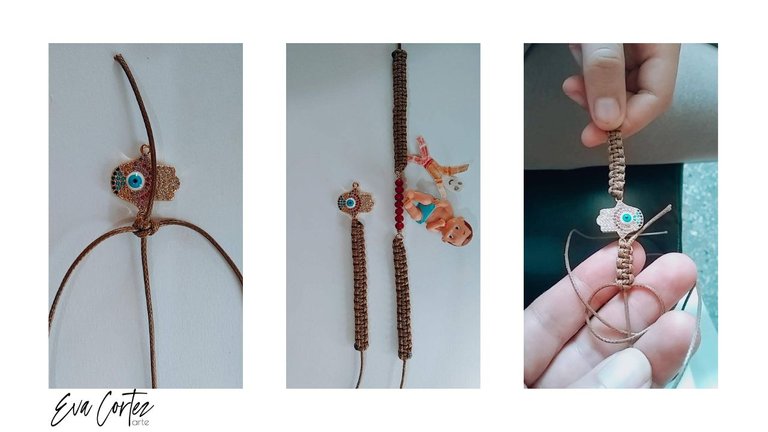
To start we will make the flat knot, cut a thread of 70 cm and another smaller one of 25 cm.
Take the 70 cm thread, fold it in half and pass it through one of the rings of your pendant, as shown in the picture.
ESPAÑOL
Cuando era adolescente aprendí a hacer los nudos del tejido macramé :)
Con el tejido macramé se puede realizar infinidad de manualidades: tapetes, pantallas de lámparas, muebles, posavasos, manteles, cinturones, entre otras.
He utilizado este tejido para realizar pulseras, collares, pendientes y bolsos :) De hecho, desde adolescente inicié un emprendimiento realizando este tipo de accesorios. Ha sido un emprendimiento maravilloso, las técnicas del macramé, el alambrismo y la orfebrería, me sustentaron por muchos años y me llevaron a participar en innumerables ferias de emprendimiento. Sin embargo, desde el año 2020 justo con el inicio de la pandemia tuve que poner en pausa mi emprendimiento.
Hoy te mostraré una manualidad que realicé hace unos días, a propósito del cumpleaños de la maestra de mi hija.
Siempre es lindo tener un detalle o un gesto, con aquellas personas que forman parte de nuestro día a día, en especial con quienes tienen la bonita labor de ayudarnos a educar y formar a nuestros hijos. Además, un regalo hecho a mano tiene un significado único, pues es realizado con cariño especialmente para alguien.
Mi hija por supuesto me ayudó como de costumbre, después de todo era un regalo para su maestra :)
Realizamos dos pulseras, con los nudos plano y pitillo. Estos son algunos de los nudos del tejido macramé.
Te enseñaré cómo realizarlas :)
Para cada pulsera necesitarás los siguientes materiales:
- Hilo cuero de serpiente de 1mm u otro material similar y del color que prefieras, yo utilicé color marrón.
- yesquero para hacer los acabados.
- Dos (2) dijes.
- Una tijera para cortar cuero.
Para empezar haremos el nudo plano, corta un hilo de 70 cm y otro más pequeño de 25 cm.
Tomas el hilo de 70 cm, lo doblas a la mitad y lo pasas por uno de las argollas de tu dije, como ves en la imagen.
Then you place the 25 cm yarn in the center.
Let's start weaving: the yarn you see on your right you pass it over the center yarn and then under the yarn on your left.
Take the yarn on your left and pass it behind the center yarn and then over the yarn on your right.
Luego colocas el hilo de 25 cm en el centro.
Empecemos el tejido: el hilo que ves a tu derecha lo pasas por encima del hilo del centro y luego por debajo del hilo que está a tu izquierda.
Tomas el hilo que está a tu izquierda lo pasas por detrás del hilo del centro y luego por arriba del hilo de la derecha.
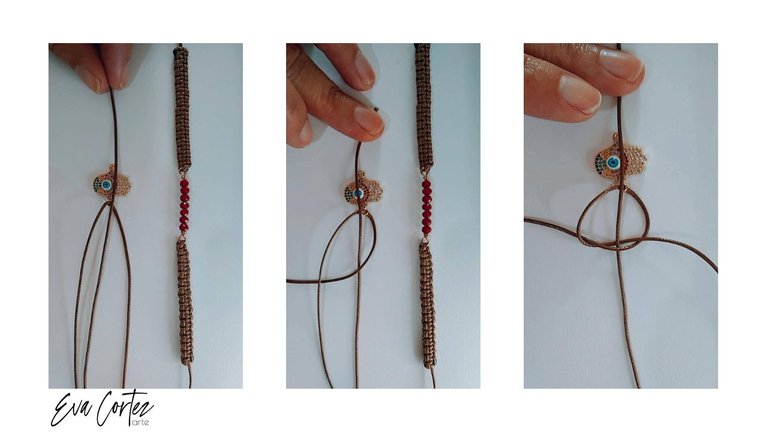
Pull and fasten off.
Now we knit the other side: You take the yarn on your left, pass it over the middle yarn and behind the yarn on your right.
Take the yarn on your right, pass it behind the middle yarn and then over the yarn on your left.
Halas y ajustas.
Ahora tejemos del otro lado: Tomas el hilo a tu izquierda, lo pasas por encima del hilo del centro y detrás del hilo a tu derecha.
Tomas el hilo de la derecha, lo pasas por detrás del hilo del centro y luego por arriba del hilo izquierdo.
Pull and adjust.
Repeat the above steps until the bracelet is half the length of the bracelet.
My daughter wanted to place these two (2) characters in the picture :D one of them is Baby Jesus. They are waving at you :)
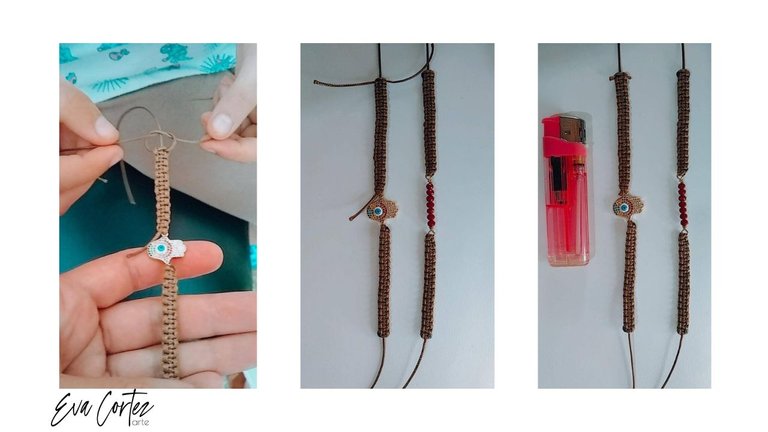
You repeat the procedure on the other side of the charm, to make the other side of the bracelet.
As you can see, my daughter helped me to hold one of the ends to weave, you can help yourself with a hook or something that allows you to hold the other end.
Halas y ajustas.
Repites los pasos anteriores hasta lograr el largo de la mitad de la pulsera.
Mi hija quiso colocar a estos dos (2) personajes en la fotografía :D uno de ellos es el Niño Jesús. Ellos les saludan :)
Repites el procedimiento del otro lado del dije, para hacer el otro lado de la pulsera.
Como ves, mi hija me ayudó a sostener uno de los extremos para tejer, puedes ayudarte con un gancho o algo que te permita sostener el otro extremo.
Of course, my little girl also wove :) if she learned, she is small, you can do it too :D
You cut the excess threads and burn the ends with the tinder to melt the leather a bit and it will adhere.
Por supuesto, mi niña también tejió :) si ella aprendió, que es pequeña, tú también puedes hacerlo :D
Cortas los hilos sobrantes y quemas los extremos con el yesquero para que se derrita un poco el cuero y se adhiera.
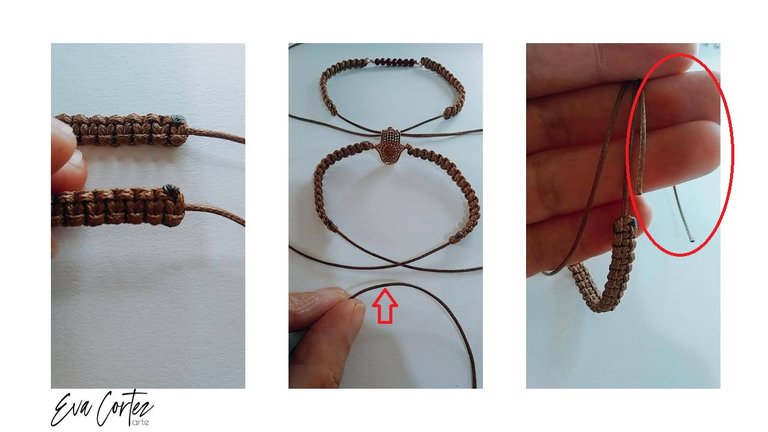
Once you burn it looks like this.
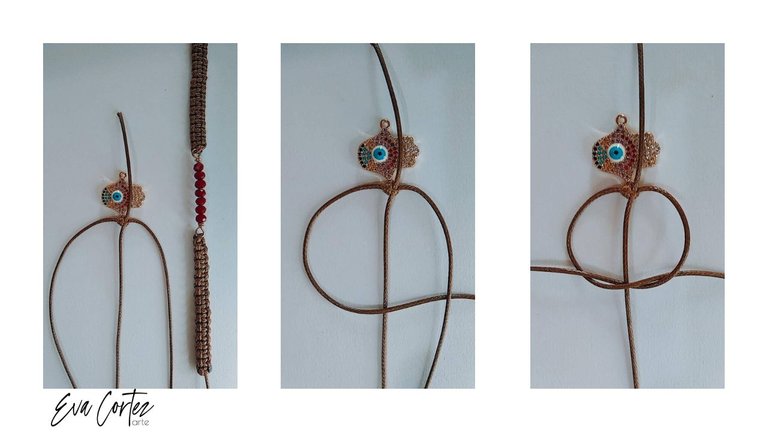
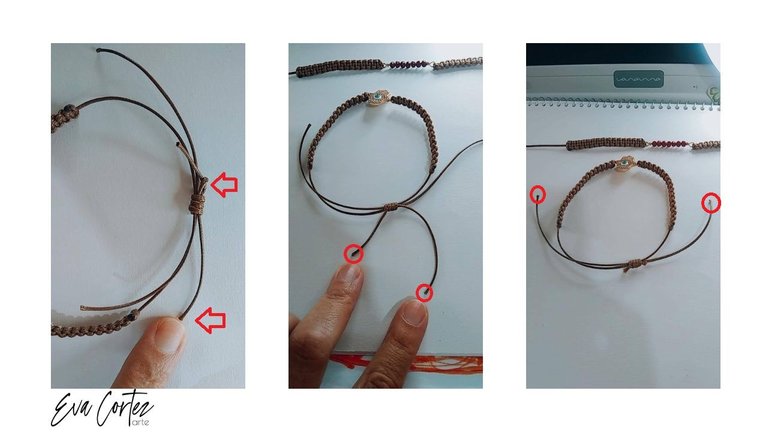
I placed the bracelets in a circular position. I cut a 12 cm piece of leather to make the straw knot, this is a slip knot that will allow the adjustment of the bracelet.
You place the 12 cm thread next to the threads at the ends of the bracelet.
Una vez que quemas queda así.
Coloqué las pulseras en posición circular. Corté un pedacito de cuero de 12 cm para hacer el nudo pitillo, este es un nudo corredizo que permitirá el ajuste de la pulsera.
Colocas el hilo de 12 cm junto a los hilos de los extremos de la pulsera.
Fold the 12 cm yarn and form the bunny ear you see above.
Take the right end of the 12 cm yarn and pass it over all the yarns. Give it another twist.
Doblas el hilo de 12 cm y formas esta orejita de conejo que ves arriba.
Tomas el extremo a tu derecha del hilo de 12 cm y lo pasas por encima de todos los hilos. Le das otra vuelta.
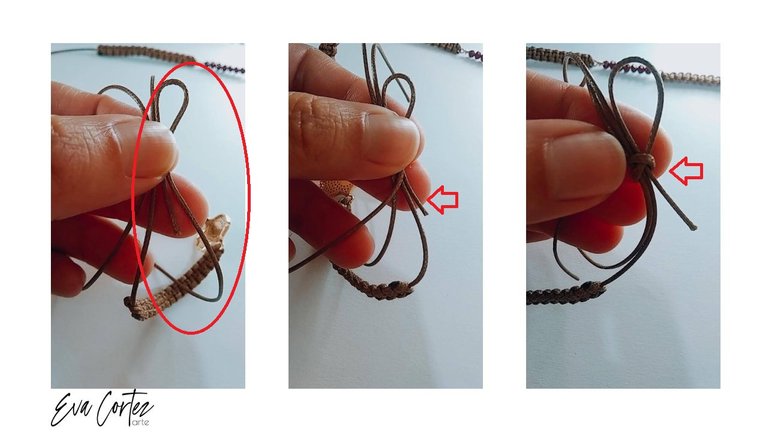
Give it another 3 or 4 turns.
Finally you pass the end of the yarn you are winding through the ear.
Le das otras 3 ó 4 vueltas.
Finalmente pasas el extremo del hilo que estás enrollando por la orejita.

The other end of the thread is pulled to adjust the ear. I indicate with my finger, which end to pull.
Cut the two (2) ends as you see in the last two pictures.
El otro extremo del hilo lo halas para ajustar la orejita. Te indico con el dedo, el extremo que debes halar.
Cortas los dos (2) extremos como ves en las dos últimas imágenes.
You must burn the ends of the straw knot.
Tie knots in the adjustment threads of the bracelet and burn the ends as well.
This way both bracelets are finished :)
Debes quemar los extremos del nudo pitillo.
Realiza nudos en los hilos de ajuste de la pulsera y quema los extremos también.
Así quedan ambas pulseras terminadas :)
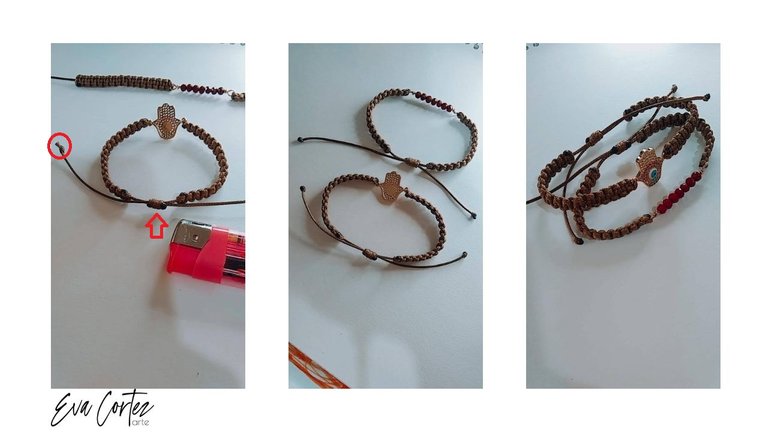
This is what the bracelets look like :)
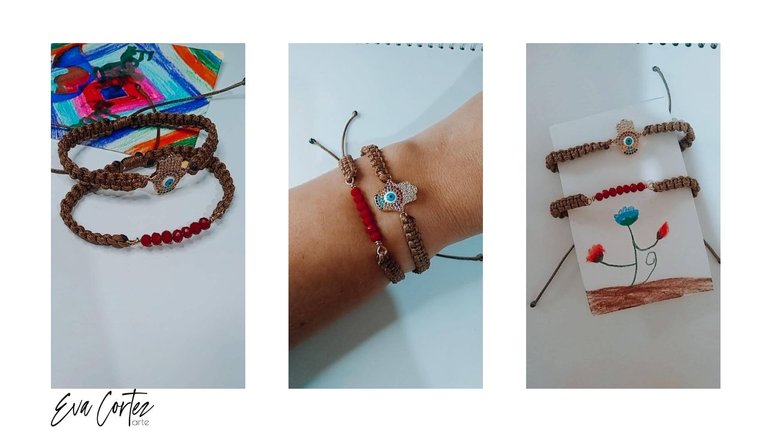
They are very cute :) the teacher received them and is wearing them with great affection <3
Appreciation is shown in the details :)
Mi hija realizó unas tarjetitas con dibujos y flores para incluirlo en el regalo.
Así se ven las pulseras puestas :)
Han quedado muy lindas :) la maestra las recibió y las luce con gran cariño <3
El aprecio se demuestra en los detalles :)
https://twitter.com/608922928/status/1584727878050406401
The rewards earned on this comment will go directly to the people( @kawsar8035 ) sharing the post on Twitter as long as they are registered with @poshtoken. Sign up at https://hiveposh.com.
Me gustan estas pulseras, son muy bellas y de acuerdo a la combinaciones de materiales y colores pueden ser mas informales o más casuales. Además son muy comerciales.
Te felicito este proyecto estuvo bien explicado y lindo.
Si, estas pulseras son muy versátiles :) y el tipo de nudo con el cual están hechas sirve para realizar cualquier cantidad de proyectos, desde aretes hasta trajes de baños :)
it looks nice bracelet. as a teenager, my friends and I in a group wore the same bracelet as a sign of our solidarity.
I would love to receive a bracelet from you anyway :)
what a great way to identify yourself as a group! I would love to make a bracelet for you of course, with pleasure, the thing is how to send it :D
Me encantan, quiero aprender a tejerlas. Iré viendo los materiales para comprar y tu paso a paso, gracias por el tutorial. Es un lindo detalle para regalar y una buena idea para emprender.
Sí :) los nudos en macramé nos permiten hacer gran variedad de accesorios, nos sacan de un apuro :) tanto para un regalo, como para lucir accesorios para una ocasión especial. Es una buena idea de emprendimiento, la ejercí por aproximadamente 20 años, desde adolescente. Ahora estoy dedicada a la pintura pero muy probablemente lo retome :) cuando realices tu primera pulsera me etiquetas para aplaudirla :D
Este tutorial está genial amiga. A mi siempre me han llamado la atención pero la verdad no he hecho el intento.
Hace un tiempo estuve haciendo algo de bisutería con mi cuñada y una amiga pero era para uso personal y para algún regalo.
Es algo que se disfruta mucho, súper relajante y definitivamente todo un arte. Lo que quizá me de problemas es el nudo corredizo, nunca aprendí a hacerlo, pero el paso a paso está muy bueno, así que espero conseguirlo!
El macramé es un mundo maravilloso, cada nudo te permite hacer variedad de diseños, despertando tu creatividad, realizar cada pieza te llena de gran satisfacción. Puedes realizar piezas hermosas :) espero puedas compartirnos luego un accesorio que realices :) gracias por tu comentario.
Me encantan estás pulseras, definitivamente soy fan del tejido macramé, lo he intentado un par de veces y se me sigue dificultando un poco así que admiro quienes ya lo tienen dominado 😂, excelente trabajo 💕