Making a banner in Canva (Part II) / Creando un banner en Canva (Parte II) (ENG/ESP)


Keeping active, with our minds busy, improves our health and mood.
Greetings my beloved ones, welcome everyone, here I am sharing with you another elaboration of a banner, since it is another order that I was asked to make.
I show you in a very simple way and in a few steps, how you can make your final banner for closing publications, this will certainly give class and bring beauty, besides being a distinctive, as a business card on your blog.
The functions of a banner are to capture the attention of everyone who visits a publication, it is so important that it could be one of the ways with which you get followers as you present your projects, writings or works, even services, in a way that looks professional, creating with this even your own brand.
Your banner will be that door in which your followers identify with your content, a reader will always stop at the end of your publication to admire how you close it, in this sense, it will give it structure, therefore, we must ensure that the banner fits what we publish and our personality as well as being directed to a specific audience.
Any image or multimedia content you use from Canva, is copyright free as long as it does not have the watermark, you can remove it if you pay a monthly membership, this will give you access to many more tools and exclusive content.
Meanwhile, Canva has its own bank of images and multimedia content, which, like Pixabay, you can use without disclosing the source. But for Hive purposes, it's always good to make it clear at the end of your posts that you've used this tool for image extraction, editing and anything else you can use from it.
That said, join me in the step-by-step.

Mantenernos activos, con la mente ocupada, mejora nuestra salud y estado de ánimo.
Saludos amados míos, bienvenidos sean todos, aquí estoy compartiendo contigo otra elaboración de un banner, ya que es otro pedido que me encargaron en hacer.
Te muestro de forma muy sencilla y en pocos pasos, cómo puedes elaborar tu banner final para cierre de publicaciones, esto sin duda le dará clase y aportará belleza, además de ser un distintivo, como tarjeta de presentación en tu blog.
Las funciones de un banner son para captar la atención de todo el que visita una publicación, es tan importante que podría ser una de las formas con las que obtengas seguidores ya que presentas tus proyectos, escritos o trabajos, hasta servicios, de una forma que se vea profesional, creando con esto hasta tu propia marca.
Tu banner será esa puerta en la que tus seguidores se identifican con tu contenido, un lector siempre al llegar al final de tu publicación se detendrá a admirar cómo cierras la misma, en este sentido, le dará estructura por lo tanto, debemos procurar que el banner se ajuste a lo que publicamos y nuestra personalidad además de estar dirigida a un público específico.
Toda imagen o contenido multimedia que uses de Canva, es libre derechos de autor mientras no tenga la marca de agua, la misma la puedes quitar si pagas una membresía mensual, esto te dará acceso a muchas más herramientas y contenido exclusivo.
Mientras tanto, Canva posee su propio banco de imágenes y contenido multimedia, que al igual de Pixabay, puedes usar sin necesidad de enunciar su fuente. Pero para efectos de Hive, siempre es bueno aclarar al final de tus publicaciones que has usado esta herramienta para extraer imágenes, edición y todo aquello que puedas usar de ella.
Dicho esto, acompáñame al paso a paso.

Step by Step / Paso a paso

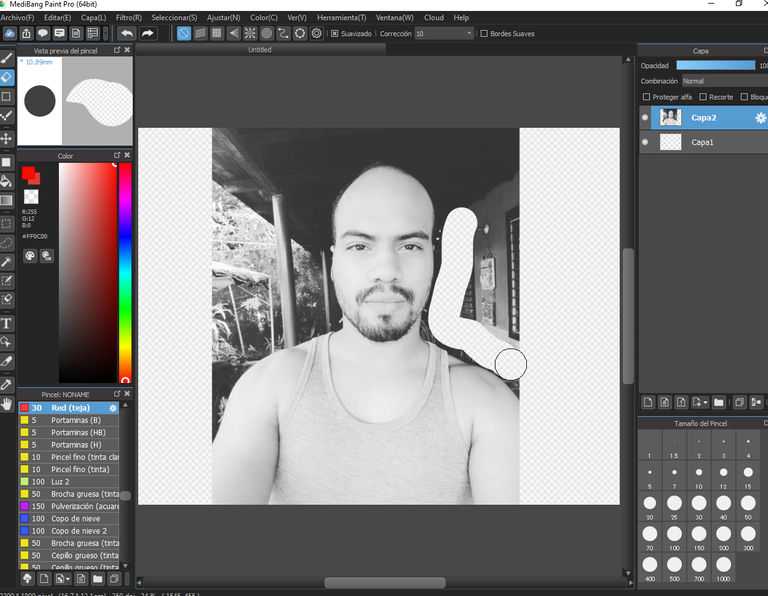

The first thing I did was to work on editing the image that was sent to me, which will be the center of attention of the card.
My intention is to remove the background, that is why I used Medibang Paint Pro to edit it, since it is my favorite program for image editing and design.
When we want to remove the background of an image and it does not have a flat color we must do it manually, so with the eraser tool, proceed to erase the outline of the image.
Of course you can use other tools to erase the background, either programs or websites that will do it automatically, but maybe they will not give you the same quality in the image, so I prefer to use Medibang and have a lot of patience and pulse.
Once you finish erasing the image save it in PNG format.

Lo primero que hice fue trabajar en la edición de la imagen que me enviaron, la cual será el centro de atención de la tarjeta.
Mi intención es quitar el fondo, es por ello que usé Medibang Paint Pro para editarla, ya que es mi programa predilecto para edición de imágenes y diseño.
Cuando queremos quitar el fondo de una imagen y esta no tiene un color plano debemos hacerlo de forma manual, así que con la herramienta borrador, procede a borrar el contorno de la imagen.
Por supuesto que puedes usar otras herramientas para borrar el fondo, ya sean programas o webs que lo harán en automático, pero tal vez no te darán la misma calidad en la imagen, por eso prefiero usar Medibang y tener mucha paciencia y pulso.
Una vez que termines de borrar la imagen la guardas en formato PNG.

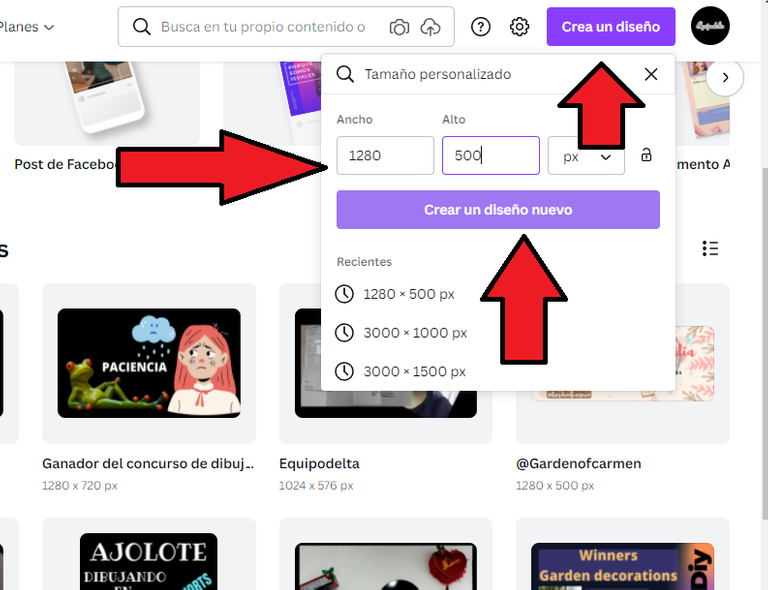

We go to the Canva WEB from there we will create a new design, click on the option Create a design in this case we will work with a custom size whose measures are 1280 wide by 500 long in Px, then you can click on the option Create a new design and automatically opens a new canvas to overflow your creativity.

Nos vamos a la WEB de Canva desde allí vamos a crear un diseño nuevo, has clic en la opcion Crea un diseño en este caso trabajaremos con un tamaño personalizado cuyas medidas son 1280 de ancho por 500 de largo en Px, luego puedes hacer clic en la opción Crear un diseño nuevo y automáticamente abre un nuevo lienzo para desbordar tu creatividad.

 👉
👉 


We look for the location of the image we are editing and drag it on our canvas, then we click on the option templates and we see the ones available, we choose one or the ones we would like to merge.
This time the client asked me to work with a specific color palette consisting of monochromatic or grayscale tones. It is a bit difficult to search for images, but we can edit them inside the program.
In the next step, we take those objects we like from a template and simply paste it into the main one, then we can delete that additional template by clicking on the trash can.

Buscamos la ubicación de la imagen que editamos y la arrastramos en nuestro lienzo, seguidamente hacemos clic en la opción plantillas y vemos las que tienen disponibles, escogemos una o las que quisiéramos fusionar.
En esta ocasión el cliente, me pidió trabajar con una paleta específica de colores que consta de tonos monocromáticos o escala de grises. Un poco dificultosa la búsqueda de imágenes pero podemos editarlas de igual modo, dentro del programa.
En el paso siguiente, tomamos aquellos objetos que nos gustó de una plantilla y simplemente la pegamos en la principal, luego podemos eliminar esa plantilla adicional haciendo clic en el bote de basura.


Studying the client's personality, I know that he likes the contact with nature, I thought it was appropriate to add the background of mountains, since they also have poetic and philosophical sense, because they can induce us to relaxation and meditation. The disadvantage is that the image is in color, but that is not a problem.
To edit an image in terms of color, we can click on the option Edit Image and a number of options and filters that we can apply are displayed, but in this case I just want to place the image in grayscale, so we click on the option Adjust there we can manipulate the contrast, brightness and saturation until it is to our liking.

Estudiando la personalidad del cliente, se que le gusta el contacto con la naturaleza, me pareció propio agregar el fondo de montañas, ya que las mismas también tienen sentido poético y filosófico, pues nos puede inducirnos a la relajación y meditación. El inconveniente es que la imagen está a color, pero eso no es problema.
Para editar una imagen en cuanto a color, podemos hacer clic en la opción Editar Imagen se nos despliega una cantidad de opciones y filtros que podemos aplicar, pero en este caso solo quiero colocar la imagen a escala de grises, por lo tanto hacemos clic en la opción Ajustar allí podemos manipular el contraste, brillo y saturación hasta que quede a nuestro gusto.

 👉
👉 

I had found another detail, when editing the background color, the main image was lost, it looked very pale, so I went back to the Medibang program and proceeded to edit the image, playing with the hue and filter.
First we edit the filter, by clicking on the Filter option We adjust the bar and then click ok.
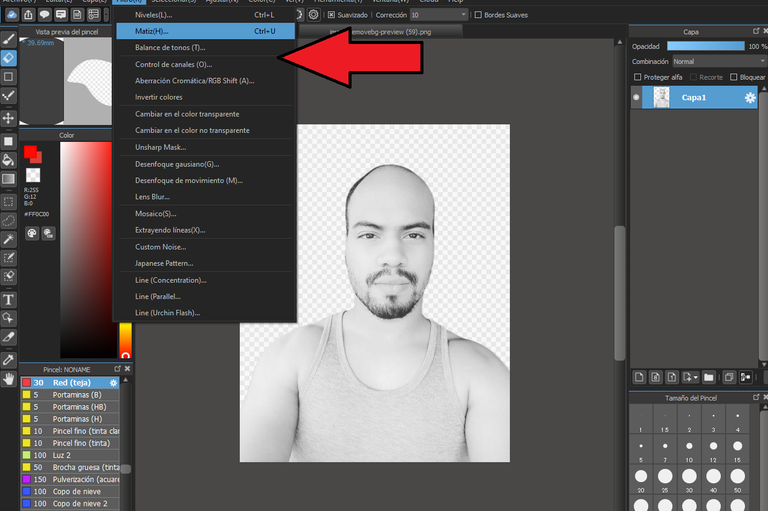
Then, we can create a dark or light background behind the image, we copy our image (Ctrol+C) and then paste (Ctrol+V) we click on the option Filter then on Hue and modify the color by moving the bar, to finish we click on ok.
Move the canvas to the back of the image, select the image (Ctrl+T) and enlarge it, then save again in PNG format and transfer to Canva as in the previous steps.

Había encontrado otro detalle, al editar el color de fondo, la imagen principal se perdía, lucía muy pálida, por lo tanto, regresé al programa Medibang y procedí a editar la imagen, jugando con el matiz y el filtro.
En primer lugar editamos el filtro, haciendo clic en la opción Filtro Ajustamos la barra y luego clic en ok.
Luego, podemos crear un fondo oscuro o claro detrás de la imagen, copiamos nuestra imagen (Ctrol+C) y luego pegamos (Ctrol+V) hacemos clic en la opción Filtro luego en Matiz y modificamos el color moviendo la barra, para finalizar hacemos clic en ok.
Movemos el lienzo a la parte de atrás de la imagen, seleccionamos la misma (Ctrol+T) y agrandamos, luego guardamos nuevamente en formato PNG y trasladamos a Canva como en los pasos anteriores.

 👉
👉 

It's time to add the text, but first we need a geometric figure to highlight, to do this we click on the option located in the left panel Elements there we look for the option Lines and shapes or use the image search system in the top bar. Select the one you like and, as in the previous steps, you can also modify its color.
Add the text, and select the colors and shapes you want.

Es el momento de agregar el texto, pero antes necesitamos una figura geométrica para resaltar, para ello hacemos clic en la opción ubicada en el panel de la izquierda Elementos allí buscamos la opción Líneas y formas o usamos el sistema de búsqueda de imágenes en la barra superior. Seleccionamos la que nos guste e igual que los pasos anteriores también podemos modificar su color.
Agregamos el texto, y seleccionamos los colores y formas que deseamos.

 👉
👉 

Additional details are not superfluous, if we can add a little movement in our banner, it will capture more attention, it will make your reader stay longer in your blog once they finish reading.
Therefore, we can add Gifs in our banner, we click on the left panel option Elements in the top search bar we write Stickers followed by what we want to add, in this case I was looking for lines, then we select the option Graphic Elements It remains only to click choosing the desired one and placing it in the place we want.
Once you finish your project you can save it in the format you want, for the purposes of your blog, if you made a banner with movement, the ideal is: that the duration of the same does not exceed 3 seconds and save it in GIF format.
That's all friends, I hope you find this second tutorial useful.

Los detalles adicionales no están demás, si podemos agregar un poco de movimiento en nuestro banner, captará mayor atención, hará que tu lector se detenga más tiempo en tu blog una vez que termine su lectura.
Por lo tanto, podemos agregar Gifs en nuestro banner, hacemos clic en el panel izquierdo opción Elementos en la barra superior de búsqueda escribimos Pegatinas seguido de lo que queremos agregar, en este caso buscaba líneas, luego seleccionamos la opción Elementos Gráficos Nos queda solo hacer clic escogiendo la deseada y colocándola en el lugar que queramos.
Una vez termines tu proyecto puedes guardarlo en el formato que desees, para efectos de tu blog, si hiciste un banner con movimiento, lo ideal es: que la duración del mismo no pase de 3 segundos y lo guardes en formato GIF.
Es todo amigos, espero te sea de utilidad este segundo tutorial.

Work completed / Trabajo terminado
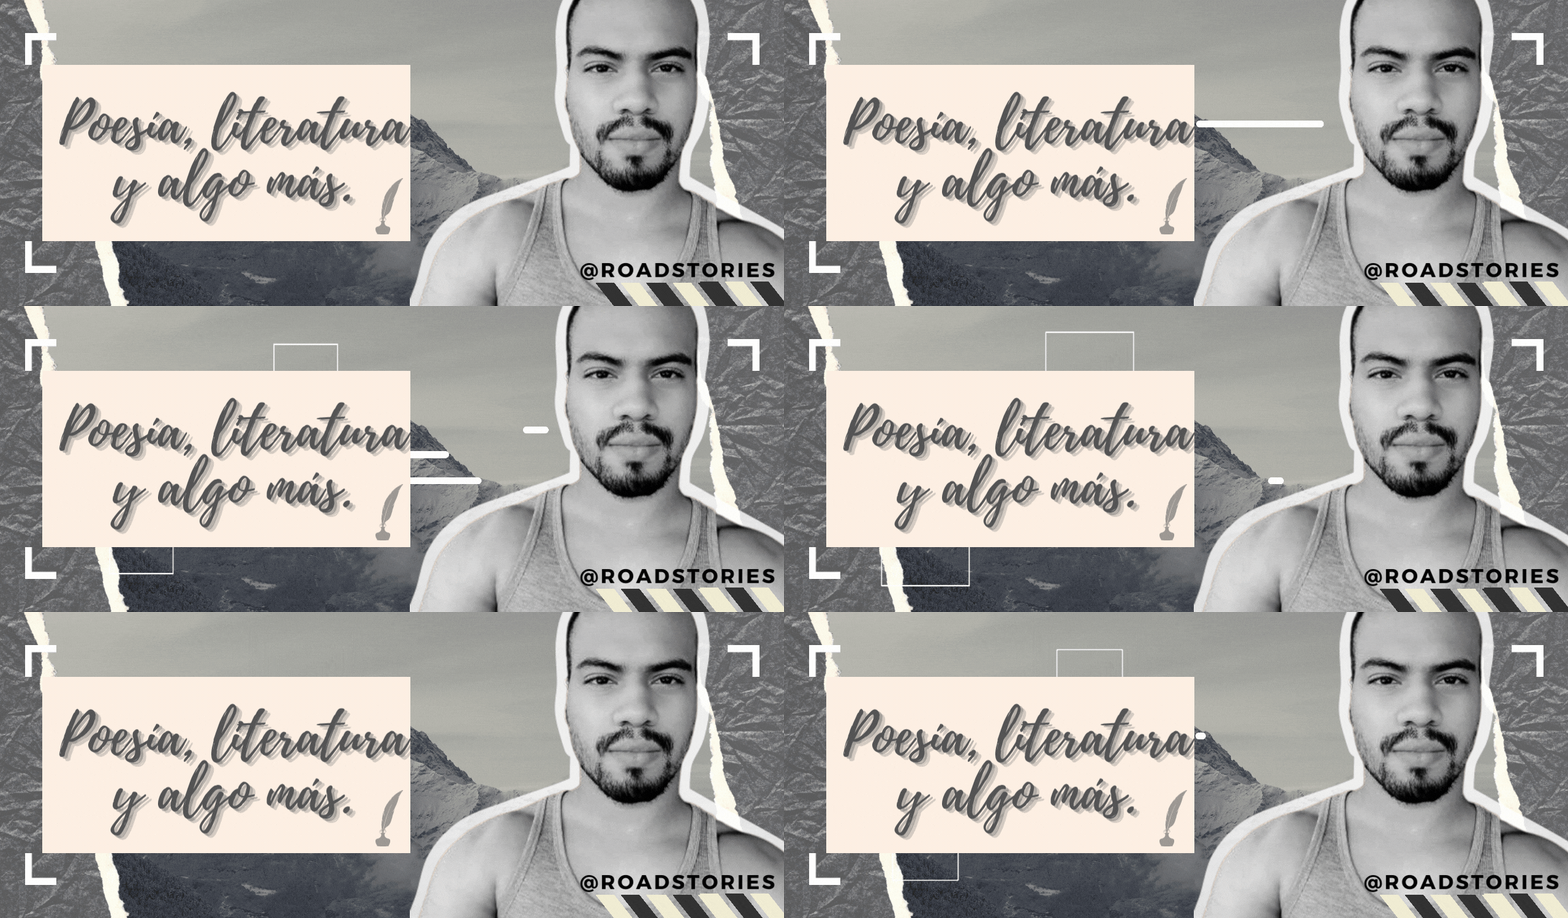
This banner has been created exclusively for @roadstories, I release all my copyrights, the use of it does not need my mention.
Este banner ha sido creado exclusivamente para @roadstories, libero todos mis derechos de autoría, el uso de la misma no necesita mi mención.

Resources / Recursos

Time Lapse: 6 hours.
Program: MediBang Paint Pro.
Graphics tablet: Huion (Usb Pen Tablet). Model 420.
Pinceles Medibang: Lápiz, (Flower Japanesse) para el separador de texto
Canva Gifs, covers, efects, editions

I'm a contributor of royalty-free images
Soy contribuyente de imágenes libres de derechos de autor

My youtube channel - game Play
My youtube channel - arts and crafts

Hacks, DIY, Crafts, handmade arts Community
Discord




Mil gracias cariño, cuando se trata de cositas como estas siempre las he dejado en tus manos porque sabes lo que haces y lo que quiero.
Besotes.
Siempre es un placer, para mi es un halago que te guste mi trabajo y me encargues lo que deseas <3. A la orden cariño, siempre que quieras, me encanta, me encanta. Que lo disfrutes.
https://twitter.com/EquipodeltaS/status/1511806391375306763
The rewards earned on this comment will go directly to the person sharing the post on Twitter as long as they are registered with @poshtoken. Sign up at https://hiveposh.com.
Te ha quedado genial @equipodelta Eres bastante buena... Tus diseños son de admirar y te logras desenvolver muy bien en diferentes programas para diseñar.
Yo he tenido bastante curiosidad en probar programas como estos para mis diseños, pero es que me cuesta salir del Photoshop, no quiero traicionarlo jajajaja
Buen aporte =) Saludos y bendiciones!!!
Hola querido, quien trabaja en photoshop y lo domina, no recomiendo pase a Medibang, porque se va a acostumbrar a la papita, jajajaja ya he dicho que la calidad es notable, porque Medibang trabaja en pixeles, photoshop no
Hola muy util amiga, por cierto como puedo hacer o que tengo que hacer para obtener una etiqueta o insignia en la comunidad?
HOla querida, con gusto, puedes solicitarlo en nuestro canal de Discor de la comunidad: https://discord.gg/tYENgKmTHA
Congratulations, your post has been upvoted by @dsc-r2cornell, which is the curating account for @R2cornell's Discord Community.