DIY- pulsera tejida en macramé con técnica de nudo garra + anillo✨ || macramé woven bracelet with claw knot technique + ring ✨ [ESP/ENG]
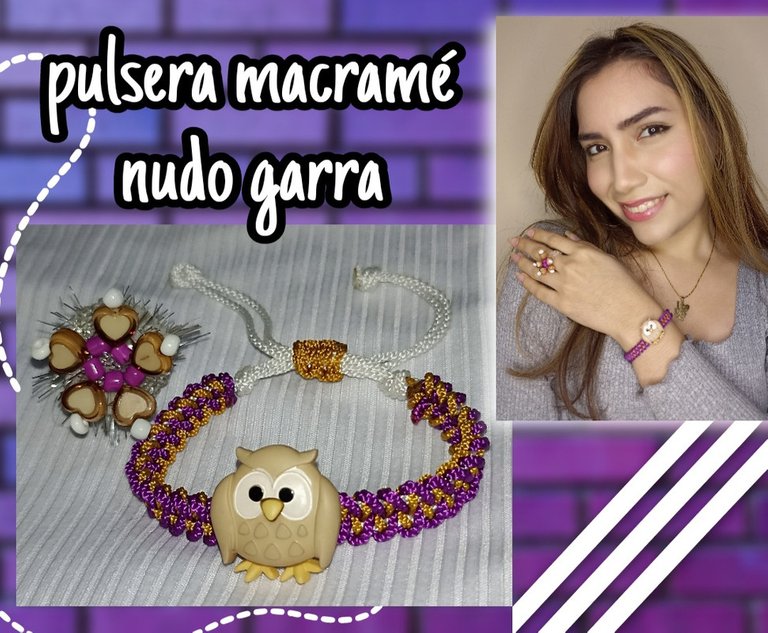


Hola amigos de Hive ❤️ hoy les quiero compartir un pequeño tutorial para realizar una linda pulsera con tejido macramé usando la técnica de nudo garra, combinando dos colores de hilo y un lindo dije central en forma de búho. Además de este proyecto les quería mostrar como accesorio opcional o adicional, un sencillo anillo en bisutería, siguiendo un poco con la temática de colores usando algunos cristales, cuentas y piedras con lindas formas de corazón. Está técnica es una de las más sencillas porque solo es cuestión de cruzar hilos por el centro siguiendo el mismo patrón, agregándole cómo detalle ese lindo dije, pedo si deseas puedes usar solo el tejido para la pulsera no quizás agrrgarle el dije que prefieras. Así que si te gusta, te animo a que me acompañes y aprendas junto a mi a realizarlo, y ahora sí, sin más que agregar... Comencémos!!

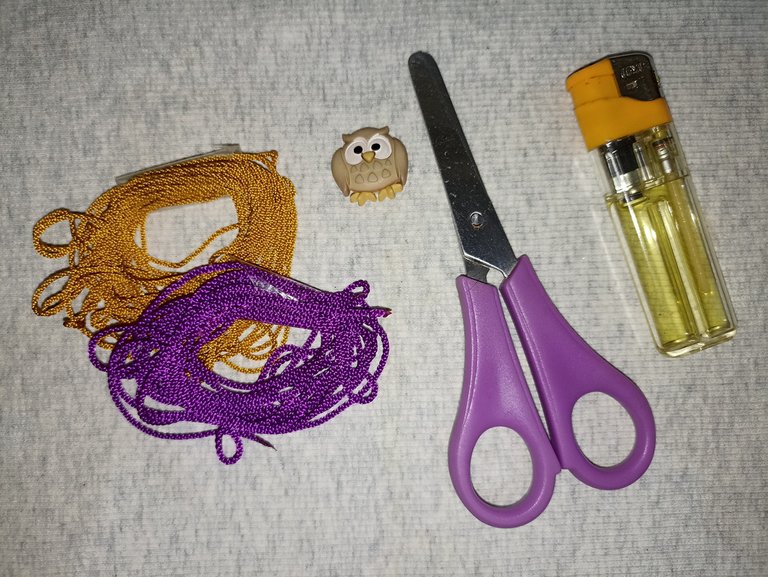

- 1 Cordón de nylon 60 cm (blanco)
- 1 Cordón de nylon 80 cm (morado)
- 1 Cordón de nylon 80 cm (mostaza)
- Dije (búho)
- Tijera
- Encendedor


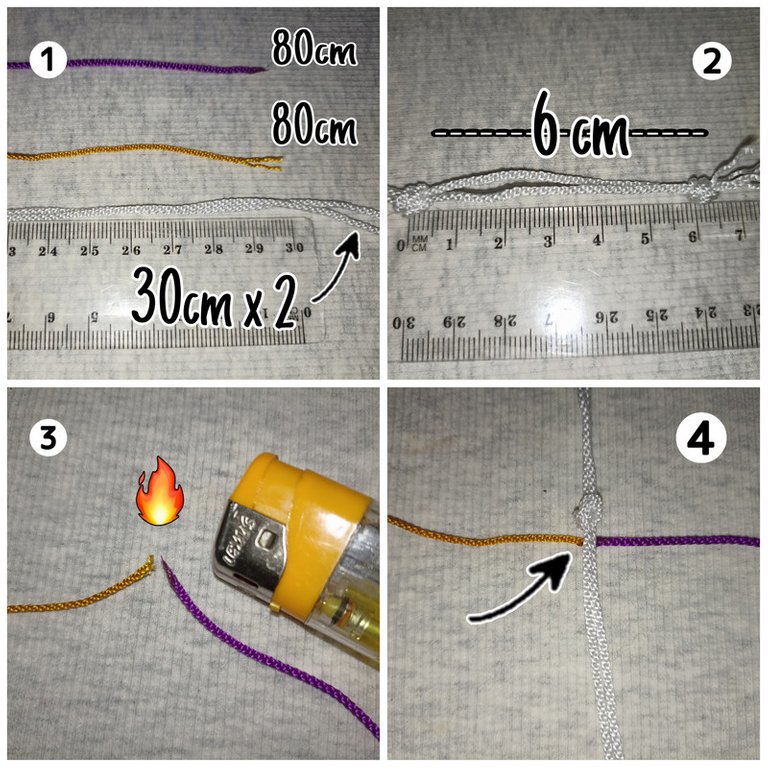
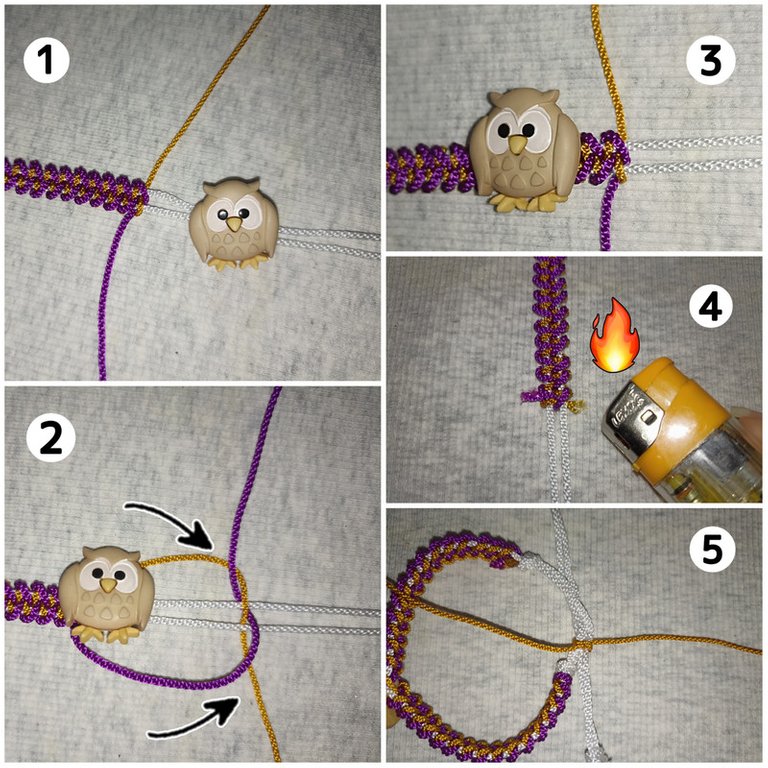
Para comenzar vamos a necesitar un hilo central de un color, en este caso de color blanco, de 60cm de largo, que a la mitad serían 30 aproximadamente. También vamos a necesitar 1 hebra de 80 cm de un color, y otra hebra del mismo largo pero de un color diferente, en mi caso usaré morado y un tono mostaza. Estos últimos serán nuestros hilos de tejer, así que vamos a quemar sus puntas para unirlos y formar una sola hebra de dos tonos. Justo esa mitad la vamos a ubicar detrás de los hilos centrales para ocultarlo y así comenzar a tejer nuestros nudos. En los hilos centrales vamos a dejar también una separación de 6 cm aproximadamente y hacemos un nudo para asegurar.

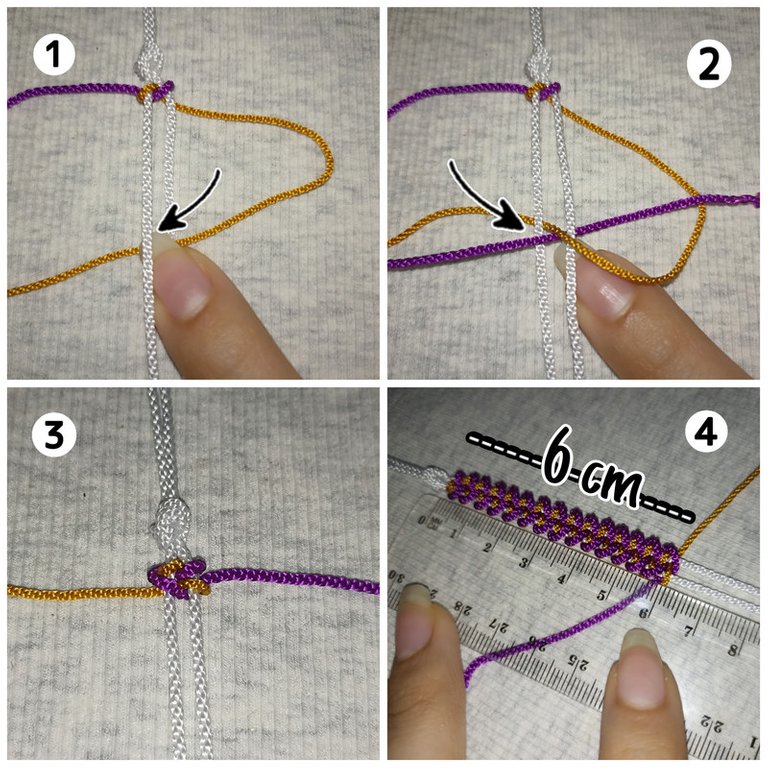
Ahora sí para hacer está técnica macrame, vamos a tomar una de las hebras de un color (mostaza) y las pasaremos por el medio de los hilos centrales, y con la otra hebra (morada )haremos el mismo proceso solo que esta luego de pasar por el medio, la sacaremos por el medio círculo formado por el otro hilo tal como se lo nuestro en la 2 imagen, hecho esto ajustamos y apretamos bien y así nos deberia ir quedando hasta obtener un largo de aproximadamente 6 cm.

Ya cuando tengamos esa medida, es hora de introducir el dije, si es el caso que no usaras dije, continúa el tejido hasta obtener el largo deseado. Ya colocado el dije repetiré nuevamente el nudo hasta completar la otra mitad, corto los hilos sobrantes con los que estaba tejiendo y quemo las puntas para asegurar. Cruzo los hilos centrales para cerrar la pulsera realizando varios nudos planos y repito el mismo proceso cortando y quemando los hilo sobrantes para un mejor acabado.

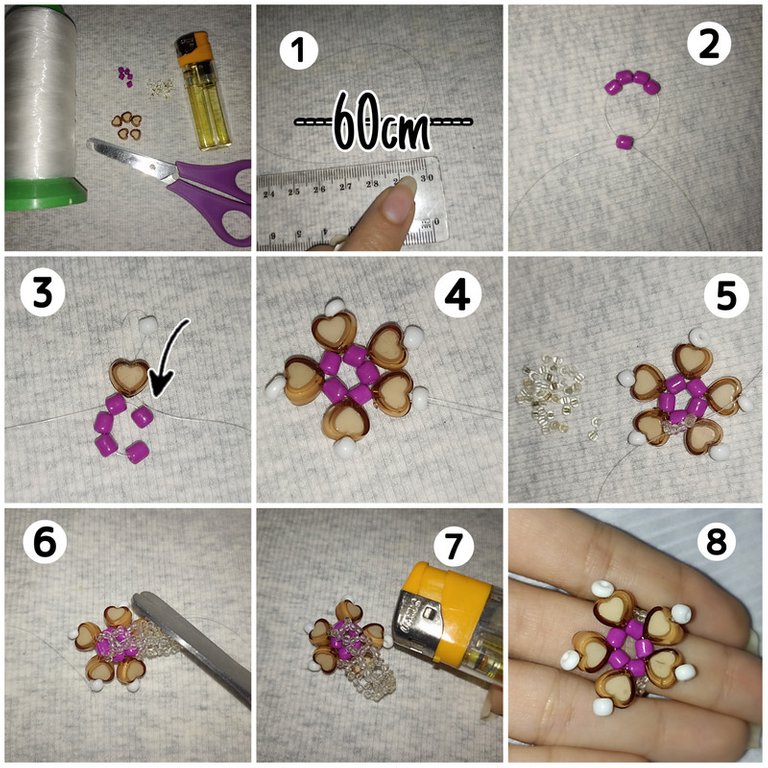
Ya casi para terminar y como detalle extra decidí hacer un lindo anillo con los mismos colores,, para ello necesitaré 60 cm de hilo nylon, mostacillas, cuentas blancas, moradas y piedras marrones en forma de corazón. Comenzaré haciendo un círculo con cuentas moradas introduciendo 4 cuentas y cruzando en otra. Luego por una de las hebras introduzco una piedra de corazón, luego una cuenta blanca y me devuelvo por la piedra anterior. Esto lo voy a repetir hasta completar toda la flor, ya para cerrarla me ubico en una de las cuentas centrales y empiezo a realizar el mango del anillo, para ello introduzco dos mostacillas por cada hebra y cruzo con otras dos, y este proceso lo repetiré hasta obtener el largo deseado del tamaño de mi dedo. Cruzo con otra cuenta central para cerrar, corto los hilos y vuelvo a quemar para así terminar.

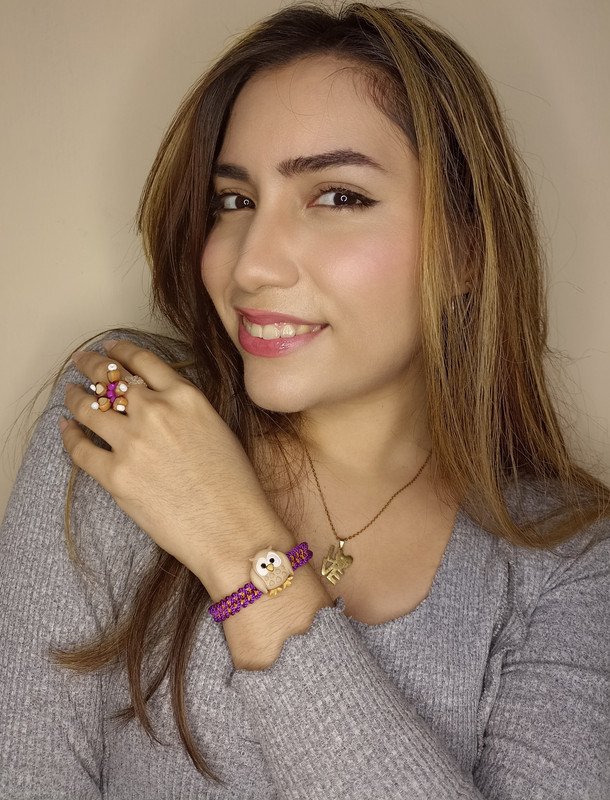
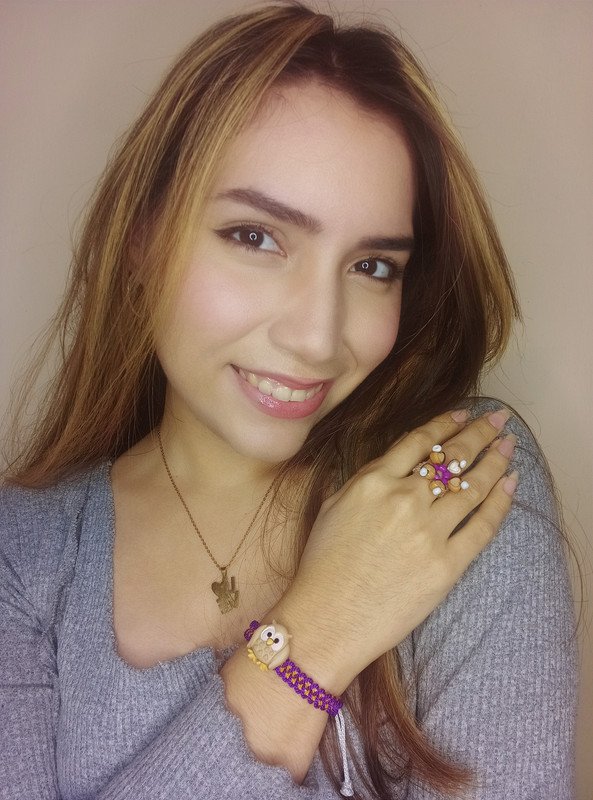
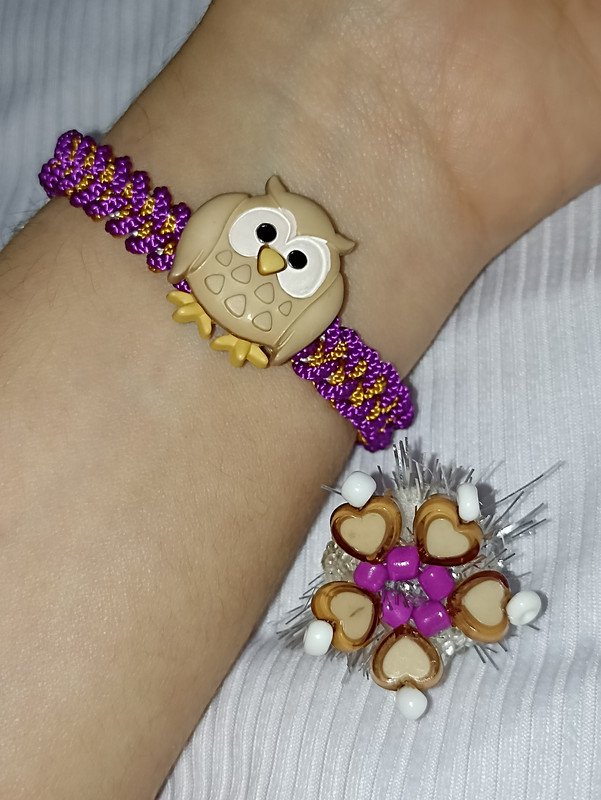
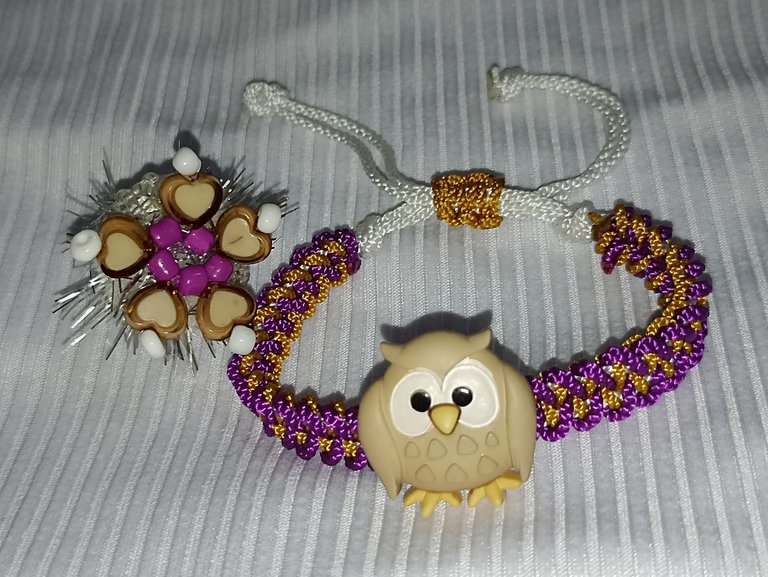
Y aquí les muestro el set de dije y anillo terminado!!. Puedes seguir mi guía tutorial o puedes dejar volar tu imaginación y hacerlo combinando los colores, piedras, cristales y el diseño que quieras... La creatividad es tuya y por supuesto un toque secreto de amor para que el trabajo quede con el mejor acabado 🥰.!! si te gusto te animo a que lo intentes, me encantó mostrarles este pequeño tutorial, para tu uso personal o para regalar en una fecha especial 😁...espero compartirles muy pronto nuevos trabajos, con mucho cariño me despido y será hasta la próxima !!💕


Hello friends of Hive ❤️ today I want to share with you a small tutorial to make a nice bracelet with macrame weaving using the claw knot technique, combining two colors of thread and a cute central pendant in the shape of an owl. In addition to this project I wanted to show you as an optional or additional accessory, a simple costume jewelry ring, following the color theme using some crystals, beads and stones with cute heart shapes. This technique is one of the easiest because it is just a matter of crossing threads in the center following the same pattern, adding as a detail that nice charm, but if you want you can use only the fabric for the bracelet or perhaps add the charm you prefer. So if you like it, I encourage you to join me and learn with me to make it, and now yes, without more to add .... Let's get started!


- 1 Nylon cord 60 cm (white)
- 1 Nylon cord 80 cm (purple)
- 1 Nylon cord 80 cm (mustard)
- Charm (owl)
- Scissors
- Lighter


To start we are going to need a central thread of one color, in this case white, 60cm long, which in half would be 30 approximately. We are also going to need 1 strand of 80cm of one color, and another strand of the same length but of a different color, in my case I will use purple and a mustard tone. These last ones will be our weaving yarns, so we are going to burn their ends to join them and form a single strand of two tones. Just that half we are going to place it behind the central threads to hide it and thus begin to weave our knots. In the central threads we will also leave a separation of approximately 6 cm and we will tie a knot to secure it.


Now to make this macrame technique, we will take one of the strands of a color (mustard) and we will pass them through the middle of the central threads, and with the other strand (purple) we will do the same process only that this after passing through the middle, we will take it out through the half circle formed by the other thread as shown in the 2 image, done this we adjust and tighten well and so we should be staying until we obtain a length of approximately 6 cm.


Once we have that measurement, it is time to insert the charm, if you are not using a charm, continue weaving until the desired length is obtained. Once the charm is in place, repeat the knot again until the other half is complete, cut the excess threads with the ones I was weaving with and burn the ends to secure them. I cross the central threads to close the bracelet making several flat knots and repeat the same process cutting and burning the excess threads for a better finish.


Almost to finish and as an extra detail I decided to make a nice ring with the same colors, for this I will need 60 cm of nylon thread, beads, white beads, purple beads and brown stones in the shape of a heart. I will start making a circle with purple beads introducing 4 beads and crossing in another one. Then through one of the strands I introduce a heart stone, then a white bead and return through the previous stone. I will repeat this until I complete the whole flower, and to close it I place it on one of the central beads and start to make the shank of the ring, for this I introduce two beads for each strand and cross with two others, and I will repeat this process until I get the desired length of the size of my finger. I cross with another central bead to close, cut the strands and burn again to finish.


And here I show you the finished pendant and ring set!!!. You can follow my tutorial guide or you can let your imagination fly and do it combining colors, stones, crystals and the design you want..... The creativity is yours and of course a secret touch of love so that the work is with the best finish 🥰.!!! if you like it I encourage you to try it, I loved to show you this little tutorial, for your personal use or to give as a gift on a special date 😁...I hope to share with you very soon new works, with much love I say goodbye and will be until next time !!!💕


Todo el contenido es de mi autoría y las imágenes son de mi propiedad
Cámara: Redmi note 10s
Uso un aro de luz LED como base para mi teléfono y tomarme las fotos
All content is my own and images are my property
Camera: Redmi note 10s
I use an LED light ring as a base for my phone to take pictures of myself

Edición y Separador|Editing and Separator
App PicMonkey - App Picsart - App Canva
Traductor|Translator
DeepL


Amé el tejido, el anillo y la pulsera completa!, muy hermosa! Gracias por compartir!
Muuchas gracias🥰...me alegra que te guste, gracias a ti por el apoyo y visitarme 💕🤗un saludito para ti!!
https://twitter.com/138949334/status/1623134861744566274
https://twitter.com/1048398048240566273/status/1623147480828334080
https://twitter.com/2774723569/status/1623174967893319683
https://twitter.com/1620028521639825409/status/1623750789356298240
https://twitter.com/1491299868391919620/status/1624048394938318849
https://twitter.com/1462311950197706755/status/1624148698388127766
The rewards earned on this comment will go directly to the people( @leticiapereira, @kristal24, @hiveonsocials, @baned, @officialrosh1 ) sharing the post on Twitter as long as they are registered with @poshtoken. Sign up at https://hiveposh.com.
Amo este tipo de cosas, a veces quisiera aprender pero me resulta difícil, es un arte!
Yo hace varios meses tampoco lo sabía dominar del todo...pero cuando empiezas a practicar, por lo menos el nudo más fácil, ya le agarras el truco porque en cada accesorio se vuelve repetitivo, estoy segura que si te lo propones te volverás una experta 😸...gracias por visítarme que gusto verte @veronicamartinc 🤗💕un saludito amiga!!
Tendré que intentarlo, cuando estaba en el cole hacía unas tejidas con hilo. La verdad no sé la técnica y ni recuerdo como se hacía muy bien pero si me gusta da
Me encanta, el tejido queda muy bien con este tipo de hilo, el búho queda precioso.
Graacias 🤗 si a mí también me gustó, se me hizo mucho mas fácil hacer el tejido, es la primera vez que lo uso y queda super bien en este tipo de accesorios, agregándole uno que otro dijecito para hacerlo más bonito 🥰. Un saludito amiga!!💕
Me gustó mucho tu proyecto de hoy,@edwarlynll los colores muy llamativos...y el tejido super genial.felicidades.
Muchas gracias amiga 🤗creo que este pequeño dijecito combinaría con muchos otros colores, me pareció muy tierno incluso una amiga ya me la pidió 😅, me alegra que te gustara, un saludito para ti!!💕
Congratulations @edwarlyn11! You have completed the following achievement on the Hive blockchain And have been rewarded with New badge(s)
Your next target is to reach 1500 comments.
You can view your badges on your board and compare yourself to others in the Ranking
If you no longer want to receive notifications, reply to this comment with the word
STOPTo support your work, I also upvoted your post!
Check out our last posts:
Support the HiveBuzz project. Vote for our proposal!
Me encanta la forma en que le pones tu toque personal a tus creaciones. Son muy auténticos y hablan de tu personalidad. Está hermoso el conjunto completo.
Te felicito por tu creatividad.
Bendiciones.
Aww muchas gracias aprecio mucho tu comentario 🥰🐱.. es que no puedo evitar agregarle detalles a medida que hago algo😅 me alegra que te gusten mis trabajos...un saludito, bendiciones y feliz noche para ti también querida @artsugar 🤗💕
¡Felicidades! Esta publicación obtuvo upvote y fue compartido por @la-colmena, un proyecto de Curación Manual para la comunidad hispana de Hive que cuenta con el respaldo de @curie.
Si te gusta el trabajo que hacemos, te invitamos a darle tu voto a este comentario y a votar como testigo por La Colmena.
Si quieres saber más sobre nuestro proyecto, te invitamos a acompañarnos en nuestro servidor de Discord.
Hermosa
Gracias amiga 🥰💕 saluditos!!
Tanto los colores como el búho los amé! Te quedo hermosa amiga. Yo tengo que aprender ese tejido,que aunque me gusta no la he intentado. Le tengo como respeto jeje
Through imagination and creativity anyone can do anything and this DYI bracelet is a proof of that. Fashionable and joyful, the bracelet surely is a statement piece that will capture other's appreciation.