Commemorating our PUD // Honeycomb Charm Quilling technique / [Eng/Esp]
Hello everyone... ⚡️🐝⚡️
Hello to my dear Hiver and the dear community of #Jewelry artists, as always very pleased and excited to be here to show you a work made with love and affection especially for you.
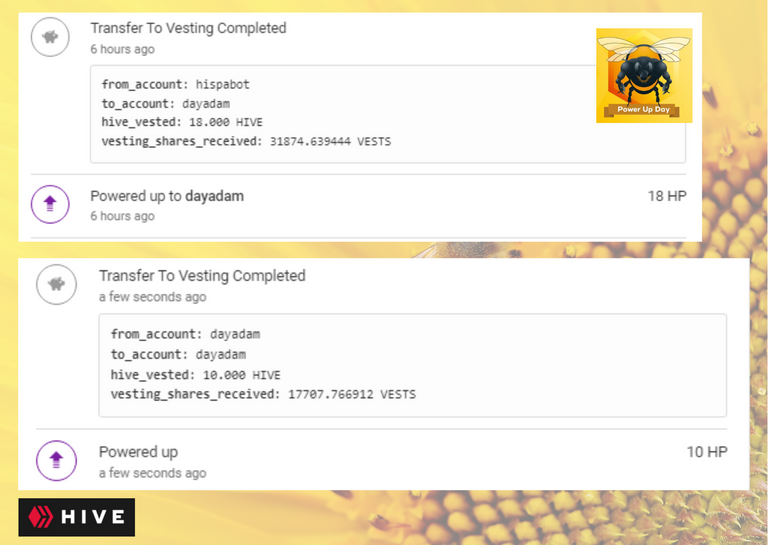
Today in our beloved #Hive, we celebrate being the 1st of the month another #PowerUpDay (PUD). In a few days I will be 17 months here and for the 15th month I am participating in this celebration making a small contribution to my HP to continue growing and thus help our beloved ecosystem continue to grow more and more.
Hive has brought me immemorial moments, I am very grateful to life for finding me in this medium that in this time has given me so much, from being able to do, to show what I really like and also to give that teaching to others in case they want to materialize it to undertake, or simply to give a detail. I have made beautiful friendships, and an endless number of contributions to my life.
This post today goes to two niches unfortunately I can not post it in different communities, but what better to do it in the niche that I manage, that I love and in which I have received so much support in my work of jewelry and crafts.
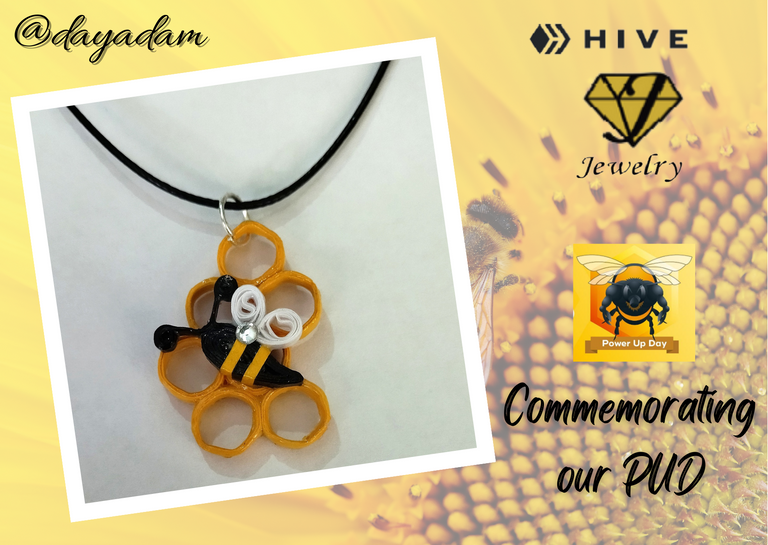
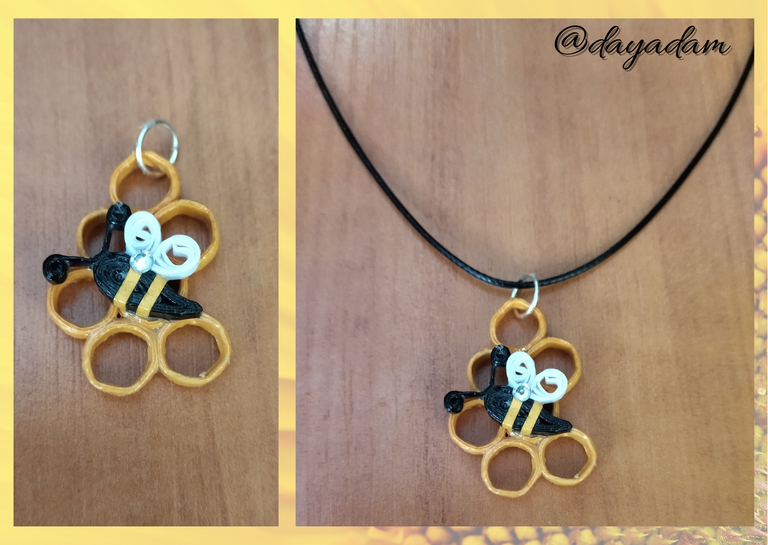
To commemorate this day and be part of it, not only making my respective powerup, I want to give you the simple and step by step elaboration of a small medallion in the form of a honeycomb decorated with a little bee in the quilling technique, what more characteristic of this day or our ecosystem than a little bee to wear with pride for being part of this wonderful world.
I recommend to everyone that if you can participate and grow month by month as far as you can, do it, and I also suggest you to see the post of our friends @traciyork @victorialab that encourage us to participate through a contest in the global and hispanic, offering many attractive and beneficial prizes for everyone, check the links I left, you will see that you will be very interested in participating. A special thanks to the people of @hivebuzz for their great work every day.
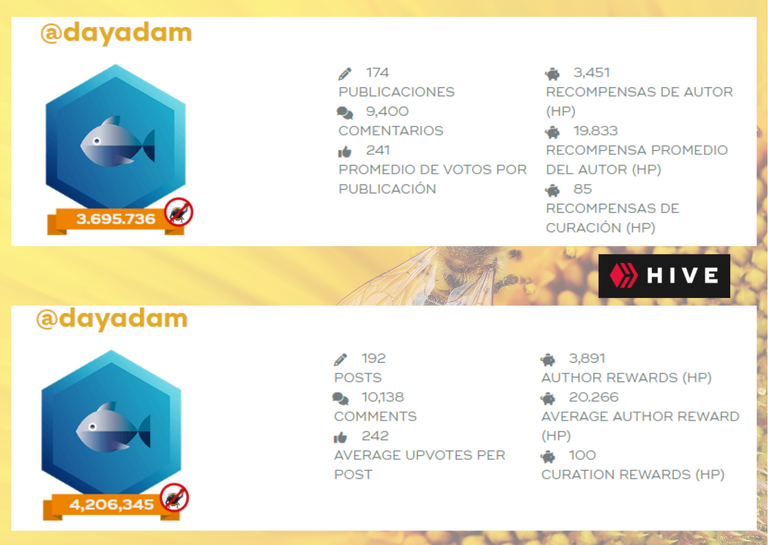
Below is an image of my progress this month in relation to last month, my respective PowerUp with a small contribution of 10 Hives.
Surprisingly while I was making the post I found out the news that this month I won the @hispaup in which I have participated since its inception with the @hispapro project, and I became creditor of the allocation of 18HP, very grateful for the award and I wish all the success in the world to this project that is growing, thanks for the support.
Without further ado I leave you my creative process of this little tutorial, I hope you like it.
Let's get started:😃

Hola a Todos... ⚡️🐝⚡️
Hola a mis queridos Hivers y a la querida comunidad de artistas #jewelry, como siempre muy complacida y emocionada de encontrarme por acá nuevamente, mostrándole mi trabajo hecho con mucho amor y especialmente para ustedes.
El día de hoy en nuestro querido #Hive, celebramos siendo 1ero de mes un #PowerUpDay (PUD) más. En unos días cumpliré ya 17 meses por acá de los cuales por mes numero 15 estoy participando en esta celebración haciendo un pequeño aporte a mis HP para seguir creciendo y así mismo ayudar a que nuestro querido ecosistema siga creciendo más y más.
Hive me ha traído momentos inmemorables, estoy muy agradecida a la vida por encontrarme en este medio que en este tiempo me ha dado tanto, desde poder hacer, mostrar lo que verdaderamente me gusta y así mismo poder regalarle esa enseñanza a los demás por si quieren materializarlo para emprender, o simplemente para obsequiar un detalle. He conseguido amistades hermosas, y un sin fin de aportes a mi vida.
Este post de hoy día va a dos nichos lamentablemente no puedo postearlo en comunidades distintas, pero que mejor que hacerlo en la del nicho que manejo, que me encanta y en la que he recibido tanto apoyo en mi trabajo de joyería y manualidades.
Para conmemorar este día y ser parte de él, no solo realizando mi respectivo powerup, quiero regalarles la elaboración sencilla y paso a paso de un pequeño medallón en forma de panal decorado con una abejita en la técnica de quilling, que más característico de este día o de nuestro ecosistema que una abejita para llevar con orgullo por ser parte de este maravilloso mundo.
Les recomiendo a todos, que si pueden participar y crecer mes a mes en la medida de sus posibilidades lo hagan, así mismo les sugiero ver los post de las amigas @traciyork @victorialab que nos incentivan a participar mediante un concurso en la parte global e hispana, ofreciendo muchos premios atractivos y beneficiosos para todos, revisen los link que les deje, verán que se interesaran mucho en participar. Un agradecimiento especial a la gente de @hivebuzz por su gran labor día a día
Más abajo les dejo una imagen de mi progreso de este mes con relación al anterior, mi respectivo PowerUp con un pequeño aporte de 10 Hives.
Sorpresivamente mientras realizaba el post me entere de la noticia que este mes gane el @hispaup en que he participado desde sus inicios con el proyecto de @hispapro, y me hice acreedora de la asignación de 18HP, muy agradecida por el premio y le deseo todo el éxito del mundo a este proyecto que está en crecimiento, gracias por el apoyo.
Sin más preámbulos les dejo mi proceso creativo de este pequeño tutorial, espero sea de su agrado.
Comencemos:😃

• Cintas de quilling de 3mm de ancho amarillo tostado, blancas y negras.
• Aguja para quilling.
• Lápiz o molde de forma hexagonal.
• Pega blanca extra fuerte (de carpintería).
• Cristal de bisutería.
• Tijera.
• Argolla mediana de bisutería.
• Collar de tu preferencia.
• Pincel.
- 3mm wide quilling ribbons in tan yellow, white and black.
- Quilling needle.
- Hexagonal pencil or mold.
- Extra strong white glue (carpentry glue).
- Jewelry glass.
- Scissors.
- Medium size costume jewelry ring.
- Necklace of your choice.
- Paintbrush.

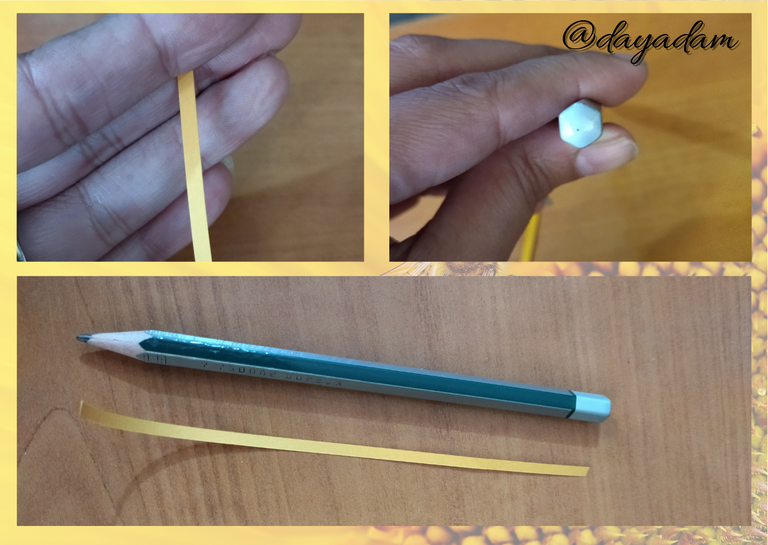
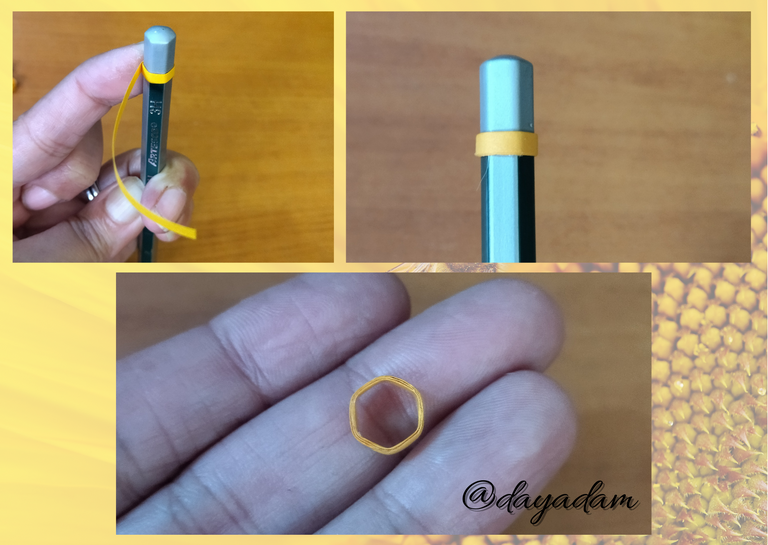
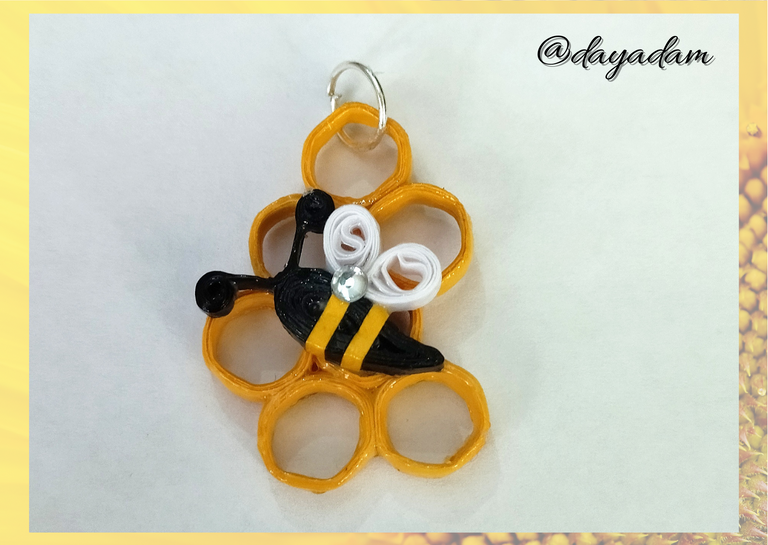
- We start by taking a 3mm x 14cms long yellow quilling ribbon, we are going to go through a hexagon shaped mold, fortunately I had a pencil with that shape and the ideal size for the medallion and pass the ribbon around it until the end, seal with glue and take it out of the mold. Like this piece I made 7.
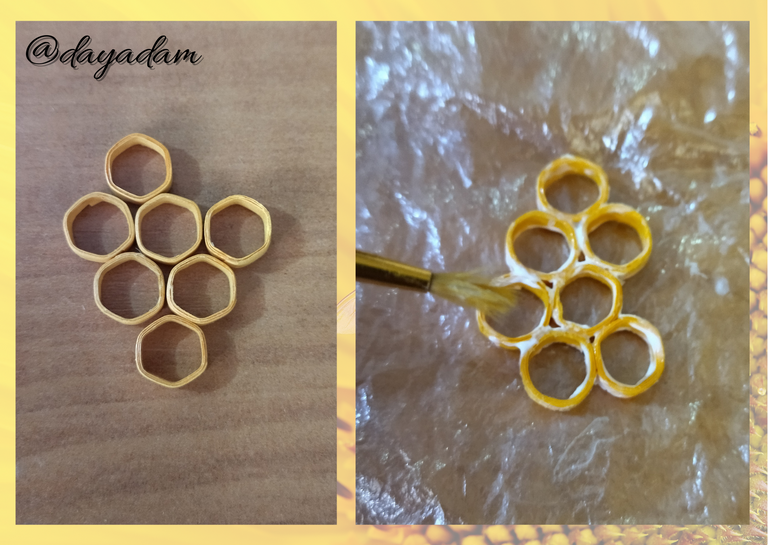
- With glue I joined the hexagons to form a small honeycomb, the way I liked the most for the medallion, you can do it as you wish.
- Once our honeycomb was formed, I applied several layers of extra-strong white carpentry glue to harden the base while I made the other pieces.

• Comenzamos tomando una cinta de quilling amarillo tostado de 3mm x 14cms de largo, vamos a pasar por un molde en forma de hexágono, afortunadamente yo contaba con un lápiz con esa forma y de la medida ideal para el medallón y pase la cinta por alrededor hasta terminar con la misma, selle con pega y saque del molde. Como esta pieza elabore 7.
• Con pega uní los hexágonos para formar un pequeño panal, de la forma que más me agrado para el medallón, tú lo puedes hacer como desees.
• Una vez unidas formado nuestro panal, le coloque su protección liquida aplicando varias capas de pega extrafuerte blanca de carpintería, para que fuera endureciendo la base mientras hago las demás piezas.
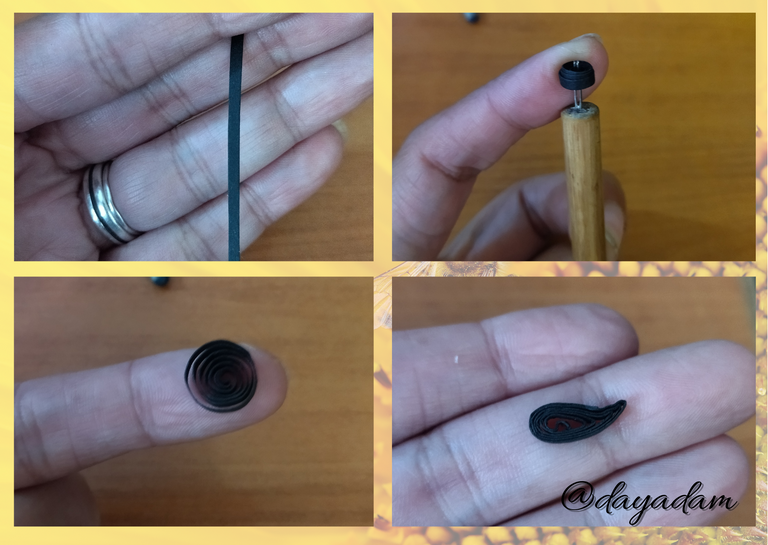
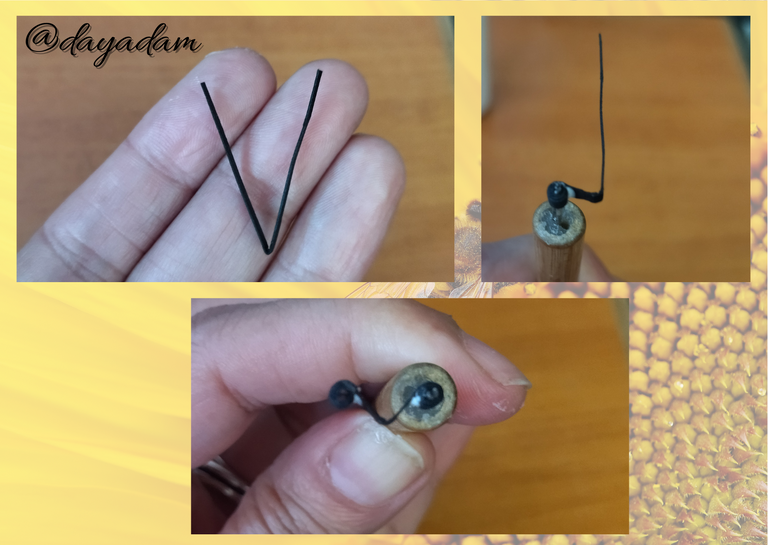
- Now we will take a piece of black quilling ribbon 3mm wide x 14cms long, we will roll it with the quilling needle until we reach the end, take it out of the needle and form an open circle which we will mold to form the body or base which will be a little bee.
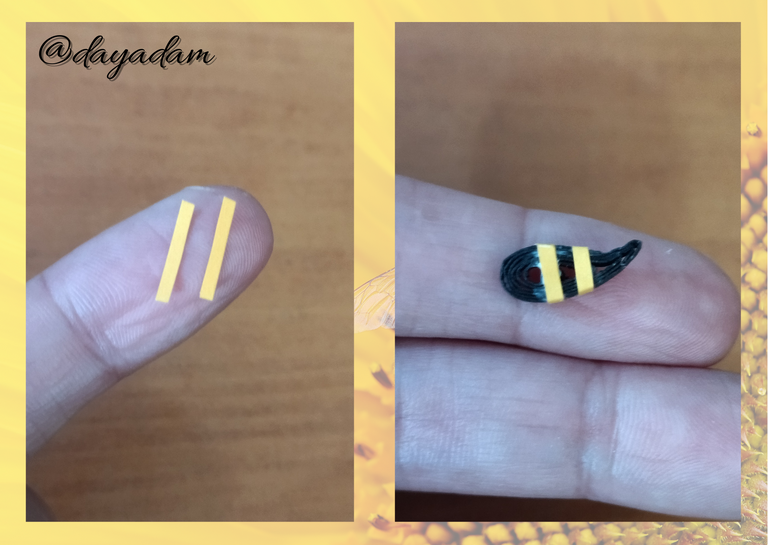
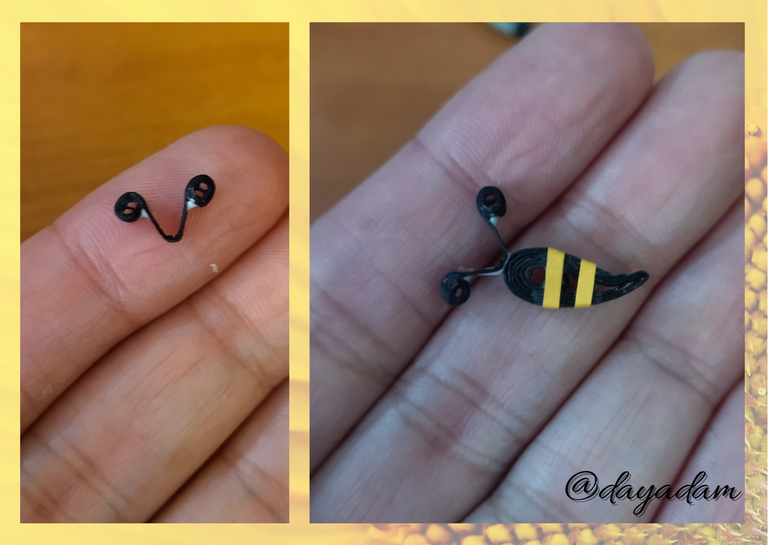
- I decorated the small piece I made with two small pieces of yellow ribbon 1mm wide to resemble the bee's spots.
- We are going to make the antennae with a small piece of black ribbon 3mm wide, with the quilling needle we roll it side and side, then we add it to the base of the bee.
• Ahora tomaremos un trozo de cinta para quilling color negro de 3mm de ancho x 14cms de largo, enrollaremos con la aguja para quilling hasta llegar al final sacamos de la aguja y formaremos un circulo abierto el cual moldearemos para formar el cuerpo o base que será una abejita.
• Decoré la pequeña pieza que hice con dos trocitos de cinta amarilla tostado de 1mm de ancho para asemejar las manchas de la abeja.
• Vamos a realizar las antenas con un pequeño trozo de cinta negra de 3mm de ancho, con la aguja para quilling enrollamos de lado y lado, luego añadimos a la base de la abeja.
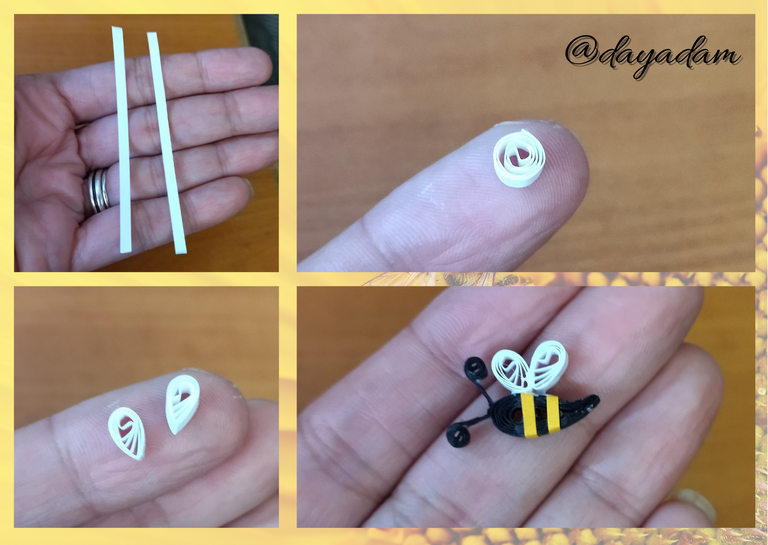
- Let's make a pair of wings, with two pieces of white quilling tape 3mm wide x 7cms long, one by one we will roll them with the needle to form a small open circle, which we will mold in the shape of a leaf. Once ready and molded, we will glue them to the body of the bee.
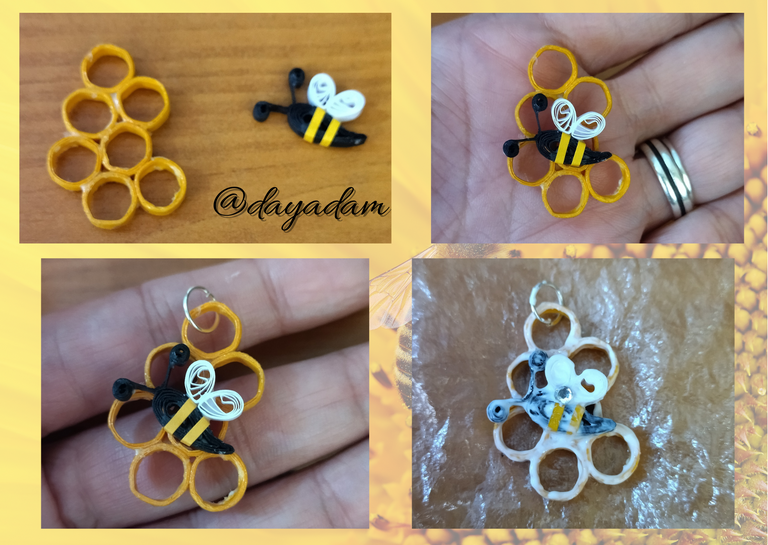
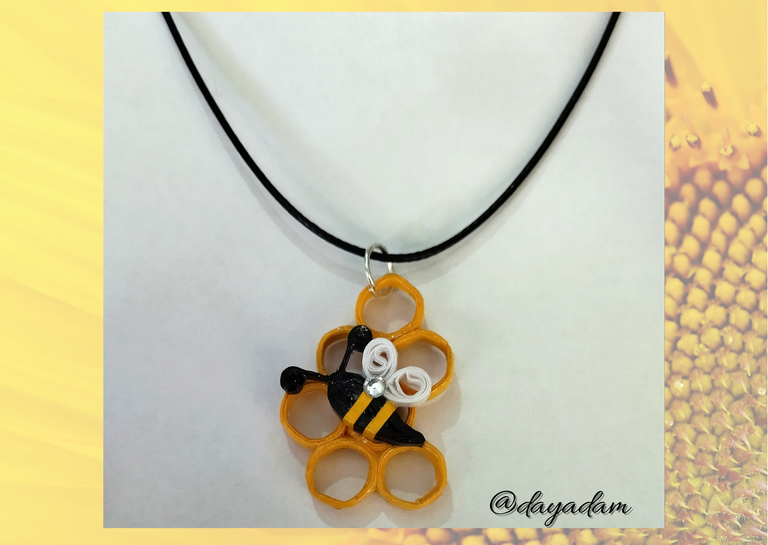
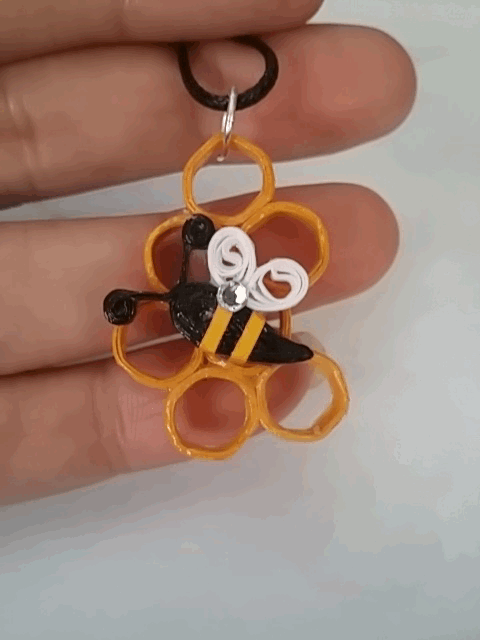
- Once the two pieces, the honeycomb and the bee, are ready, we will proceed to glue them together.
- We place a costume jewelry ring on the top of the honeycomb.
- Finally we are going to protect our medallion applying again a layer of white glue extra strong carpentry, let it dry very well, and take the opportunity to paste in the central part of the wings a small glitter or costume jewelry crystal.
This way we will have a simple and beautiful honeycomb medallion with a little bee ready for our use.
I hope you liked what I did to commemorate our #PowerUpDay.⚡️🐝⚡️
• Realicemos un par de alas, con dos trozos de cinta para quilling color blanco de 3mm de ancho x 7cms de largo, una a una enrollaremos con la aguja para formar un pequeño círculo abierto, el cual moldearemos en forma de hoja. Una vez listas y moldeadas pegaremos al cuerpo de la abeja.
• Listas las dos piezas, el panal y la abeja vamos a proceder a pegarlas.
• Colocamos una argolla de bisutería en la parte de arriba del panal.
• Por ultimo vamos a proteger nuestro medallón aplicando nuevamente una capa de pega blanca extra fuerte de carpintería, dejamos secar muy bien, y aprovecho para pegar en la parte central de las alas un pequeño brillo o cristal de bisutería.
De esta manera tendremos listo un sencillo y bonito medallón de panal con abejita listo para nuestro uso.
Espero les haya gustado lo que realice para conmemorar nuestro #PowerUpDay.⚡️🐝⚡️

What did you think, did you like it?
I hope you did, I hope you liked my explanation, procedure and photos, I made them with love for you.
"Let out that muse that inspires you, and let your imagination fly".
Thank you all, see you next time. Happy PowerUpDay ⚡️🐝⚡️
¿Que les pareció, les gustó?
Espero que sí, que les haya gustado mi explicación, procedimiento y fotos, los hice con mucho cariño por y para ustedes.
"Deja salir esa musa que te inspira, y deja volar tu imaginación".
Gracias a todos, nos vemos en la próxima. Feliz PowerUpDay ⚡️🐝⚡️
Todas las fotos usadas en este post son de mi autoría y han sido sacadas en mi celular personal un Redmi 9T y editadas Canva Banner y separador hecho por mí en Canva Traducido con la ayuda de DeepL

Primero felicidades por obtener está delegación de HP, y que bueno incentives hacer crecer tu cuenta. En cuanto al proyecto de hoy; te quedó genial amiga. Felicitaciones
Gracias cariño agradecida por tus palabras 🐝
Me alegra que te haya gustado mi trabajo. Saluditos ✨
Me gustó mucho el molde de los panales ☺️ un uso más para los lápices.
Un lindo trabajo que se ve sencillo pero delicado. Me encanta. Gracias por compartir 😊😘💜
!DIY
!discovery 40
Gracias por tus palabras y por el apoyo mi bella. Para que veas cómo mi creatividad voló con ese lápiz. Ya sabemos que podemos aprovechar lo que sea jajajaja. ✨🐝✨
!HUG
I sent 1.0 HUG on behalf of @dayadam.
(2/300)
This post was shared and voted inside the discord by the curators team of discovery-it
Join our Community and follow our Curation Trail
Discovery-it is also a Witness, vote for us here
Delegate to us for passive income. Check our 80% fee-back Program
Thank @discovery-it 🐝✨
Gracias por unirte a nuestra iniciativa de Celf radio y la curación en vivo "Espacio de apertura"
Muchísimas gracias a ustedes por el espacio y el apoyo @celf.magazine ✨
You can query your personal balance by
!DIYSTATShttps://leofinance.io/threads/dayadam/re-leothreads-rjb1sdh7
https://leofinance.io/threads/chacald.dcymt/re-leothreads-bnz7d54x
The rewards earned on this comment will go directly to the people ( dayadam, chacald.dcymt ) sharing the post on LeoThreads,LikeTu,dBuzz.
Thanks @poshthreads ✨🐝✨
Felicitaciones amiga por el hispaplus, me encanta tus manualidades 😊 tienes el don de los detalles 🤗
Gracias mi artista culinario @edwing357 . Usted tiene un don enorme que Dios se lo bendiga. Gracias por su presencia 😘
Amen 🤗 muchas gracias, tu también tienes arte en tus manos amiga, un abrazote 😊
Como siempre destacándote!!!

Hermoso tu post, con todos esos detalles que me encantan!! Felicitaciones!
!PIZZA
!KING
Your hard work has paid off King @dayadam, alicia2022(2/6) is grateful for the passion and commitment you put into this post. Keep up the amazing work.
We are so lucky to have you as a member of our community! @alicia2022 is sending you 0.075 FT as a token of appreciation for all that you do.
BTW! FT is the token of our game RAIDS, it will serve to make your NFTs stronger warriors and earn more rewards
Gracias hermosa por tus palabras y por el apoyo. Abrazos ✨🐝✨
$PIZZA slices delivered:
@alicia2022(1/15) tipped @dayadam
Congratulations @dayadam! You received a personal badge!
Participate in the next Power Up Day and try to power-up more HIVE to get a bigger Power-Bee.
May the Hive Power be with you!
You can view your badges on your board and compare yourself to others in the Ranking
Check out our last posts:
Thanks @hivebuzz ✨🐝✨
Well done @dayadam! Your dedication to powering up is inspiring.
⚡️🐝⚡️💕
Hermoso proyecto @dayadam, y que bien lo explicas en tu tutorial, mil aplausos para ti, saluditos 🌷
Gracias hermosa. Que tengas un bello domingo @nhaydu ✨
🌹
Excelente trabajo, muy llamativo, te felicito, por la iniciativa de power up para hacer crecer tu cuenta, saludos.
Muchísimas gracias amigo, por tus palabras y por el apoyo. Me alegra que te guste mi trabajo. Éxitos y bendiciones @cetb2008 ✨🐝✨
Hermoso ,siempre talentosa
Gracias bella ✨🐝✨
Muchas gracias por el apoyo @mayvileros ✨🐝✨
muy bonita tu abejita de verdad verdad !😆
Gracias mi linda. Me alegra que te gustará ✨🐝✨
This looks beautiful. Good job here
Happy power up day.. congratulations
Thanks @nkemakonam89 ⚡️🐝⚡️💕
¡Qué maravilla de dije mi linda @dayadam! Te felicito por tus manos maravillosas. Bendiciones para ti. Un gran abrazo desde la distancia. 🤗😍
Gracias mi Sra hermosa. Me alegra un mundo que le haya gustado mi trabajo,más aún verla por aquí. Abrazos y mil bendiciones @numa26 ✨🐝✨
Te quedo estupendo 😊 está técnica me gusta mucho.
Gracias hermosa me alegra que te gustará ✨🐝✨
Que hermoso y delicado trabajo, te felicito, siempre me sorprendes con tu creatividad 🌹🌷🌼💐🌸🏵️💮🌺☘️
Gracias hermosa @taniagonzalez, un trabajo con amor para hive y para ustedes 💕
😘🌹🌷
Hermoso trabajo amiga, digamos creciendo, felicitaciones por haber ganado el hispaup
Gracias amiga @yraimadiaz. Y así es sigamos creciendo en nuestro querido Hive que tanto nos ha dado. Abrazos... ⚡️🐝⚡️
vaya llevas nucho tiempo q alegria, ni sabia habia esos eventos intentare participar a inicios de mes ^^ , las manualidades se te dan muy bn sin duda =)