Diseñando Pantalón de Explorador / Designing Explorer Pants
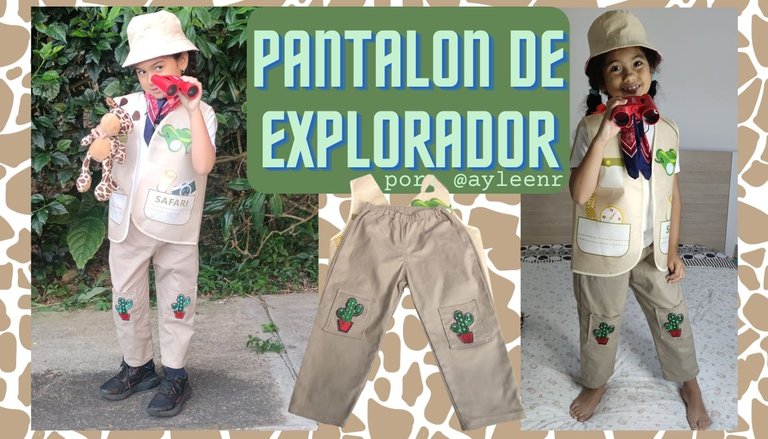
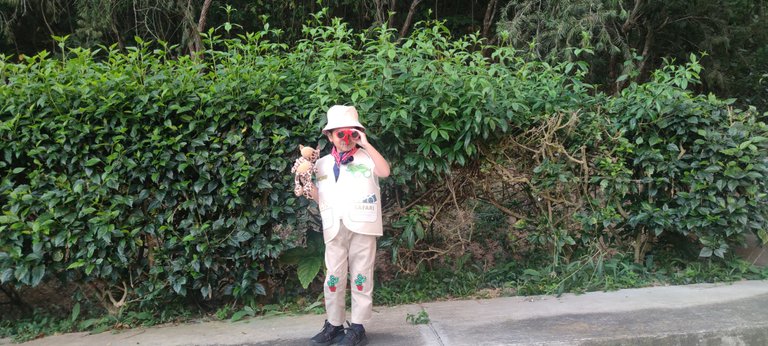
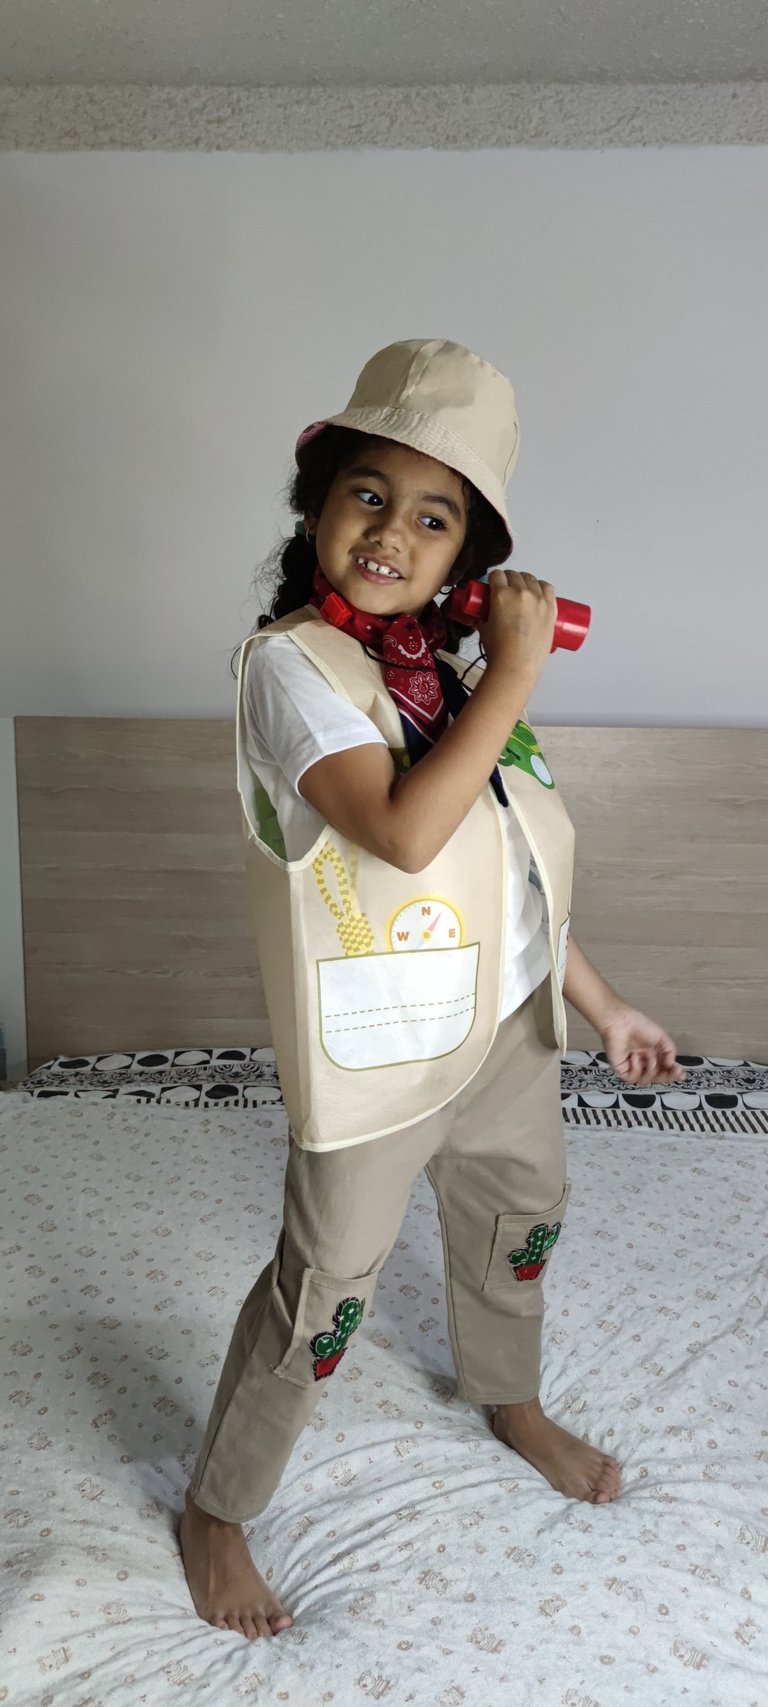
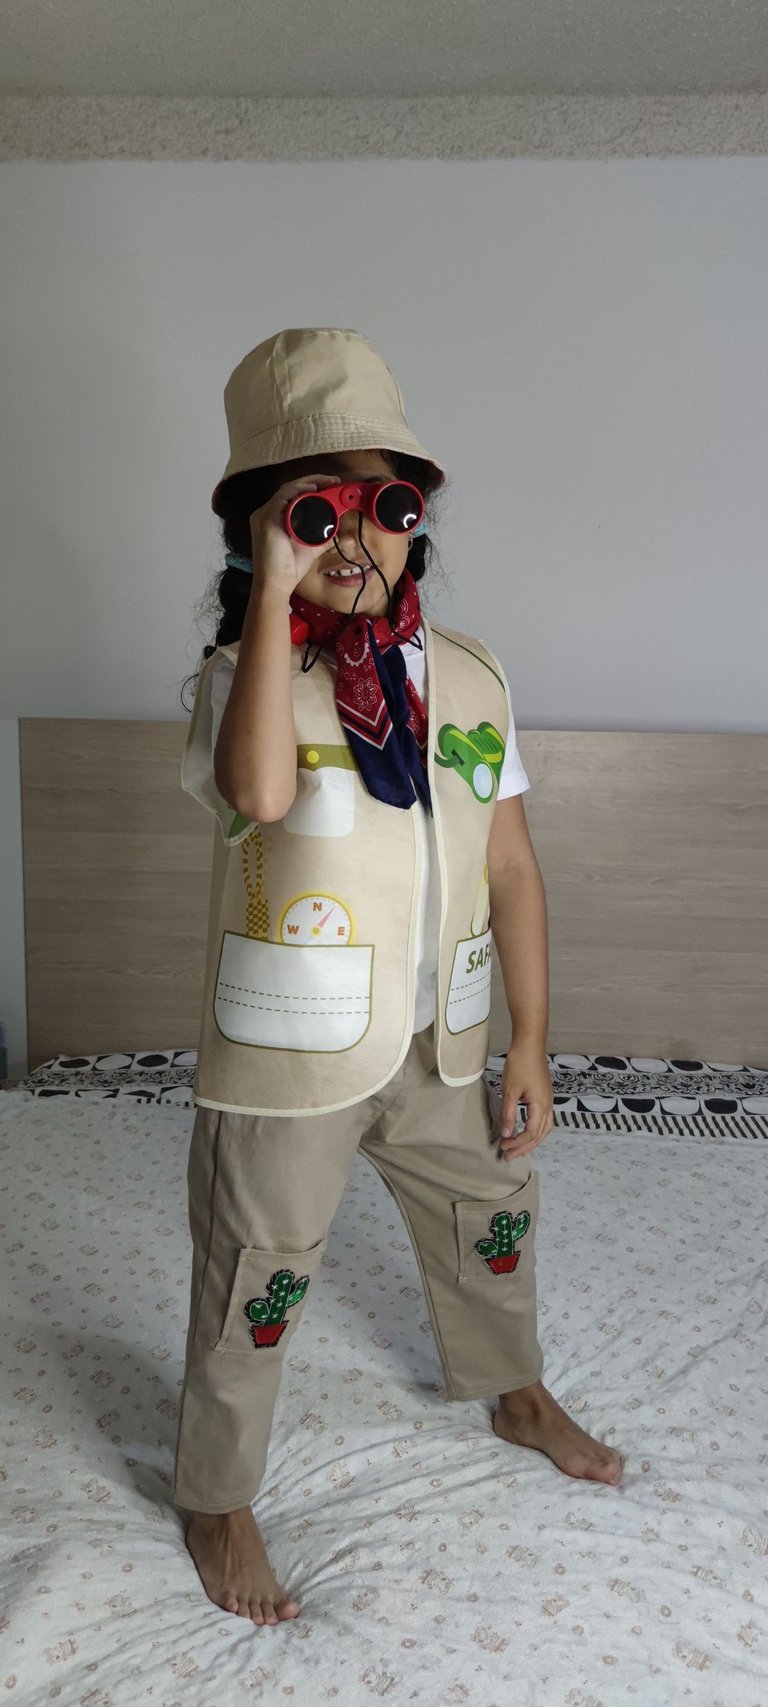
Hola amigos de la comunidad NeedleWorkMonday, estoy feliz de presentarles esta creación que hice para el disfrute de carnavales en el colegio de mi hija. El disfraz representa el Salto Angel, que es la cascada mas alta del mundo, ubicada en el parque nacional Canaima, Estado Bolivar, Venezuela. Existía solo dos opciones para el salón de mi hija: Indigenas o Exploradores. Por supuesto que viendo las característica de mi hija, como: es observadora 👀, ama la naturaleza 🌵, los animales 🐣🐇🐻🐴, la mejor opción fue, convertirse en una linda exploradora 👷♀. Pusimos la idea en marcha. Mientras pensaba que hacer en dos dias, creció en mi el deseo de hacer unos lindos pantalones ✂️👖 para prepararla en esta nueva aventura👷♀.
Fui al Castillo donde venden bellezas de telas y parches, caminé la tienda y elegimos una tela tipo strech drill color beige, siempre pienso en su comodidad, seguí caminando y en el segundo piso conseguí parches de todos los tamaños y formas, así que escogimos unos cactus de maceta roja 🌵, fue una idea fantástica, ademas de que pueda utilizar estos pantaloncillos para cualquier aventura. 🤣

Para la creación del pantalón utilicé:
Papel Bond para hacer el patrón a talla 6
Alfileres
1 metro de Tela Drill Strech Beige
Marcador para tela
Hilo color Beige
Maquina de coser
Parches de Cactus para bolsillos
Cinta Métrica
Regla de Costurera
Tijera para corta papel
Tijera para cortar tela
Elástico de 3,5cm de ancho
Aguja
Paso a Paso
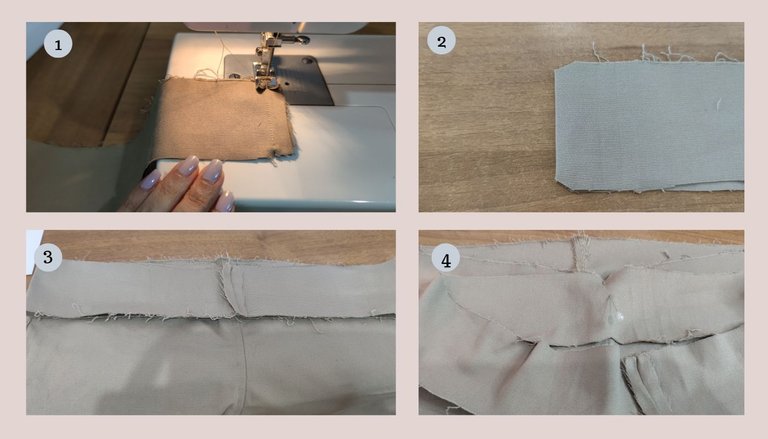
Paso 1
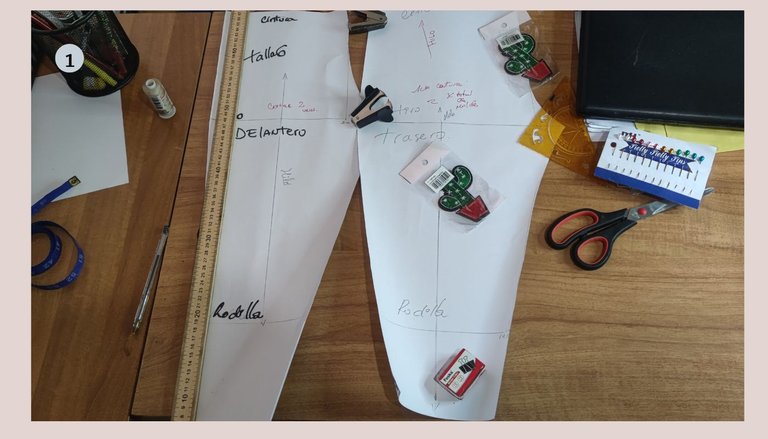
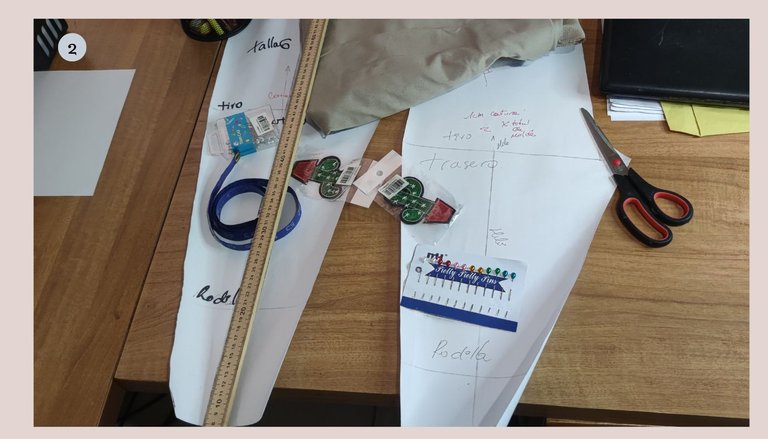
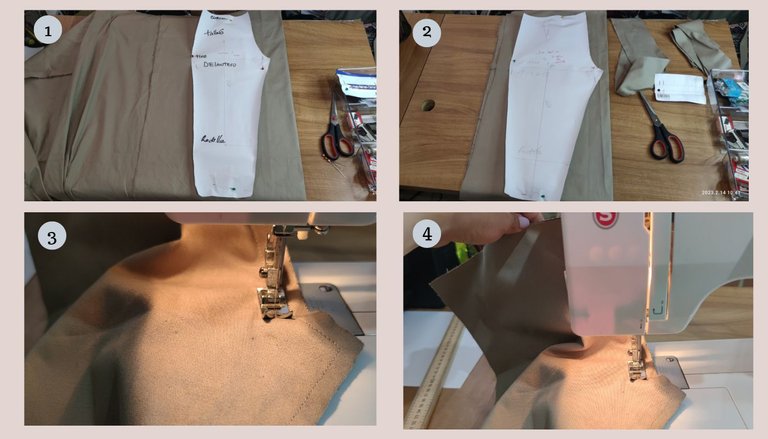
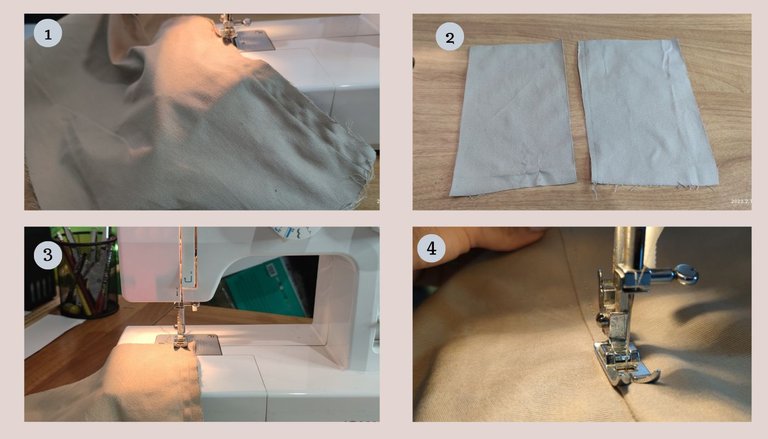
Lo primero que realicé fue el patrón base, en talla 6 y modifique los laterales para hacerlos tipo jogger 👖, en este paso preparé también todo lo que iba a utilizar para el empezar a cortar en la tela Drill Stech Beige, utilicé ambas tijera la que es para cortar en papel y otra para tela, siempre es bueno que mantengan una tijera solo para cortar telas de esta manera evitan daños. Es importante conocer hacia donde van los hilos de la tela y el derecho - revés del mismo.
Paso 2
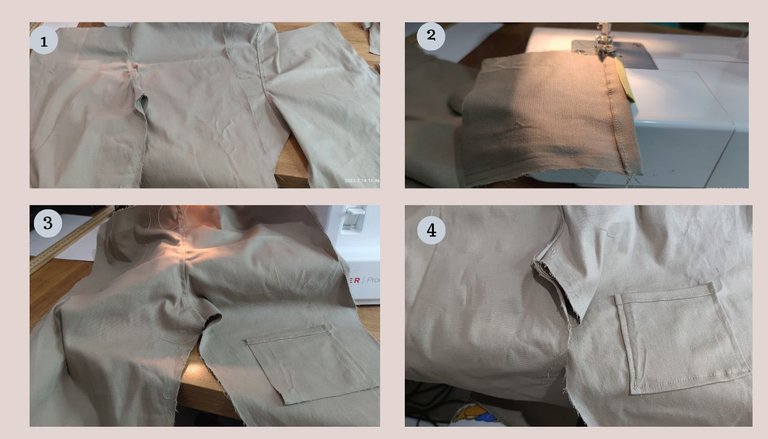
Luego de tener los moldes en la tela ya cortado, dejando 1 centímetro para la costura, uní piezas traseras para cerrar el tiro, el mismo paso lo hice con las piezas delantera, haciendo costura recta, en mi caso por falta práctica esta cerrando el entre piernas 😑. Así que descosí la zona que debía coser, ojo solo se cierra los tiros.
Paso 3
En el tiro le coloqué doble costura para darle bonita forma, adicional corte dos rectángulos para hacer los bolsillos en el área de las rodillas, luego del cierre de tiro, por el derecho de la tela sobre-pise la costura a unos 5 milímetros de la unión para que quede asentada la costura. Para los que tienen aguja doble costura pueden utilizarla para que quede mejor en su acabado.
Paso 4
Al culminar con el sobre - pisado de los tiros, cerré los bordes de los rectángulos que realicé y los coloque al nivel de las rodillas con costura recta dejando solo abierto la parte superior que es el área del bolsillo.
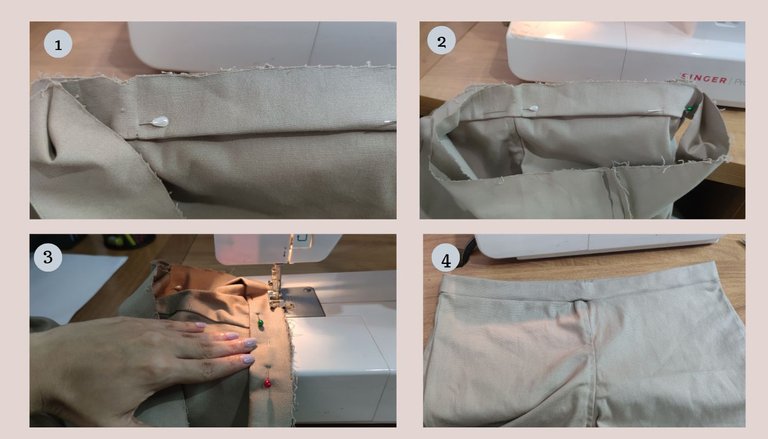
Paso 5
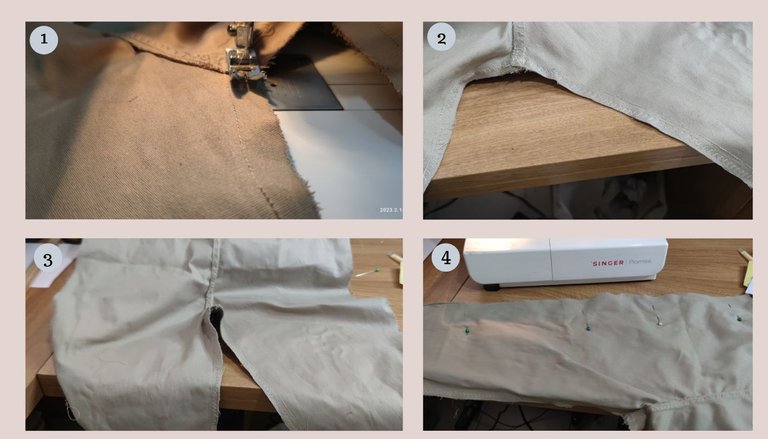
Realicé el otro bolsillo, uní las piezas del entrepiernas coloque la pieza delantera y trasera derecho con derecho para coser con costura recta a 1 centímetro de costura. En la union de los tiros trasero culminé la costura con puntada zigzag. Es importante coser que las piezas coincidan desde donde termina el tiro hasta el final de la bota.

Paso 6
Luego de realizar la costura recta en el entre piernas, realicé costura con puntada zig zag en los bordes para evitar que se descosa, asegurar la costura y darle un mejor acabado. Ahora con los alfileres sujete los costados desde el inicio de la cintura hasta el final de la bota, por los bordes de las piezas.
Paso 7
Al unir las piezas por los costados, terminé con puntada zigzag, para la pretina, utilicé un elástico de 3,5 centímetros de ancho, es decir que la pretina se debe cortar a 7,5 centímetros para dejar 0,5 cm de costura entre el pantalón y la pretina.
Paso 8
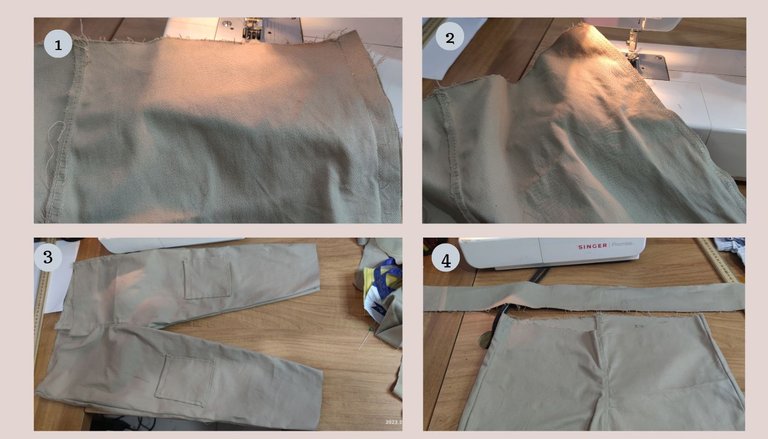
Cerré costura de la pretina con puntada recta, luego doblé por la mitad y corte las puntas para marca la mitad, luego lo presenté en el pantalón y fije con alfileres.
Paso 9
Luego se asegurar la costura con los alfileres, procedí a cerrar con costura recta, en esta parte creo que empecé a detestar la tela 🤣 porque se le salían los hilos por todos lados, pero lo logré, deje un espacio en la parte frontal para introducir el elástico. Hay quienes cosen directamente el elástico a la pretina ya queda a gusto y facilidad de cada persona.
Paso 10
Antes de comenzar a colocar el elástico, realicé el dobles de los ruedos a 1cm, con puntada recta y luego de manera decorativa utilicé la puntada zigzag, con la ayuda de un gancho introduje el elástico para fruncir la cintura, de esta manera tuve mejor precisión para crear el ajuste necesario según la cintura de mi hija.
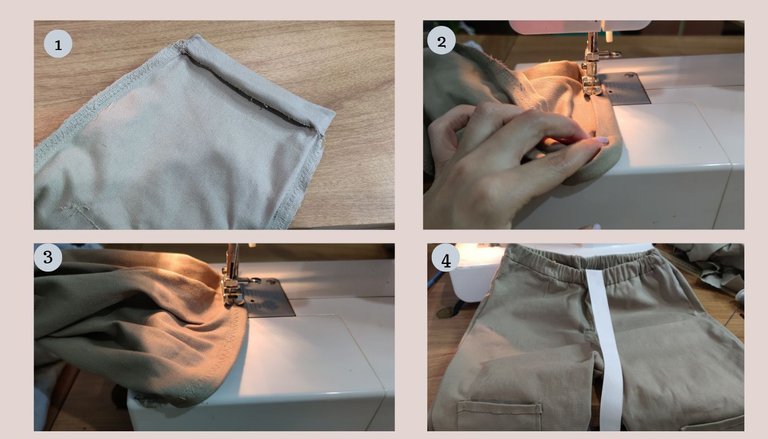
Paso 11
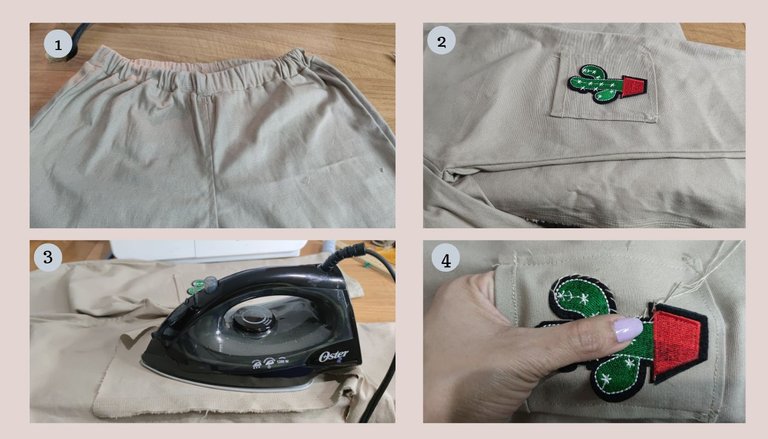
Luego de cortar el elástico procedí a coserlo con puntada recta e introduje, cerré con puntada recta, medí los parches en los bolsillos, pegue con la plancha colocando una tela por encima para evitar que se quemen los hilos, finalmente para evitar que se despegaran, ajusté con una aguja e hilo del color de la tela.
Muchas gracias por llegar aquí, espero les haya gustado este pantalón que hice con tanto cariño.
𝘚𝘦𝘱𝘢𝘳𝘢𝘥𝘰𝘳 𝘺 𝘣𝘢𝘯𝘯𝘦𝘳: 𝘥𝘪𝘴𝘦ñ𝘢𝘥𝘰 𝘱𝘰𝘳 @𝘢𝘺𝘭𝘦𝘦𝘯𝘳 𝘦𝘯 𝘊𝘢𝘯𝘷𝘢 || 𝘾𝙤𝙡𝙡𝙖𝙜𝙚: 𝙧𝙚𝙖𝙡𝙞𝙯𝙖𝙙𝙤 𝙚𝙣 𝘊𝘢𝘯𝘷𝘢](https://www.canva.com/) || 𝘐𝘮á𝘨𝘦𝘯𝘦𝘴: 𝘗𝘳𝘰𝘱𝘪𝘢𝘴 𝘦𝘥𝘪𝘵𝘢𝘥𝘢𝘴 𝘦𝘯 𝘊𝘢𝘯𝘷𝘢](https://www.canva.com/) || 𝘊𝘰𝘴𝘵𝘶𝘳𝘦𝘳𝘢: @𝘢𝘺𝘭𝘦𝘦𝘯𝘳 || 𝘍𝘰𝘵𝘰𝘨𝘳𝘢𝘧𝘪𝘢 𝘵𝘰𝘮𝘢𝘥𝘢 𝘱𝘰𝘳: 𝘮𝘪 || 𝘛𝘳𝘢𝘥𝘶𝘤𝘵𝘰𝘳: 𝘋𝘦𝘦𝘱𝘓|| 𝘓𝘰𝘤𝘢𝘭𝘪𝘻𝘢𝘤𝘪ó𝘯: 𝘌𝘯 𝘮𝘪 𝘢𝘱𝘢𝘳𝘵𝘢𝘮𝘦𝘯𝘵𝘰 𝘶𝘣𝘪𝘤𝘢𝘥𝘰 𝘦𝘯 𝘊𝘢𝘳𝘢𝘤𝘢𝘴-𝘝𝘦𝘯𝘦𝘻𝘶𝘦𝘭𝘢.
ℕ𝕆𝕎 𝕀ℕ 𝔼ℕ𝔾𝕃𝕀𝕊ℍ
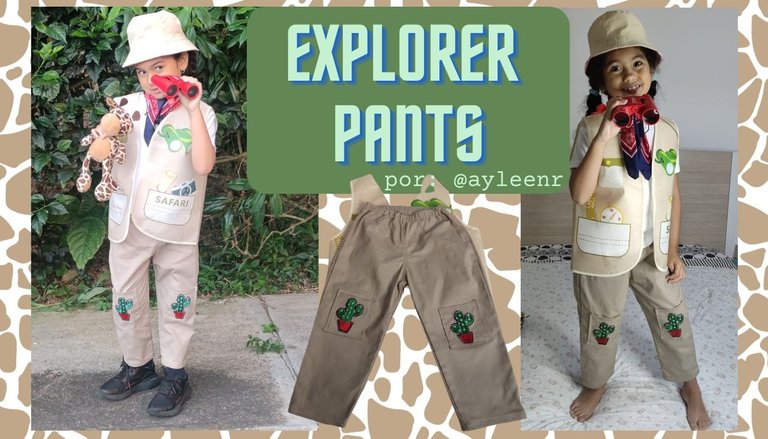
Hello friends of the NeedleWorkMonday community, I am happy to present you this creation I made for my daughter's school carnival. The costume represents the Angel Falls, which is the highest waterfall in the world, located in Canaima National Park, Bolivar State, Venezuela. There were only two options for my daughter's classroom: Indians or Explorers. Of course, seeing my daughter's characteristics, such as: she is observant 👀, loves nature 🌵, animals 🐣🐇🐻🐴, the best option was, to become a cute explorer 👷♀. We put the idea into action. While thinking what to do in two days, the desire grew in me to make some cute pants ✂️👖 to prepare her for this new adventure 👷♀.
I went to the Castle where they sell beauties of fabrics and patches, I walked the store and we chose a strech drill type fabric beige color, I always think about its comfort, I kept walking and on the second floor I got patches of all sizes and shapes, so we chose some red potted cactus 🌵, it was a fantastic idea, plus I can use these shorts for any adventure. 🤣
For the creation of the pants use:
.Bond paper to make the pattern to size 6
Pins
1 meter of Drill Stretch Fabric Beige
Fabric marker
Beige thread
Sewing machine
Cactus patches for pockets
Tape Measure
Sewing ruler
Paper Cutting Scissors
Fabric cutting scissors
3.5cm wide elastic
Needle
Step by Step
Step 1
The first thing I made was the base pattern, in size 6 and I modified the sides to make them jogger type 👖, in this step I also prepared everything I was going to use to start cutting on the Drill Stech Beige fabric, I used both scissors the one for cutting on paper and another one for fabric, it is always good to keep one scissors only for cutting fabrics this way you avoid damages. It is important to know where the threads of the fabric go and the right and wrong sides of the fabric.
Step 2.
After having the molds on the fabric already cut, leaving 1 centimeter for the seam, I joined back pieces to close the shot, the same step I did with the front pieces, making straight seam, in my case for lack of practice this closing the between legs 😑. So I unsewed the area that I should sew, eye only closes the shots.
Step 3.
I double stitched the seam allowance to give it a nice shape, in addition I cut two rectangles to make the pockets in the knee area, after the zipper, on the right side of the fabric I over-picked the seam about 5 millimeters from the seam allowance so that the seam is sewn. For those who have a double seam needle, you can use it for a better finish.
Step 4.
When I finished with the envelope - treading of the straps, I closed the edges of the rectangles I made and placed them at the level of the knees with straight stitching leaving only the upper part open which is the area of the pocket.
Step 5.
I made the other pocket, joined the crotch pieces and placed the front and back piece right sides together to sew with straight stitching at 1 centimeter seam allowance. In the union of the back straps I finished the seam with zigzag stitch. It is important to sew the pieces together from the end of the back strap to the end of the boot.
Step 6.
After sewing the straight seam in between the legs, I made a zig zag stitch on the edges to prevent the seam from unraveling, secure the seam and give it a better finish. Now with the pins, pin the sides from the beginning of the waistband to the end of the boot, along the edges of the pieces.
Step 7.
When joining the pieces on the sides, I finished with zigzag stitch, for the waistband, I used a 3.5 centimeters wide elastic, that is to say that the waistband should be cut at 7.5 centimeters to leave 0.5 cm seam between the pants and the waistband.
Step 8.
I closed waistband seam with straight stitch, then folded in half and cut the ends to mark the middle, then presented it on the pants and pinned.
Step 9.
After securing the seam with the pins, I proceeded to close with a straight seam, in this part I think I started to hate the fabric 🤣 because the threads were coming out everywhere, but I made it, I left a space in the front to introduce the elastic. Some people sew the elastic directly to the waistband, it's up to each person's taste and ease.
Step 10.
Before starting to place the elastic, I doubled the hems at 1cm, with straight stitch and then decoratively I used the zigzag stitch, with the help of a hook I introduced the elastic to gather the waist, this way I had better precision to create the necessary adjustment according to the waist of my daughter.
Step 11.
After cutting the elastic I proceeded to sew it with straight stitch and introduced, I closed with straight stitch, measured the patches on the pockets, glued with the iron placing a cloth on top to avoid burning the threads, finally to prevent them from peeling off, I adjusted with a needle and thread of the color of the fabric.
Thank you very much for coming here, I hope you liked this pants that I made with so much love.
𝘚𝘦𝘱𝘢𝘳𝘢𝘵𝘰𝘳 𝘢𝘯𝘥 𝘣𝘢𝘯𝘯𝘦𝘳: 𝘥𝘦𝘴𝘪𝘨𝘯𝘦𝘥 𝘣𝘺 @𝘢𝘺𝘭𝘦𝘦𝘯𝘳 𝘢𝘵 𝘊𝘢𝘯𝘷𝘢 || 𝘾𝙤𝙡𝙡𝙖𝙜𝙚: 𝘮𝘢𝘥𝘦 𝘢𝘵 𝘊𝘢𝘯𝘷𝘢 || 𝘐𝘮𝘢𝘨𝘦𝘴: 𝘖𝘸𝘯 𝘦𝘥𝘪𝘵𝘦𝘥 𝘢𝘵 𝘊𝘢𝘯𝘷𝘢 || 𝘚𝘦𝘢𝘮𝘴𝘵𝘳𝘦𝘴𝘴: @𝘢𝘺𝘭𝘦𝘦𝘯𝘳|| 𝘗𝘩𝘰𝘵𝘰𝘨𝘳𝘢𝘱𝘩𝘴 𝘵𝘢𝘬𝘦𝘯 𝘣𝘺: 𝘮𝘺 @𝘢𝘺𝘭𝘦𝘦𝘯𝘳 || 𝘛𝘳𝘢𝘯𝘴𝘭𝘢𝘵𝘰𝘳: 𝘋𝘦𝘦𝘱𝘓|| 𝘓𝘰𝘤𝘢𝘵𝘪𝘰𝘯: 𝘪𝘯 𝘮𝘺 𝘢𝘱𝘢𝘳𝘵𝘮𝘦𝘯𝘵 𝘭𝘰𝘤𝘢𝘵𝘦𝘥 𝘢𝘵 𝘊𝘢𝘳𝘢𝘤𝘢𝘴-𝘝𝘦𝘯𝘦𝘻𝘶𝘦𝘭𝘢.
https://twitter.com/3603525563/status/1630332339862532098
The rewards earned on this comment will go directly to the people( @ayleenr ) sharing the post on Twitter as long as they are registered with @poshtoken. Sign up at https://hiveposh.com.
@ayleenr te felicito por el hermoso trabajo, el pantalón quedó espectacular y la modelo es muy guapa y feliz con su atuendo, toda una exploradora profesional.
Bendiciones!
Gracias amiga si la verdad no imaginé que quedaría asi, cuando lo culminé amé el resultado final.
Congratulations @ayleenr! You received a personal badge!
You can view your badges on your board and compare yourself to others in the Ranking
Check out our last posts:
Support the HiveBuzz project. Vote for our proposal!
Muchas gracias @hivebuzz wow que rápido pasa el tiempo.
Feliz cumpleaños en Hive @ayleenr
🎉🎈🎂🎉🎈
Yupi... ya son 2 años. Gracias @arcange
Es cierto que los años pasan rápido @ayleenr
Por cierto, realmente apreciamos su apoyo a nuestra propuesta anterior, pero expiró y el proyecto Hivebuzz no ha sido financiado desde finales de diciembre.
¿Podemos pedirle que renueve su apoyo a nuestra nueva propuesta (https://peakd.com/me/proposals/248)?
Tu ayuda será realmente apreciada. ¡Gracias! 🤗
Por supuesto que tiene mi apoyo.
Muchas gracias por su apoyo @ayleenr, es muy apreciado. ❤️
So cute costume!😊
You did a great work your daughter must loved it!
Thank you very much, yes my daughter liked it so much that she got into the character. 😃
That's nice 😀
Saludos, te quedó muy bello todo. Muy prolijo, especialmente me encantaron los cactus que usaste. Te felicito por tu bello proyecto, y feliz 2 hiveaños. Feliz día 💕
Muchas gracias ☺️, si los cactus creo que hicieron el cambio, espero seguir creciendo en este mundo de agujas, el tiempo pasa muy rápido. Feliz de cumplir 2 años en esta grandiosa plataforma de Hive. Igualmente Feliz día 💖
Hola @ayleenr es un verdadero gusto tenerte de vuelta en nuestra comunidad.
Este difraz de explorador es tan lindo y creativo, me gustó mucho el motivo de cactus que elegiste. Te felicto por este gran proyecto. Saludos!
Hola @kattycrochet gracias la verdad extrañaba mucho a la comunidad, feliz de ser recibida tan gustosamente de tu parte, después de tanto tiempo, tanto que olvide algunos detalles y fui recordando a medida que iba creando este pantalón explorador, los cactus me pareció genial para la ocasión, fue una difícil decisión jajajaja . Gracias nuevamente por el recibimiento y apoyo. Un gran abrazo. 🤗
🤗
Wow you are so perfect, the trouser look amazing. You are really good keep it up
Thank you very much ☺️ I really love sewing, I hope to continue learning to bring it here and share it with you.
Muchas gracias @rutablockchain por el apoyo ❤️